Calibrating Your Monitor
This page is a local copy of earlier information from JASC, retrieved from the WaybackMachine:
http://web.archive.org/web/20101114115350/http://www.jasc.com/support/kb/articles/monitor.asp
To get the very best results when working with Jasc® Paint Shop™ Pro® , you need to have a properly calibrated monitor. Calibrating the monitor improves the quality of your graphics and photos, and allows others to view your images as you intend them to be viewed. To calibrate your monitor, follow the instructions for the Brightness & Contrast Calibration and the Gamma Estimation images below.
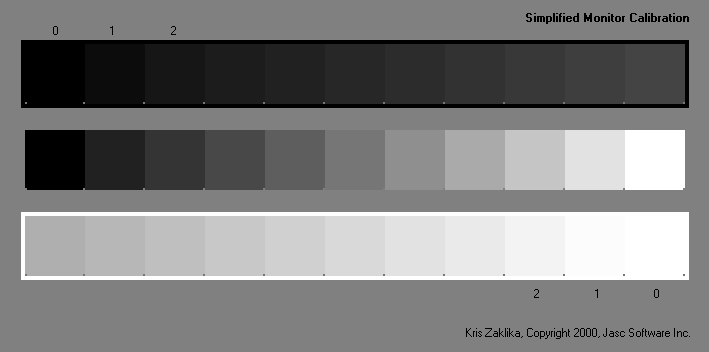
Brightness and Contrast Calibration
With a properly adjusted monitor, you should be able to distinguish square 1 and 2 from square 0 and the surround for the dark squares at the top and the light squares at the bottom. All the squares in the centre greyscale should be distinguishable and the steps should look evenly spaced. If your monitor doesn't meet this criteria, it needs adjustment. Follow these steps:
-
Warm up the monitor for 30-60 minutes. Select subdued room lighting, avoiding reflections of lights or windows on the monitor.
-
Under File > Preferences > Monitor Gamma, set all three colour channels to 1.00.
-
Turn the contrast control, usually a half black/half white circle, all the way up.
-
Adjust the brightness control, usually a sun symbol, until you can differentiate the dark squares.
-
If necessary, adjust the contrast control to differentiate the light squares.
-
Mark the control positions and tape the controls in place.
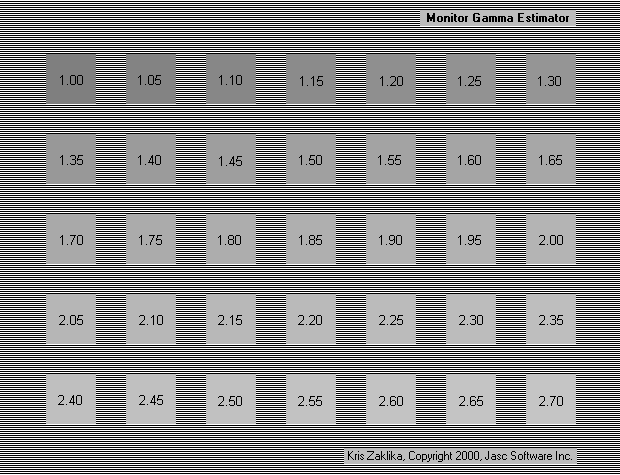
Monitor Gamma Estimator
-
Stand facing the screen. Make sure you are far enough away so you can't clearly see the numbers in the squares.
-
Estimate which square best merges with the background and note its position.
-
Check the number in the square. This is the monitor gamma.
When viewing images, once the data is read from your image file, it undergoes several transformations. The last of these is the application of voltage to the electron gun in your monitor, causing an electron beam to strike the phosphors on the inside of the monitor faceplate, which then emit red, green, or blue light. The relationship of the light output to the applied voltage is roughly like the following chart.
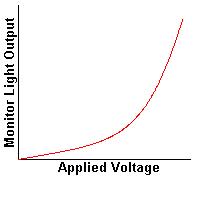
You can see that the light output rises faster as the voltage is raised. The shape of the curve equates to this relationship:
Light output = Voltage![]()
where ![]() is the Greek letter gamma and controls how sharply the curve sweeps upwards.
This type of curve is called a power law curve and results from electrostatic interactions in the picture tube.
Depending on your monitor and its driver software, you may or may not be able to adjust gamma.
However, you can at least check that the gamma of your overall system is in the correct range.
The effect of varying gamma is shown below.
is the Greek letter gamma and controls how sharply the curve sweeps upwards.
This type of curve is called a power law curve and results from electrostatic interactions in the picture tube.
Depending on your monitor and its driver software, you may or may not be able to adjust gamma.
However, you can at least check that the gamma of your overall system is in the correct range.
The effect of varying gamma is shown below.
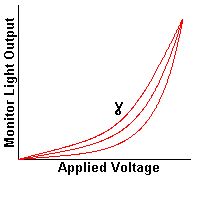
Though monitor gamma is the most frequently discussed item in connection with monitor calibration, your monitor has two important controls that should be adjusted before you estimate your system's gamma. These are brightness and contrast.
You can think of the brightness control as a black level or offset or pedestal control. Its behaviour is shown below.
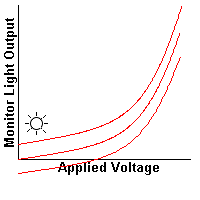
The effect slides the entire curve up or down. When the curve is too high, light is emitted even when the image is black. Pure black cannot be seen and appears as a dark grey instead. When the curve is too low, even dark grey causes no light output because the monitor cannot emit "negative light". As a result, dark greys are indistinguishable from black, so the shadow detail in your image is lost. The control should be positioned so the black is as black as your monitor can show and the darkest grey is just perceptibly lighter than this black. The instructions for doing this are given above.
The contrast control can also be thought of as a picture or range or scale control. It raises or lowers the topmost part of the gamma curve. This is illustrated below.
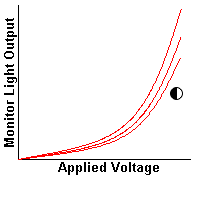
In combination with a properly set brightness control, the contrast control should be set as high as possible. This lets you see the largest range of light intensities. Under optimal viewing conditions, the human eye can discern 100 steps of lightness, provided they are of a certain size. Thus, for you to see them all, brightness must vary over a wide range. This will give your images maximum contrast and sharpness. There is, however, a practical limit to how high you can set the control. If you set it too high, you can lose the ability to distinguish light grey from white, therefore, reducing the highlight detail in your image. The instructions for setting contrast are given above.
Once the brightness and contrast are set properly, you can tape these controls in place. The settings of good monitors do not drift much and should be stable for a number of months. Now you can check the gamma of your system using the gamma Estimation image (download). A properly adjusted PC system will have a gamma value in the range 2.35 to 2.55. The gamma value controls the balance between highlights and shadows in the image. Too high a gamma , and your images looks too bright with no highlight detail. Too low of a gamma, and your images look dark and shadow detail cannot be seen.
Paint Shop Pro is designed for a PC with gamma in the range 2.35 to 2.55.
However, because your images may be viewed on other computers, for instance with a Web browser, you may want to be aware that Apple and Silicon Graphics computers use somewhat different system gamma values (about 1.8 and 1.5 respectively).