
|
|
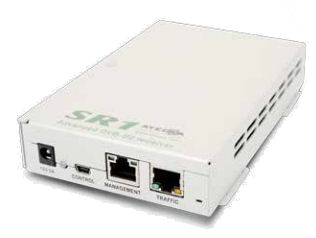
Receiving EUMETCast with the Ayecka SR1Renseignements en français de F6BEK sont ici.I suggest that if you are doing this before 2015, it's best to get the SR1
working in place of or in parallel with your existing DVB-S receiver, and then migrate
to the DVB-S2 service. Information about LinuxYou can find some helpful information about Linux (CentOS 7 variant) here,
thanks to Martin,
OK2MNM. If you are migrating from DVB-S ...If you already have a working DVB-S signal and EUMETCast system, there may be just a few steps to getting the SR1 working in your environment.
Your box may be black rather than white, but if you are already running a DVB-S system successfully, and if your SR1 has been supplied by GEO it may already be configured for both the DVB-S and DVB-S2 service, so the steps to get data flowing may be as simple as:
and watch the data flow! However, if you are starting from scratch you will need to install various other items of software associated with the TelliCast system first. If your SR1 is not already configured for DVB-S2, you can follow the steps in
section 4.2 of the EUMETSAT
Setup Guide to update the configuration automatically, using the
configuration files on the GEO
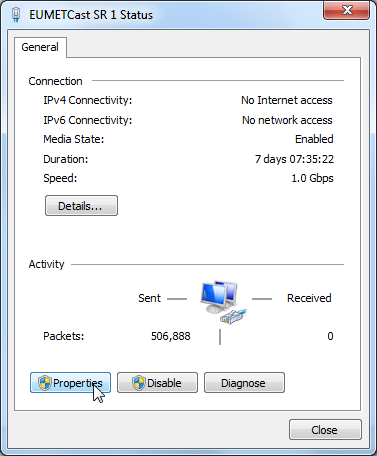
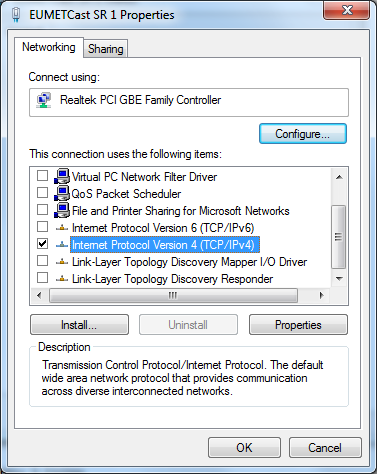
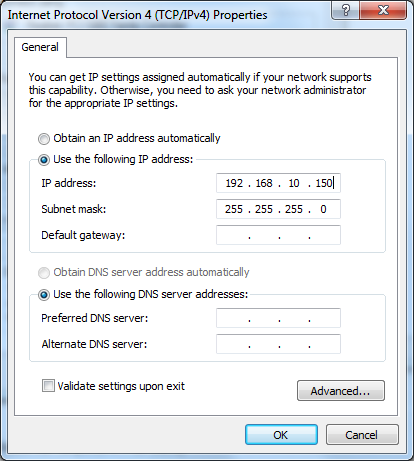
Web site. Configuring the network adapter addressThis is well documented for all versions of Windows, so the detailed instructions will not be repeated here. Please see: http://www.howtogeek.com/howto/19249/how-to-assign-a-static-ip-address-in-xp-vista-or-windows-7/ For Windows-7, Control Panel, Network, Network & Sharing Center, Change adapter settings. In the Status dialog, click on Properties: The only entries you need are:
NetworkingWith an IP receiver, you may think that that the networking is more complicated than it was with your existing SkyStar or DVB World receiver. Actually, it's simpler, because instead of having to set a virtual network address in the DVB World or SkyStar software, you simply add a network card to your PC and configure that as shown above. Your PC may already have a network connection to your router through to the Internet, which may be a wired or wireless connection. If you have a wired connection, you might like to consider changing to a wireless connection instead.
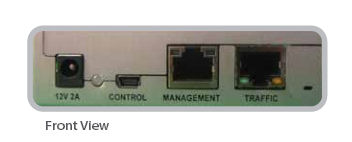
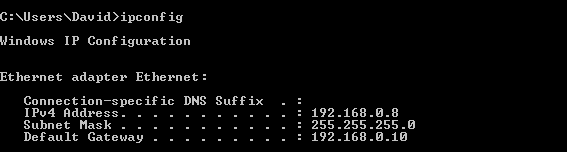
Network AddressesYou may not have needed to bother very much with network addresses before, as modern wired and wireless installations make use of DHCP to allocate network addresses automatically and some of this may be new to you. To get your PC to talk to the SR1 you will need to set its network address to be in the same range (technically, the same subnet) as that used by the SR1. A typical network address is made up of two parts, a network address and a subnet mask. Examples might includes addresses in the 1982.168.1.0 to 192.168.1.255 range, where the fixed part of the address if the left three numbers, and the address on individual devices is set by the final number. As the first three numbers are fixed, the subnet mask would be 255.255.255.0. The SR1 has addresses in the 192.168.10.x network, so your PC needs to have its network port configured in the same range, and hence the suggestion to use 192.168.10.150. The SR1 has multiple addresses internally, allowing it to have both data and management functions on the same physical Ethernet port. What is my IP address - how do I find out?To find what addresses your PC is using, enter the IPCONFIG command at the command prompt. Your output will be different, of course, and there will be other adapters listed as well. How does the SR1 fit into this?Here is how a typical configuration might look after the SR1 has been added. Your router will have replaced the .X component of the PC's IP address with a value by DHCP and will have its own address instead of .Y. See your router manual for details of its address. The subnet in use will differ between services - for example it might be 192.168.0 for VirginMedia superhub, and 192.168.1 for a BT home hub.
The USB cable would be needed for any configuration updates using the EUMETSAT tool, and can also be used for small configuration changes and monitoring if a Management port connection is not available over the LAN, but it can be used at any time and may left in place should you wish. Managing the SR1 from other PCsAn alternative configuration is possible where you use two network cables to connect the SR1 both to your processing PC and to your local network. In this configuration, you should disable the Management IP Multicast in the Ayecka network menu, or your LAN will be flooded with EUMETCast traffic possibly stopping other programs from working (e.g. local video traffic). The advantage of this arrangement is that the SR1's Management port is accessible from anywhere on your LAN, so that you can use any PC to manage the SR1 rather than that function being tied to the receiving PC.
Note that the management port, your PC's internet connection, and your router
are on one subnet (192.168.1.*), and the traffic from the SR1 and your PC's new
network card are on a different subnet (192.168.10.*) in the example
above. Your addresses will be different depending on your ISP and other
settings, subnet 192.168.10.x is likely to be OK for the SR1. It also
opens the possibility of remote monitoring using SNMP and port forwarding in
your router, but that's beyond the scope of this Web page. Starting a new installation ...Next - installing the TelliCast software Migrating from DVB-S to DBV-S2So you already have a working installation, and have installed the Ayecka SR1 receiver. The next step is to move from DVB-S to DVB-S2. Information about changing the receiver is here, and of course you will need to realign your antenna (it's a very small move east) and readjust your LNB for optimum Es/No (SNR). It's critical to make this adjustment as well as you can, as there is less signal from the new satellite at 10A and the bandwidth required in the receiver is greater!
| ||||||||||||||||||||||||||||||||||||||||||||||||||||||||||
|
|