


|
|
The DSD+ SuiteSome brief notes in the course of being developed about using DSD+ without a third-party SDR program. Likely the information may be out of date, requite more explanation, or just plain wrong - please tell me! I've based this on installing the most recent DSD+, paying for the Fast Lane version, and copying the Fast Lane files on top of the installation. The latest Windows-10 version was used (the 2019-09 update). I've tried to write this for those who may be not quite so familiar with things like command scripts in Windows. I'll tell you what programs are in the suite, how they interconnect both with
each other and with third-party software, using the receiver programs for the
Airspy, RTL-SDR, and RSP 2 receiver hardware, and then how to configure the
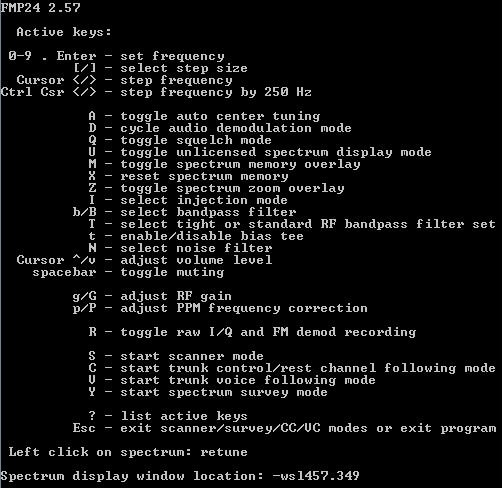
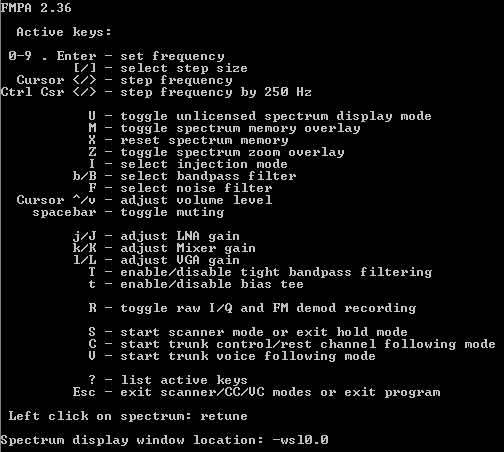
decoder program. Programs - what's in the suite?The main program is DSDplus.exe which does the decoding from an incoming audio stream. There are support programs which are single-function SDR receiver software for the RTL-SDR dongle [FMP.exe and FMP24.exe (why are there two?)], the Airspy [FMPA.exe], and the SDRplay [RSP 2 - FMPP.exe]. All these programs have a set of configuration parameters in text files [.CFG file] which you can edit with Notepad or Notepad++, and a command script [.BAT file] which contains other parameters such as frequency and gain settings. You aslo use Notepad to edit the .BAT file - don't use a word processor e.g. Word. This allows you to have several command scripts (.BAT files) for different sources, which keeping other settings such as the radio serial number or your location the same in the .CFG file. The programs will accept a "? key to display the Help of what other keystrokes are accepted - for example tweaking the various gain settings of the hardware in use. Once the optimum gain settings are determined these values can be edited into the command script. Interconnection - how do the two programs connect?
The programs in the DSD+ download are outlined above. DSDplus can take input directly from an audio source. This might be a discriminator tap, but more typically, if you use SDR software you will use a software virtual cable connection to connect the SDR output to the DSDplus input. Neither of these approaches will be covered here as we'll use the FMP programs instead. The FMP programs can also work with a virtual cable connection (red lines) to send the audio to DSDplus, but they can use a network connection (blue lines) within the PC itself (or across a network?) and DSDplus can accept such an audio source. It avoids having to configure a virtual audio cable. This is as easy to use as entering the port number in the FMP and DSDplus command scripts! Please don't be put off by the word "network", two numbers are enough. Installation - where to put the filesLike much radio software, the programs rely on being able to write to their
own directory, where the executable lives. Since Windows-7 this has been
forbidden for best security practice. so rather than disabling User Account
Control you might like to set up a directory such as C:\Tools\, and immediately
after creating that directory set its security properties to Everyone, Full
control. Consider doing this should you get "Access denied" or
similar security-related messages. How to configure the receiver programsTypically the FMP programs will work with more than one device connected to the PC - two Airspy devices, for example. The network output is specified by the "-o20002" parameter where "20002" is the port number. If you use a virtual audio cable it would be the number as shown in the control panel. "-f" is the receiver frequency. Airspy MiniIn this case I have just one Airspy Mini connected, but I did need to specify the serial number in FMPA.cfg - it's the first line. I got the number from SDR#. 0123456789ABCDEF ; Airspy serial number list Sample script: FMPA -i1 -o20002 -f438.9125 I noted that to get the spectrum display working you had to manipulate the
window somehow and I don't know why. Sometimes setting the Scan enabled
("S") would do the trick. I need help with this one, please! RTL-SDR dongle"g" is the gain parameters, "P" the PPM offset, and "-b" the bandwidth. Specifying "-b-9.5" says use a 9.5 kHz bandwidth whatever DSDplus says it would prefer. Sample script: FMP24 -i1 -o20002 -P0.0 -g10 -b-9.5 -f438.9125 RSP 2Again, a serial number is required. I got this using Simon Brown's SDR Console program, and entered it in FMPP.cfg: 1234565432 ; SDRPlay serial number list "L" and "M" are the gain parameters. Sample script: FMPP -i1 -o20002 -f438.9125 -L3 -M5 I noted that to get the spectrum display working you had to manipulate the
window somehow and I don't know why. Sometimes setting the Scan enabled
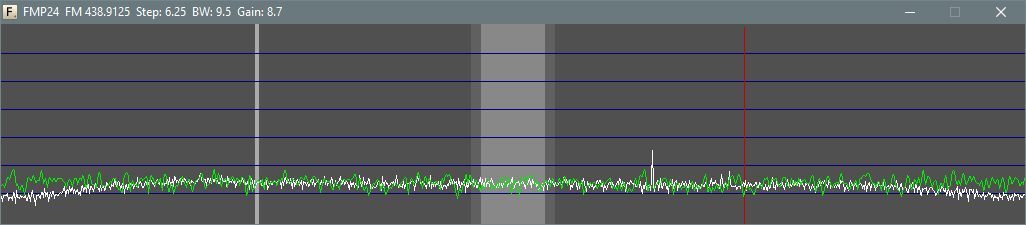
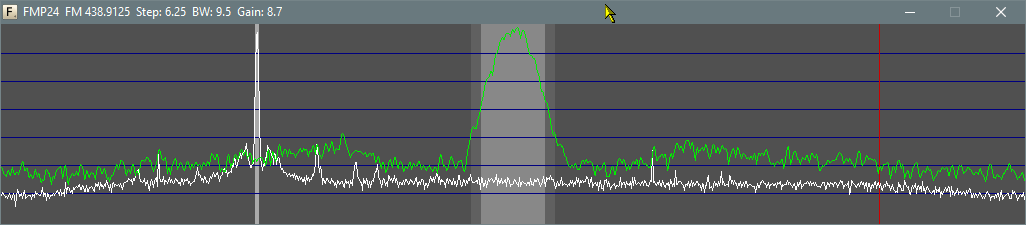
("S") would do the trick. I need help with this one, please! The spectrum plotAfter running the FMP .BAT script you would get a program startup log. You can see that I didn't bother to alter the default location.
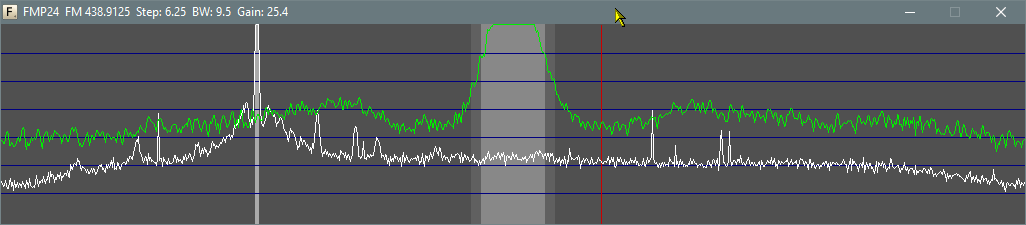
Once a signal appears, if it looks like this with a flat top you either have too much signal or too much gain!
So you can see that the lower-case "g" and upper-case "G" commands can be used on this device to adjust the RF gain, and pressing "g" results in a reduction of the RF gain so that the signal is no longer flat-topping:
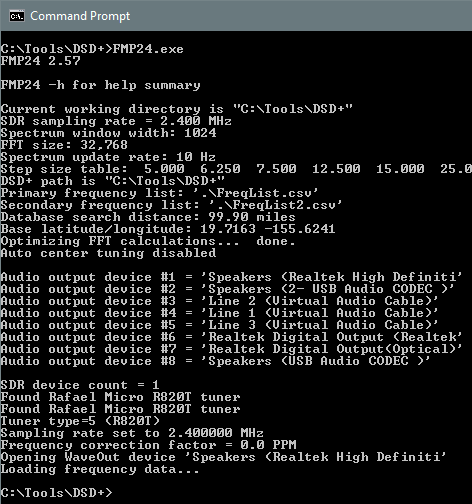
How to determine the audio device numbersJust run the programs directly from the command line with no parameters, but be prepared for a loud burst of noise from the FMPx programs so be sure to turn the volume down first!
How to configure the decodersI must write more here, but here are two scripts to run DSDplus with input over the network from one of the FMP programs. There are minor differences. but the major one is that the "-fr" parameter made the program look for DMR data in the incoming audio stream, and the "-fd" makes it look for D-STAR data. The "-w..." parameters are Window positions. The "-i20002" specifies the input source, high numbers implying a network source. DMRSample script: DSDPlus -rv -Pwav -fr -1 -i20002 -v3 -wsl400.210 -wss100.200 -wel172.522 -wcl528.0 >>VC.log One oddity I found was that the data I thought was on slot 1 required the "-2" parameter, and vice versa! You can type "1" or "2" while the program is running to change the slot. You can also type "0" or "3" to get no slots or both slots, I think. Please correct me if I'm wrong! D-STARSample script: DSDPlus -rv -Pwav -fd -i20002 -v3 -g0 -wsl400.210 -wss100.200 -wel172.522 -wcl528.0 >>VC.log AcknowledgementsMy thanks to Mike (MM0EFJ) and Brian (EI8EJB) for highlighting the Andrew Milluzzi (KK4LWR) article in QEX March/April 2017. |
|
|