Updating GPSD for Galileo
Background
Having recently purchased a couple of GPS
modules from Uputronics which were capable of Galileo operation, I wanted to
use these modules to see how they worked in a domestic environment using
Raspberry Pi cards. This needs version 3.20 of the gpsd package, but at
the time of writing (May-2020) the current release of Raspbian only provides
3.17. 3.20 includes an improved cgps program which includes a better
indication of the satellites in use making it easier to see whether the hardware
has actually found the satellites! By default, the units I have are
activated for just GPS and GLONASS, and require the Galileo to be activated
after each power-cycle (although a few hours large capacitor backup is
provided).
I've provided notes on installing GPSD from scratch, running as a service, some Linux commands, and the hardware
I've used. My preferred method is now to install GPSD from scratch, as
I've had issues with using backports and trying to update an existing GPSD
installation from the OS distribution. These older method are archived at
the end of this page - using backports, and updating
an existing GPSD install.
There is some information on using U-blox u-center with
gpsd, connecting Linux and Windows over the network, and a very simple null-modem
for Linux using socat.
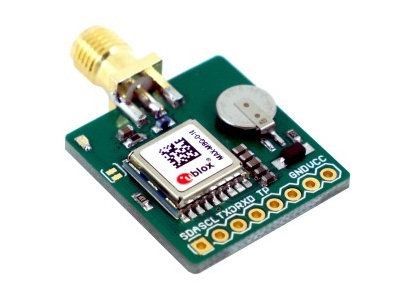
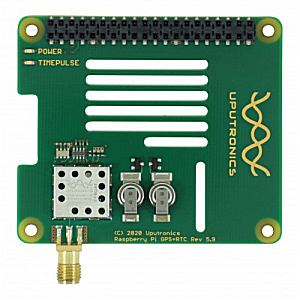
My interest in this dates back some time to the first operational
availability of Galileo data. I've long been a fan of the professionally
made Uputronics GPS
modules, so I was delighted to find that a ready-made general purpose unit was available
in addition to the HAT device already offered for the full-size Raspberry
Pi. This unit is applicable to a wider range of devices that just the
Raspberry Pi. Here it is, together with the HAT version. For Galileo
operation you need the breakout as that is supplied with the MAX-M8Q-0-10
module, or the HAT supplied since mid-2020 which includes a more recent u-blox
module, and a real-time clock (RTC) for operation without GPS signals.
The only issue I found with these devices to use Galileo was that as supplied
by U-Blox they come with GPS and GLONASS configured, so you're using only two of
the three available satellite constellations. So each time the devices are
powered up you need to send a command to enable the Galileo mode should you want
the extra satellites. It's easy with gpsd 3.20 as it includes a brilliant "ubxtool"
command, and I'll mention that later. Yes, you can also send that command
with gpsd 3.17, but you have to work out the u-blox command yourself, and code
it in hex. "ubxtool -e GALILEO" is somewhat easier and much less
error-prone!
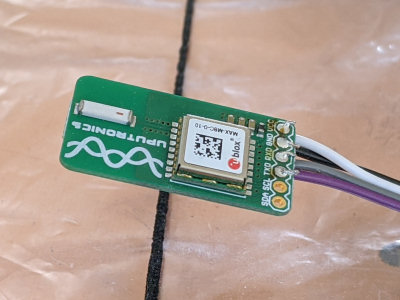
I also had the chance to try the Pico module, which swaps the capacitor
backup and SMA socket for a built-in chip antenna. Here it is, together
with my test lash-up.
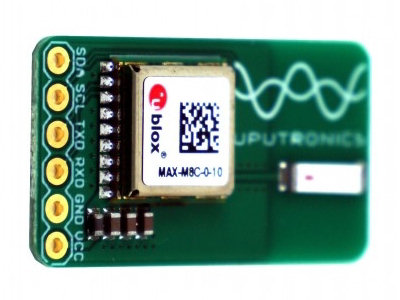
This uses the u-blox MAX-M8C-0-10 device, which basically offers the same
facilities in a more compact unit, although there is no 1 PPS timepulse output. Having the
un-amplified chip antenna
means that the device is much less sensitive indoors. I tried to improve
the signal level by clamping the unit to an insulated copper-clad board with the
black elastic band you can see in the photo, but that didn't seem to improve
things. Eventually I go the unit just poking out of the window on an
extension lead but this made testing rather awkward! As with the breakout,
you need you need to send a command to enable Galileo.
However, I've more recently discovered that you can send a SAVE command to
the u-blox with the super-capacitor backup so that it keeps the Galileo enabled
over reboots and brief power outages. This is described below.
MODEM changes
Note that the Raspberry Pi 3 and 4 have changes so that the PL011 UART0 is
set for Bluetooth, and the miniUART is set for the "primary" GPIO pins
14/15. This is undesirable as the mini UART has a variable baud rate
according to the CPU speed! You can change this by adding a line to /boot/config.txt
which allocated the miniUART to the Bluetooth and the better PL011 UART to the
GPIO pins. In devices:
/dev/serial0 is the primary UART - GPIO pins
/dev/serial1 is the secondary UART (Bluetooth)
/dev/ttyS0 is the miniUART
/dev/ttyAMA0 is the first PL011 (UART0)
The connection is by symbolic links, which you can check for yourself:
As supplied, by default:
pi@RasPi-23:~ $ ls -l /dev/ser*
lrwxrwxrwx 1 root root 5 May 31 11:21 /dev/serial0 -> ttyS0
lrwxrwxrwx 1 root root 7 May 31 11:21 /dev/serial1 -> ttyAMA0
Edit: sudo nano /boot/config.txt
 add: dtoverlay=pi3-miniuart-bt
Reboot
and then:
pi@RasPi-23:~ $ ls -l /dev/ser*
lrwxrwxrwx 1 root root 7 Jun 1 08:56 /dev/serial0 -> ttyAMA0
lrwxrwxrwx 1 root root 5 Jun 1 08:56 /dev/serial1 -> ttyS0
Be aware of this in the notes above. This is better explained here: https://www.raspberrypi.org/documentation/configuration/uart.md
Building GPSD from scratch
At the end of May-2020, a beta of the 64-bit Raspberry Pi OS was
released. This basically works just the same way as the 32-bit version, so
here are some very condensed notes. The same commands also work on the
32-bit Buster OS and the recently renamed Raspberry Pi OS.
- Test first with Uputronics HAT
- Install NTP and configure for PPS (22) clock driver (127.127.22.0)
- Note that recent Raspberry Pi OS version don't have NTP installed by
default.
- raspi-config: for access to the serial ports
- sudo apt-get install minicom
- Checks - note modem changes above from ttyS0 to ttyAMA0
- minicom -b 9600 -o -D /dev/ttyAMA0 (note modem changes above)
- minicom -b 115200 -o -D /dev/ttyAMA0 (for 115,200 baud units)
- sudo apt-get install pps-tools libcap-dev libssl-dev
- sudo nano /boot/config.txt
- add dtoverlay=pps-gpio,gpiopin=18
- sudo nano /etc/modules
- sudo reboot
- Three checks:
- lsmod | grep pps
- dmesg | grep pps
- sudo ppstest /dev/pps0
- ntpq -pn shows kPPS working and running
- Now that works, do NOT install gpsd, but build it from the source.
- sudo su (enter superuser mode) - this is important otherwise the files don't
get installed correctly
- apt-get install scons libncurses-dev python-dev pps-tools
- apt-get install git-core asciidoctor python3-matplotlib
- apt-get install build-essential manpages-dev pkg-config - (many may be
already installed)
- git clone https://gitlab.com/gpsd/gpsd.git
- cd gpsd
- to update: sudo git pull origin master --rebase
- scons --config=force && scons install
- exit (out of superuser mode)
- sudo gpsd /dev/ttyAMA0 -n -F /var/run/gpsd.sock
- sudo gpsd /dev/ttyAMA0 -s 115200 -n -F /var/run/gpsd.sock
(for higher speed GPS module)
- Checks:
- cgps - shows location fix and list of satellites
- ubxtool - produces several pages of output
- Use "ubxtool -p MON-VER | grep PROTVER" to determine the
protocol your GPS requires, then:
- Use: export UBXOPTS="-P 18" to set it for your subsequent commands,
as ubxtools will see this.
- Or append "-P 18.00" to each ubxtools command
Compiling a monitoring program
I wrote a GPS monitoring program which is described here.
With each of the methods listed here I had minor issues when compiling linking
and running. With the install from scratch method, I noted:
- Compile the program:
- gcc gpsGetSatellites.c -o gpsGetSatellites -lgps
- Run program; cannot find libgps.so.28 (GPSD 3.22)
- sudo ldconfig /usr/local/lib/libgps.so.28.0.0
- all now OK!
Enabling Galileo as a permanent option
If you have a u-blox module with the Galileo capability, you can use this
command to enable it:
# ubxtool -e GALILEO -P 18.00
To save that capability (and other settings) permanently in a module with the
battery backup option:
# ubxtool -p SAVE -P 18.00
The commands can be run as root or not, as you prefer. The
"-P 18.00" is for my u-blox device, your may be different, and it's
not needed if you've run the export command: export UBXOPTS="-P 18"
There is more about saving u-blox settings in section 3.1 Configuration Concept
in this document:
https://www.u-blox.com/sites/default/files/products/documents/u-blox8-M8_ReceiverDescrProtSpec_%28UBX-13003221%29.pdf
Base on notes from
Charles Curley, many thanks! Paul Theodoropoulos commented that he prefer
to have the option variables left in the gpsd.service file and set the values in
/etc/default/gpsd file instead, as per the normal practice.
Check if there is already a service running:
pi@RasPi-23:~ $ sudo systemctl status gpsd.service
If it reports "Unit gpsd.service could not be found" then check in /etc/systemd/system for a gpsd.service file. if there's not
one there, there is an example one in the download from GIT at ~/gpsd/systemd/gpsd.service
(if you're using the directory structure from the previous paragraphs).
This is a somewhat generic file, with the options and device for gpsd not
complete.
Charles Curley comments: Using /etc/default/gpsd (debian) or /etc/sysconfig/gpsd (redhat) to set
options lets folks who are accustomed to the SysV init on those two environments retain their old habit.
I have no problem with moving the environmental variables into service.gpsd.
Having done that, you can probably get rid of the two EnvironmentFile=- lines in [Service]. That's one less file to parse during
startup.
I have commented those lines in the examples below.
The gpsd.service file, along with the other
two, must be copied to /etc/systemd/system, and you can check with the "ls
-l" command:
pi@RasPi-23:~/gpsd/systemd $ sudo cp gpsd* /etc/systemd/system
pi@RasPi-23:~ $ ls -l /etc/systemd/system/gps*
-rw-r--r-- 1 root root 452 Jun  6 18:37 /etc/systemd/system/gpsdctl@.service
-rw-r--r-- 1 root root 356 Jun  6 18:52 /etc/systemd/system/gpsd.service
-rw-r--r-- 1 root root 362 Jun  6 18:37 /etc/systemd/system/gpsd.socket
I'm unsure about the times here, but I think that 18:37 may be the
time I ran the commands below, and 18:52 may be when I rebooted the RPi just to
ensure that the service started at boot time. Once you've copied the file,
you may need to edit the line in /etc/systemd/system/gpsd.service to point to
your choice of options and device. I changed:
[Service]
Type=forking
EnvironmentFile=-/etc/default/gpsd
EnvironmentFile=-/etc/sysconfig/gpsd
ExecStart=/usr/local/sbin/gpsd $GPSD_OPTIONS $OPTIONS $DEVICES
to:
[Service]
Type=forking
ExecStart=/usr/local/sbin/gpsd /dev/ttyAMA0 -n -F /var/run/gpsd.sock
You then need to run commands to enable and run the gpsd service, and to
check the service status:
sudo systemctl enable gpsd
sudo systemctl start gpsd
sudo systemctl status gpsd
I got:
* gpsd.service - GPS (Global Positioning System) Daemon
Loaded: loaded (/etc/systemd/system/gpsd.service; enabled; vendor preset: enabled)
Active: active (running) since Sat 2020-06-06 18:54:08 BST; 15h ago
Process: 358 ExecStart=/usr/local/sbin/gpsd /dev/ttyAMA0 -n -F /var/run/gpsd.sock (code=exited, status=0/SUCCESS)
Main PID: 383 (gpsd)
Tasks: 2 (limit: 4249)
CGroup: /system.slice/gpsd.service
`-383 /usr/local/sbin/gpsd /dev/ttyAMA0 -n -F /var/run/gpsd.sock

Jun 06 18:54:08 RasPi-23 systemd[1]: Starting GPS (Global Positioning System) Daemon...
Jun 06 18:54:08 RasPi-23 systemd[1]: Started GPS (Global Positioning System) Daemon.
- You can also use the usual "sudo service gpsd stop" and
"sudo service gpsd start" commands to control the service.
- To get the gpsd service to start automatically: systemctl enable gpsd
Here are some sample files. When using a different version (3.17) I
found that the executable daemon was in /usr/local/sbin/ rather than /usr/local/sbin/
so I simply copied the file (with sudo, of course). Note that you would
also need sudo to edit or create the examples below.
| Sample files from /etc/systemd/system/ |
| gpsd.service |
[Unit]
Description=GPS (Global Positioning System) Daemon
Requires=gpsd.socket
# Needed with chrony SOCK refclock
After=chronyd.service

[Service]
Type=forking
# EnvironmentFile=-/etc/default/gpsd
# EnvironmentFile=-/etc/sysconfig/gpsd
ExecStart=/usr/local/sbin/gpsd /dev/ttyAMA0 -s 115200 -n -F /var/run/gpsd.sock

[Install]
WantedBy=multi-user.target
Also=gpsd.socket
|
| gpsd.socket |
[Unit]
Description=GPS (Global Positioning System) Daemon Sockets

[Socket]
ListenStream=/var/run/gpsd.sock
ListenStream=[::1]:2947
ListenStream=127.0.0.1:2947
# To allow gpsd remote access, start gpsd with the -G option and
# uncomment the next two lines:
# ListenStream=[::1]:2947
# ListenStream=0.0.0.0:2947
SocketMode=0600

[Install]
WantedBy=sockets.target
|
| gpsd@.service |
[Unit]
Description=Manage %I for GPS daemon
Requires=gpsd.socket
BindsTo=dev-%i.device
After=dev-%i.device

[Service]
Type=oneshot
Environment="GPSD_SOCKET=/var/run/gpsd.sock"
# EnvironmentFile=-/etc/default/gpsd
# EnvironmentFile=-/etc/sysconfig/gpsd
RemainAfterExit=yes
ExecStart=/bin/sh -c "[ \"$USBAUTO\" = true ] && /usr/local/sbin/gpsdctl add /dev/%I || :"
ExecStop=/bin/sh -c "[ \"$USBAUTO\" = true ] && /usr/local/sbin/gpsdctl remove /dev/%I || :"
|
If you don't have IPv6 enabled comment out this line in the gpsd.socket:
ListenStream=[::1]:2947
If you don't use systemd, Gary E. Miller suggests an option to auto-start
gpsd, using SU mode:
# echo "gpsd /dev/ttyAMA0 -s 115200 -n /dev/pps0" >> /etc/local.d/local.start
You might be familiar with the U-Blox u-center Windows tool which you can
download here:
https://www.u-blox.com/en/product/u-center
- I recommend V21.05 rather than "u-center 2"
Of course u-center is a Windows program, and your gpsd is running on a Linux
system, so how to resolve this? Fortunately, as part of the gpsd suite
there is a program called gpspipe which listens to the output of the gpsd and
can send it on in various formats including NMEA to the standard output.
Next, you need to get that std-out stream onto a network to link to the Windows
PC. There is a standard Linux program which does this - "nc" -
which can act as a listener and accept TCP connection requests from one
(or more?) PCs. The one-line Linux script to do this looks like:
gpspipe -r | nc -l 12101
The "-r" switch to gpspipe asks for NMEA format output. The
"-l" switch for nc makes it a listener, waiting for connection
requests on port 12101 (choose your own port). Run the script from your
user account (no need for sudo). A ctrl-C will stop the script, and it
also stops when u-center disconnects.
Once the script is running, in u-center on the Windows PC, you need to select
network input, TCP format, from the address of your Raspberry Pi:
Receiver -> Connection -> Network Connection ->
New. Enter:
tcp://192.168.0.135:12101
So here's what "cgps -s" on the Raspberry Pi shows:
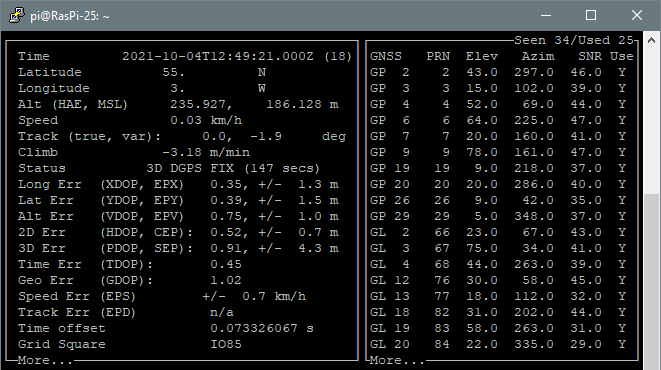
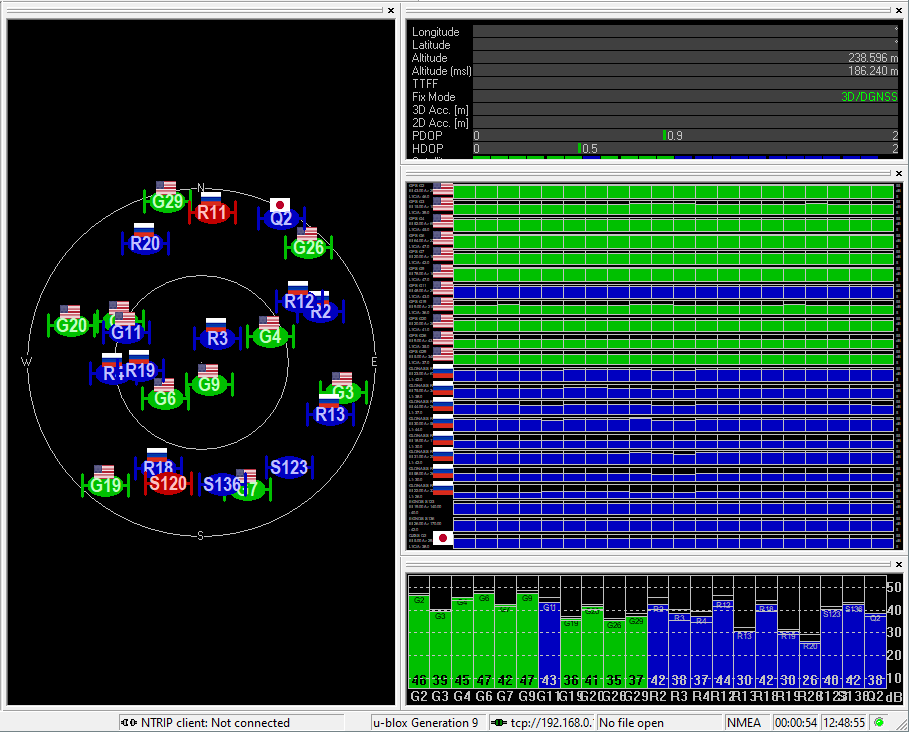
and here's the u-center display:
In the light of later experience, I no longer recommend this backports
route. Instead, go for and installation of GPSD from scratch as detailed earlier.
The Buster OS includes gpsd 3.17, and back ports are available of 3.20, so
the steps required are to tell APT that an update is available in the backports
resource, and install that version. These steps are detailed in http://marksrpicluster.blogspot.com/2019/12/add-buster-backports-to-raspberry-pi.html
- sudo nano /etc/apt/sources.list
- Add at the end
- deb http://deb.debian.org/debian buster-backports main
A couple of keys are required:
- sudo wget -qO - 'https://keyserver.ubuntu.com/pks/lookup?op=get&search=0x04EE7237B7D453EC' | sudo apt-key add -
- sudo wget -qO - 'https://keyserver.ubuntu.com/pks/lookup?op=get&search=0x648ACFD622F3D138' | sudo apt-key add -
Now simply update the software, but tell the install to use the backports:
- sudo apt update
- sudo apt-get install -t buster-backports gpsd gpsd-clients python-gps
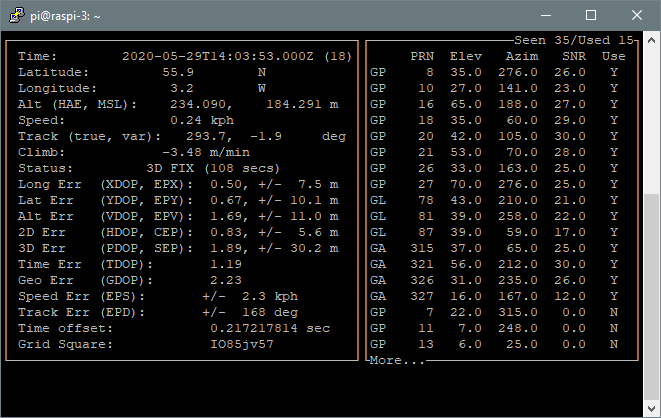
You can use "cgps -s" to check what satellite constellations are in
use - this shot from a unit indoors upstairs nearer to the centre of the room:
You should then be able to tell the gps hardware to enable Galileo with the ubxtool
(included in gpsd), using -d for disable or -e for enable and see the difference
almost immediately in the cgps display.
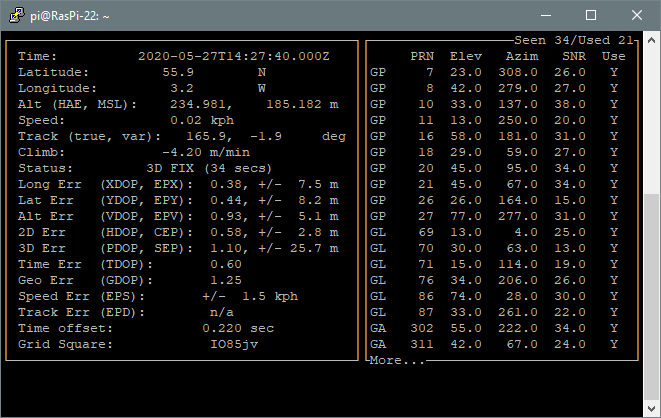
Another screen-shot, this time from a downstairs unit with the antenna on the
floor right in the corner of the room. This is the version I built from
the source and it shows greater precision in the QTH locator grid square, and
although a similar number of satellites is visible there are fewer used. I
don't know why, but perhaps lower SNR reduces the number used? This might
also account for the greater errors in lat/lon etc. I don't know what the
(18) after the time means!
Still to be resolved, getting gpsd to start automatically.
In view of my later experience, I no longer recommend this "remove
and add" route. Instead, go for and installation of GPSD from scratch
as detailed earlier.
Unfortunately the same approach cannot be used for the Raspberry Pi model 1
B. Why would you want to use such an old RasPi? Well, if it works
and has all the hardware connections in place - why not! This particular
Raspberry Pi has environmental sensors in place (well, pressure temperature and
humidity, (environmental is the more modern term!) so "if it works, leave
it".
Building from source
When I tried the backports approach it became clear that there were
incompatibilities, possibly due to the backport not being tested (or even
designed) for the ARMv6 instruction set. Gary E Miller suggested compiling
from the master source instead. This turned into a very long saga, so
let's just post what actually worked, what snags and work-rounds I used, and a
few new-to-me Linux commands I needed.
I used the information here: https://gpsd.gitlab.io/gpsd/installation.html
For Buster, it was necessary to install some required software, and I
installed the minimum as I don't need X capability nor the documentation on that
particular RasPi. What is critical is to remove any existing gpsd:
- sudo apt remove gpsd
- sudo apt purge gpsd
Having done that I did still find some lurking gps files in /local/bin (or
elsewhere) so I zapped them as well.
Doubtless there would be a cleaner way to do this but after many days of
struggling it seems to be not unwise. The next step would have been a
complete re-install anyway! Having done that, install the minimum required
tools:
- sudo apt-get update
- sudo apt-get dist-upgrade
- sudo reboot
- sudo apt-get install scons libncurses-dev python-dev pps-tools
- sudo apt-get install git-core
- sudo apt-get install build-essential manpages-dev pkg-config
Then find a directory to place the downloaded source files - I chose
/Home/pi/gpsd, so I ran the command:
Now I deviated from the documented procedure here as it implied running two
steps as sudo. When I did this, one of the steps gave a privilege
error. So instead I ran the first step as a normal user (compiling the
programs) and the install step with priviilege:
- scons --config=force
- sudo scons install
After that a test program (in /home/pi/) would not compile, as the required
shared object wasn't available. The install procedure hadn't copied it to
the required system location. Moving my program into the pi/gpsd directory
fixed that one I discovered the -L (upper case) link option in gcc. So
something like:
- gcc myprog.c -L/home/pi/gpsd -lgps -o myprog
I was disappointed that the "install" hadn't already done
this. On trying to run the program, it couldn't find the libgps.so which
it needed, so I had to copy the .so file from my gpsd directory into /usr/local/lib
and create some llinks:
pi@raspi-3:~ $ ls -l /usr/local/lib/libgps.so*
lrwxrwxrwx 1 root root 16 May 27 13:27 /usr/local/lib/libgps.so.27 -> libgps.so.27.0.0
-rwxr-xr-x 1 root root 116856 May 27 12:00 /usr/local/lib/libgps.so.27.0.0
Likely an "apt-get install" would have made a better job!
At this point, my program worked, so I stopped [for the time being].
Instead, I would recommend the route below.
First, you need to install socat
sudo apt install socat
Then use socat to create a couple of ports. Socat will run until Ctrl-C
is typed. Doubtless you could put this in the start-up if required.
These are created as /dev/pts/<number>, so in a fresh SSH or terminal
session you might want to link those to unused tty numbers to allow software to
access as if they are conventional ports. You can use the LS command to
see how they would appear to a program:
# Create the port pair
$ socat -d -d pty,raw,echo=0 pty,raw,echo=0
2021/10/10 07:30:36 socat[9080] N PTY is /dev/pts/1
2021/10/10 07:30:36 socat[9080] N PTY is /dev/pts/2
2021/10/10 07:30:36 socat[9080] N starting data transfer loop with FDs [5,5] and [7,7]
Create a new SSH or terminal session, and then:
# Create the symbolic links
$ sudo ln -s /dev/pts/1 /dev/tty101
$ sudo ln -s /dev/pts/2 /dev/tty102

# List the ports you have created
$ ls -l /dev/tty10*
crw--w---- 1 root tty 4, 10 Oct 1 14:37 /dev/tty10
lrwxrwxrwx 1 root root 10 Oct 10 07:26 /dev/tty101 -> /dev/pts/1
lrwxrwxrwx 1 root root 10 Oct 10 07:26 /dev/tty102 -> /dev/pts/2
Now we have the ports create a couple of SSH or terminal sessions to prove
that the two ports can communicate:
# ------------------ Session 1 --------------------
$ sudo minicom -D /dev/tty102

# ------------------ Session 2 --------------------
$ sudo minicom -D /dev/tty101
I'm not sure why the SUDO is required - perhaps dial-out privilege is needed
or I need to do something with the ports? It's confusing to start with as
you type into terminal 1, but the output appears on terminal 2 and
vice-versa! Of course, this is exactly what it should be
doing! I suspect the links will persist over a reboot, but I've not tested
that. I also don't know whether the control signals on a real TTY/COM port
are mirrored using socat. I suspect not.
|
Finding files, starting at "/" with a
given name including
wildcards
|
pi@raspi-3:~ $ sudo find / -name "libgps*so*"
/usr/local/lib/libgps.so.27.0.0
/usr/local/lib/libgpsdpacket.so.27.0.0
/usr/local/lib/libgpsdpacket.so.27
/usr/local/lib/libgps.so.27
/usr/local/lib/libgpsdpacket.so
/home/pi/gpsd/libgps.so.27.0.0
/home/pi/gpsd/libgpsdpacket.so.27.0.0
/home/pi/gpsd/libgps_sock.o
/home/pi/gpsd/libgpsdpacket.so.27
/home/pi/gpsd/libgps.so.27
/home/pi/gpsd/libgps_json.c
/home/pi/gpsd/libgps_sock.c
/home/pi/gpsd/libgps_json.os
/home/pi/gpsd/libgps_json.o
/home/pi/gpsd/libgps_sock.os
/home/pi/gpsd/libgpsdpacket.so
/home/pi/gpsd/libgps.so
|
|
Checking a file type
Are these two compatible?
|
pi@raspi-3:~/gpsd $ sudo file /bin/tar
/bin/tar: ELF 32-bit LSB executable, ARM, EABI5 version 1 (SYSV),
dynamically linked, interpreter /lib/ld-linux-armhf.so.3, for GNU/Linux
3.2.0, BuildID[sha1]=53533d506171c559ad7c50eecf27e585e511040f, stripped

pi@raspi-3:~/gpsd $ file /usr/local/lib/libgps.so.27.0.0
/usr/local/lib/libgps.so.27.0.0: ELF 32-bit LSB pie executable, ARM, EABI5
version 1 (SYSV), dynamically linked,
BuildID[sha1]=758c80d49b842ca7a3581ba7f47b5fc16674ed90, stripped
|
|
Finding what packages are
installed, e.g. GPIO
|
pi@raspi-3:~ $ dpkg -l | grep gpio
ii python-rpi.gpio 0.7.0~buster-1 armhf Python GPIO module for Raspberry Pi
|
|
Find the Raspberry Pi clock
rate in
two different ways.
|
pi@raspi-3:~ cat /sys/devices/system/cpu/cpu0/cpufreq/scaling_cur_freq
600000   (result in kHz)

pi@raspi-3:~ vcgencmd measure_clock arm
frequency(48)=600169920  (result in Hz)
|
To check if systemd is holding the port
required for gpsd. Look for 1/init.
|
pi@raspi-3:~ sudo netstat -apn | fgrep 2947
tcp      0    0 127.0.0.1:2947      0.0.0.0:*    LISTEN      1/init
tcp6     0    0 ::1:2947            :::*         LISTEN      1/init
|
Thanks to ......
- Anthony Stirk
- Martin Burnicki
- Gary E. Miller
- Paul Theodoropoulos
- Bryan Christianson
- Per Westermark
- Charles Curley
- A. Dumas
-
and others I've forgotten! |