


|
|
Monitoring The Raspberry Pi with MRTGAs most of my Raspberry Pi cards are used headless - i.e. without a keyboard or monitor - I wanted to monitor what was happening remotely. In addition to monitoring the NTP Server operation, I've added general SNMP support (Simple Network Management Protocol) which has allow monitoring of the network I/O, disk space, CPU temperature and, with a little additional hardware, ambient temperature monitoring.
Adding SNMP support for general remote monitoring
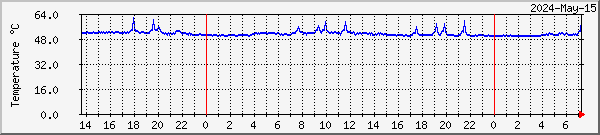
Based on: http://snmpadventures.blogspot.co.uk/ and http://www.memetic.org/category/raspberrypi/ sudo apt-get update sudo apt-get install snmpd snmp # for the SNMP server and client software [Enter "Y" at Do you want to continue:?] You need to edit the configuration if you want to monitor your Raspberry Pi from across the network rather than just locally. The configuration below allows anyone to read the SNMP data - you may want a more secure configuration. The changes below may not be ideal, but they are what I found to be necessary to get it working: sudo nano /etc/snmp/snmpd.conf Change the agentAddress from: agentAddress udp:127.0.0.1:161 to: agentAddress 161 If there is any "-V systemonly" stuff remove it if you want to monitor remotely. Thanks to Rob Janssen PE1CHL for that solution. Below the line: #rocommunity public localhost add: rocommunity public (without the initial #) Restart the SNMP daemon: sudo service snmpd restart For monitoring with MRTG, you can get the results shown here if you have a remote system running MRTG, with an include script something like this zip archive. You could also install MRTG on the Raspberry Pi itself. I do wonder what other variables you could monitor, as plotting NTP rate of change versus board or chip temperature would be an interesting exercise. Interesting that for the two nominally identical Raspberry Pi cards,
the one running gpsd and the PPS software for "precise" timekeeping
uses about 3% CPU, versus about 1% for the Raspberry Pi without and syncing just off the
LAN. I find that
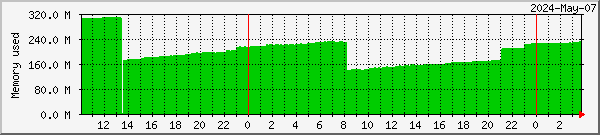
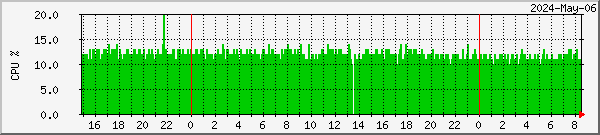
slightly surprising. Memory and CPU usageMonitoring memory can be useful if you think there is a process which is leaking memory, and monitoring CPU will show how near to being saturated your Raspberry Pi is - whether it may be able to handle more work, for example.
Access to this data is a standard part of Linux for the Raspberry Pi, once SNMP has been installed (see below). I happen to run the monitoring remotely and use MRTG scripts like those below = this for Raspbian Wheezy!
For Raspbian Jessie, some of the OIDs have changed. For example: CPU is now percent
free rather than percent busy, so subtract the value returned from 100.:
Monitoring NTP remotelyYou can produce real-time graphs like those below using MRTG and a simple script which can be run even on a Windows PC to get the statistics from NTP remotely. There is more information here.
To monitor NTP in more detail, you can edit the ntp.conf file to turn on the generation of statistics data. Note that this data maybe a megabyte or more per day, so think about keeping only a few days worth, and only enabling statistics collection when needed as the number of writes to the SD card flash memory is limited. If NTP isn't installed you'll need to: sudo apt-get install ntp first. sudo nano /etc/ntp.conf Insert (or uncomment) these lines: # Enable statistics gathering statsdir /var/log/ntpstats/ statistics loopstats filegen loopstats file loopstats type day enable or if you are exceptionally interested in the peerstats as well (which can be large files!): # Enable statistics gathering statsdir /var/log/ntpstats/ statistics loopstats peerstats filegen loopstats file loopstats type day enable filegen peerstats file peerstats type day enable Now restart the NTP daemon: sudo service ntp restart MRTG Monitoring script and PERL support programsSample MRTG script for monitoring with a +/- 500 microsecond scale:
Sample Perl script for 500 microsecond scale:
Adding SAMBA for file access from your PCTo view the results from a Windows PC (so that you can run my NTP Plotter program or use the Meinberg NTP Monitor) you need to install and configure a package called SAMBA, which allows a UNIX file system to be seen by a Windows network client. The following steps are based in information from: http://elinux.org/R-Pi_NAS sudo apt-get update sudo apt-get install samba samba-common-bin [Enter "Y" at Do you want to continue:?] sudo cp /etc/samba/smb.conf /etc/samba/smb.conf.old Edit /etc/samba/smb.conf sudo nano /etc/samba/smb.conf add at the end of the file a definition of a share named "ntp": [ntp] comment = NTP log files path = /var/log/ntpstats read only = yes guest ok = yes You may also want to add a share for the NTP leapseconds file: [ntp-leapseconds] comment = NTP leapsecond.file path = /home/pi/ntp writeable = yes guest ok = yes Later note: I discovered that the files were set to "nobody" for
owner and group when using a share for the pi home directory. To resolve
this I needed to add a couple of lines to the share definition. See: [pi] comment = Home directory for PI user path = /home/pi writeable = yes guest ok = yes force user = pi force group = pi If you want write access, replace "read only" with "writeable" as in the second example above. I found that I needed to grant access to the /home/pi/ntp/ directory, which I did with a chmod 777 ntp - doubtless there are tighter protections I could have used. Now restart the Samba server: sudo service smbd restart You now access the files from Windows just like any other network share, for example (after NTP has been running for a while): C:\>dir \\RasPi-1\ntp Volume in drive \\RasPi-1\ntp is ntp Volume Serial Number is 04CA-A6BD Directory of \\RasPi-1\ntp 24/11/2012 12:03 <DIR> . 24/11/2012 12:03 <DIR> .. 24/11/2012 14:25 112,661 peerstats.20121124 24/11/2012 14:25 33,443 loopstats 24/11/2012 14:25 112,661 peerstats 24/11/2012 14:25 33,443 loopstats.20121124 4 File(s) 292,208 bytes 2 Dir(s) 1,826,832,384 bytes free To define the IP address to Windows I simply edited the \Windows\System32\drivers\etc\hosts file with Notepad, but you may want a more elegant integration than that. I could then use the Meinberg Time Server Monitor by adding \\RasPi-1\ntp to the known nodes list within the program. Later, I found that you can edit the DHCP configuration file, uncomment the first send host-name command, edit in your own wanted name, and comment out the default name: $ sudo nano /etc/dhcp/dhclient.conf Robin Schwab notes: The service is now (Jessie, Stretch) called smbd, not samba. Then for restarting a service there is a better way than: $ sudo /etc/init.d/samba restart If you use: $ sudo service smbd restart it will work in Wheezy, Jessie and Stretch. Adding SNMP support for CPU temperature monitoring
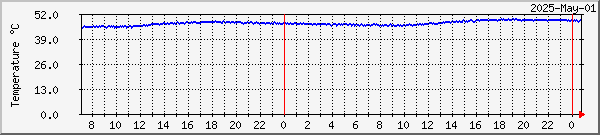
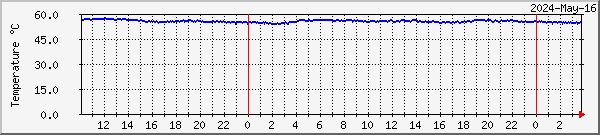
Notes based on: How
do I monitor and/or control the temperature of the SoC? To monitor the CPU temperature remotely, SNMP is the obvious medium for me. By chance I happened upon the command to get the CPU temperature of the CPU on the Raspberry Pi in either milli-degrees: $ cat /sys/class/thermal/thermal_zone0/temp or in human readable format: $ /opt/vc/bin/vcgencmd measure_temp To get this information into SNMP we can create an SNMP "pass" extension, whereby SNMP will call a specific program or shell script to get a particular object ID (OID) value. The script needs to write to standard output three lines, the OID, the data type (integer/string etc.), and the actual data. To control the execution of the program or script, the snmpd program will include a parameter when the script is called, to indicate whether the request is a "get" command (-g), a "get-next" command (-n), or a "set" command (-s). It is important that the program or script not respond to a "get-next" command if it is returning only one variable and, of course, the set command would do nothing when measuring a temperature. Use the nano editor to create a script named snmp-cpu-temp (or whatever) in your default directory: $ nano snmp-cpu-temp The script should contain: #!/bin/bash if [ "$1" = "-g" ] then echo .1.3.6.1.2.1.25.1.8 echo gauge cat /sys/class/thermal/thermal_zone0/temp fi exit 0 I selected the OID as the next unused in a sequence. You now need to mark the script executable and run it as follows: $ chmod +x snmp-cpu-temp$ ./snmp-cpu-temp -g and you should get a response something like (for a CPU temperature of 46°C): .1.3.6.1.2.1.25.1.8 gauge 46002 Having got that part working, you need to copy the script to a location where the SNMP software can find it. I used /usr/local/bin but I don't know Linux well enough to know whether that's the most appropriate directory. $ sudo cp snmp-cpu-temp /usr/local/bin Now we need to edit the SNMP daemon configuration to tell it how to handle this OID. In the snmpd.conf file, you will find a couple of examples of the "pass" command. Edit the file: $ sudo nano /etc/snmp/snmpd.conf and just below the sample ""Pass-through" MIB extension command" lines, insert a new active "pass" command: pass .1.3.6.1.2.1.25.1.8 /bin/sh /usr/local/bin/snmp-cpu-temp Restart snmpd: $ sudo service snmpd restart and you can then test that it's all working with the command: $ snmpget -v 2c localhost -c public .1.3.6.1.2.1.25.1.8 I got different responses on the two Raspberry Pi cards where I tested, but both contained the line: iso.3.6.1.2.1.25.1.8 = Gauge32: 46540 One system had a whole lot of what appeared to be messages about unfound data, but all three systems work correctly and can be accessed remotely for monitoring the CPU temperature. Here are the graphs from MRTG - click a graph for a summary or see this page for the more composite data:
The monitoring scripts (which I actually run on a Windows PC covering several Raspberry Pi card PCs) are in this Zip archive. Note that I changed from using the MRTG "in" counter on RasPi-1 -2 and -3, to using the "out" counter on RasPi-4 and -5 as I prefer the single-line blue graph to the green block. I note that there are some values which record "85", which I recall is the maximum from this sensor. Ideally, the script would treat those values as an error, and perhaps try again until a more reasonable value is found, or report the value as zero. I'd welcome your input.
|
RasPi-4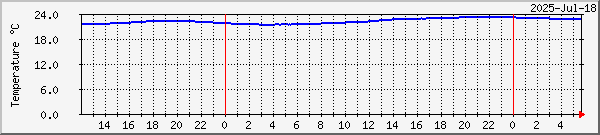 |
 Click on a graph for the week, month & year plots. |
I extended the SNMP pass function to allow monitoring of ambient temperature using the DS18B20 "single-wire" device. This is well written up for use with the Raspberry Pi here. Multiple devices an all be connected, using just a ground, 3.3V and signal wire connection, with the signal wire going to GPIO 4 (pin 7). Some extra software drivers are required, and the commands listed on that page, with comments and changes, are listed here (in case that page goes offline in the future):
The 1-Wire drivers are not loaded by default when the Raspberry Pi boots. You can load them with the following commands from a command prompt:
$ sudo modprobe wire
$ sudo modprobe w1-gpio
$ sudo modprobe w1-therm
[DJT] but it's easier to add them into /etc/modules (as I found that the command in PERL code below did not load the drivers for me).
$ sudo nano /etc/modules
Add the lines:
  wire
  w1-gpio
  w1-therm
to the end of the file, taking care not to delete any lines already there.  A reboot will be required.
Connect the sensor hardware to the Raspberry Pi and check it is detected by seeing if a device is listed on the 1-Wire bus.
$ cat /sys/bus/w1/devices/w1_bus_master1/w1_master_slave_count
1
This will print the number of sensors detected, 1 - for my hardware at the moment. You can get the sensor ID (a hexadecimal string stored in ROM on the sensor chip) by reading the w1_master_slaves file:
$ cat /sys/bus/w1/devices/w1_bus_master1/w1_master_slaves
10-00080234149b
[DJT: My device started with a 28, not a 10. In fact, it seemed to vary between a 28 and a 10, so I did modify the PERL code accordingly.] A quick check for correct operation of the sensor is to "read" the sensor file, you'll need the hex ID of the sensor from earlier commands:
$ cat /sys/bus/w1/devices/10-00080234149b/w1_slave
37 00 4b 46 ff ff 07 10 1e : crc=1e YES
37 00 4b 46 ff ff 07 10 1e t=27312
The number after 't=' is the temperature in thousandths of a degrees Celsius.
Nigel Heasman notes:
I'm setting up more 1 wire sensors on a raspberry pi B (one of the early ones), running Raspbian wheezy 2015-02-16 and using your notes, and have found that I need to add " dtoverlay=w1-gpio " to the bottom of /boot/config.txt, before the devices were recognised.
I'm not sure if this is something to do with the later versions of Wheezy, as I don't remember having to do it a couple of years ago when I set up my first lot! I found this info in http://www.modmypi.com/blog/ds18b20-one-wire-digital-temperature-sensor-and-the-raspberry-pi
I am only mentioning it in case you get queries about:-
$ cat /sys/bus/w1/devices/w1_bus_master1/w1_master_slave_count
reporting that there is no such file or directory.
Many thanks for the copious notes and information on your web pages - a mine of information
At first I wrote a PERL script and bash Shell script to read a single device, but as the PERL contained too little error checking its output was unreliable, and will not be shown here. I removed the commands to check for and load the modules as they did not work for me. Finally, I needed a script to be called by the SNMP pass option. Here is the script, named snmp-ds1-temp. It was in the same /home/pi/thermometer/DS18B20 directory. I used the next higher number for the SNMP object ID. Probably ought to have made a more formal search! As with the CPU temperature monitoring, make the script executable, test it, copy it to a directory on the path, edit and restart SNMP, and test that the new OID you have created works as expected. My current information is being plotted here as "DS1 ambient temperature".
When I added a second DS18B20 to my Raspberry Pi, I found that the two IDs were:
28-000005211b35
28-0000053520a2
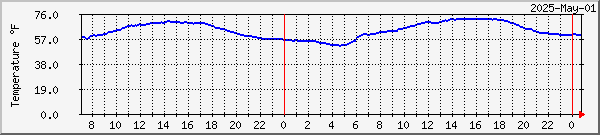
and so I took the easy way out and created two separate PERL scripts, and two separate Shell scripts to be called by SNMP. I also made some improvements to the PERL scripts to allow for retries in the event of a first try failure based on the scripts here. As the outside temperature can be negative (in Celsius) here, and as MRTG can't plot negative values, I made read-ds2.pl return the Fahrenheit rather than the Celsius temperature. These improvements are in the scripts below.
Note that I did try with MRTG plotting both indoors and outdoors temperatures on a single MRTG target, but it failed with the simple scripts. I suspect the failure may have been because SNMP was causing two PERL scripts to be run at the same time, and likely this conflicts with the 1-wire bus arrangement. I did not test putting two SNMP temperature retrievals in one MRTG target with the error-checking scripts below. In any case, I ended up with two different MRTG targets with the indoors in °C and the outdoors in °F as implemented in read-ds2.pl.
If you only have one device, you can replace the line:
$sensor_temp = `cat /sys/bus/w1/devices/*5211b35/w1_slave 2>&1`;
with a simpler wildcard such as:
$sensor_temp = `cat /sys/bus/w1/devices/28-*/w1_slave 2>&1`;
| read-ds1.pl |
|---|
#!/usr/bin/perl

$sensor_temp = "";
$attempts = 0;
$temperature = 0;

while ($sensor_temp !~ /YES/g && $attempts < 5)
{
        $sensor_temp = `cat /sys/bus/w1/devices/*5211b35/w1_slave 2>&1`;
        if ($sensor_temp =~ /No such file or directory/)
        {
                last;
        }
        elsif ($sensor_temp !~ /NO/g)
        {
                $sensor_temp =~ /t=(\d+)/i;
                $temperature = ($1);
        }
        $attempts++;
}
print "$temperature\n";
|
| read-ds2.pl |
#!/usr/bin/perl

$sensor_temp = "";
$attempts = 0;
$temperature = 0;

while ($sensor_temp !~ /YES/g && $attempts < 5)
{
        $sensor_temp = `cat /sys/bus/w1/devices/*53520a2/w1_slave 2>&1`;
        if ($sensor_temp =~ /No such file or directory/)
        {
                last;
        }
        elsif ($sensor_temp !~ /NO/g)
        {
                $sensor_temp =~ /t=(\d+)/i;
                $temperature = int ((9*$1/5) + 32000);
        }
        $attempts++;
}
print "$temperature\n";
|
Update: it seems that the Perl code above may not work correctly if the temperature is below 0°C. If so, try replacing the lines:
$sensor_temp =~ /t=(\d+)/i;
$temperature = int ((9*$1/5) + 32000);
with:
$sensor_temp =~ s/.*t=//i;
$temperature = int ((9*$'/5) + 32000);
I would appreciate any feedback on this.
| snmp-ds1-temp | snmp-ds2-temp |
|---|---|
#!/bin/bash if [ "$1" = "-g" ] then echo .1.3.6.1.2.1.25.1.9 echo gauge perl /home/pi/thermometer/DS18B20/read-ds1.pl fi exit 0 |
#!/bin/bash if [ "$1" = "-g" ] then echo .1.3.6.1.2.1.25.1.10 echo gauge perl /home/pi/thermometer/DS18B20/read-ds2.pl fi exit 0 |
pass  .1.3.6.1.2.1.25.1.9   /bin/sh  /usr/local/bin/snmp-ds1-temp
pass  .1.3.6.1.2.1.25.1.10  /bin/sh  /usr/local/bin/snmp-ds2-temp
I know this isn't particularly clever, but as a first cut it worked for me. To check that it's all working, use snmpget as for the CPU temperature:
$ snmpget -v 2c localhost -c public .1.3.6.1.2.1.25.1.9
iso.3.6.1.2.1.25.1.9 = Gauge32: 22312
$ snmpget -v 2c localhost -c public .1.3.6.1.2.1.25.1.10 iso.3.6.1.2.1.25.1.10 = Gauge32: 63386
So that's 22.312 �C for the indoor temperature, and 63.386 �F for the outdoor temperature. Bear in mind that although these devices can have a precision of 1/16 �C, they only have an accuracy (or trueness) specified to 2 �C.
#--------------------------------------------------------------- # Raspberry Pi 4 - Ambient temperature indoors #--------------------------------------------------------------- Target[raspi4-ds1-temp]: .1.3.6.1.2.1.25.1.7.0&.1.3.6.1.2.1.25.1.9:public@raspi-4 MaxBytes[raspi4-ds1-temp]: 100000 MaxBytes2[raspi4-ds1-temp]: 100000 Title[raspi4-ds1-temp]: Ambient temperature indoors Options[raspi4-ds1-temp]: gauge, nopercent, growright, unknaszero, noi YLegend[raspi4-ds1-temp]: Temperature �C ShortLegend[raspi4-ds1-temp]: �C kMG[raspi4-ds1-temp]: , Factor[raspi4-ds1-temp]: 0.001 Legend2[raspi4-ds1-temp]: Indoors temperature in �C LegendO[raspi4-ds1-temp]: Indoors temperature PageTop[raspi4-ds1-temp]: <H1>Raspberry Pi 4 - Ambient Temperature Indoors</H1> #--------------------------------------------------------------- # Raspberry Pi 4 - Ambient temperature outdoors #--------------------------------------------------------------- Target[raspi4-ds2-temp]: .1.3.6.1.2.1.25.1.7.0&.1.3.6.1.2.1.25.1.10:public@raspi-4 MaxBytes[raspi4-ds2-temp]: 100000 MaxBytes2[raspi4-ds2-temp]: 100000 Title[raspi4-ds2-temp]: Ambient temperature outdoors Options[raspi4-ds2-temp]: gauge, nopercent, growright, unknaszero, noi YLegend[raspi4-ds2-temp]: Temperature �F ShortLegend[raspi4-ds2-temp]: �F kMG[raspi4-ds2-temp]: , Factor[raspi4-ds2-temp]: 0.001 Legend2[raspi4-ds2-temp]: Outdoors temperature in �F LegendO[raspi4-ds2-temp]: Outdoors temperature PageTop[raspi4-ds2-temp]: <H1>Raspberry Pi 4 - Ambient Temperature Outdoors</H1> #--------------------------------------------------------------- |
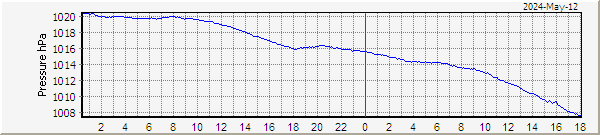
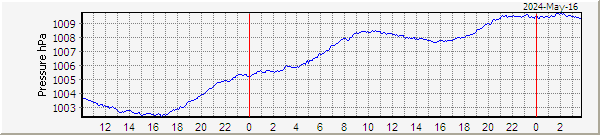
There are a couple of very low cost devices for monitoring ambient air pressure, and it's very easy to add one of these devices to a Raspberry Pi as it already supports the I2C two-wire communication protocol used by the devices, and software support is readily available from Adafruit (to whom, many thanks). The devices are the older BMP085 and the more recent BMP180, which are pin- and software-compatible. You will need to connect the board-mounted device to the Raspberry Pi as described in the Adafruit notes. You don't have to use an Adafruit board, and cheaper UK options are available from eBay. I assume that you followed their tutorial and have got as far as running the example program. Do note that if you are using a recent version of Raspbian the instructions for adding modules have changed. In very brief summary:
sudo apt-get install python-smbus
sudo apt-get install i2c-tools (already there on my RPi)
Run: sudo raspi-config, Advanced options, I2C (interface & kernel)
Add to /etc/modules: (lines were already added in my RPi)
i2c-bcm2708
i2c-dev
In: /etc/modprobe.d/raspi-blacklist.conf, comment out these lines:
blacklist spi-bcm2708 (needed comment # added)
blacklist i2c-bcm2708 (was already commented)
In: /boot/config.txt add:
dtparam=i2c1=on (had to be added)
dtparam=i2c_arm=on (already there)Reboot.
At this point, you need the BMP180 connected to see the following:
I could see two devices with the number 42 and 77.
sudo i2cdetect -y 1I think the 42 was because I had some other stuff connected, you only need the 77 present. At this point, attempt to build the Adafruit example:
sudo apt-get install git build-essential python-dev python-smbus
git clone https://github.com/adafruit/Adafruit_Python_BMP.git
cd Adafruit_Python_BMP
sudo python setup.py install
cd examples
sudo python simpletest.py
To use the sensor with SNMP and hence MRTG you need to create a program which will respond with the pressure, create a shell script which SNMP will call to get the value of the pressure, and add a line to snmpd.conf telling SNMP where to find the script. My simple examples are:
Simple program to read the pressure: pressure.py - you can put this in your home directory: /home/pi/ Note that the 2175 is the adjustment required to convert readings at my height (183 m) to sea-level pressure. Yes, you can use a more accurate formula if you wish. Do not rely on the value from the Adafruit example program where the height appears to be derived from assuming the sea-level pressure to be 1015 hPa, if my reading of their note is correct.
#!/usr/bin/python
import Adafruit_BMP.BMP085 as BMP085
sensor = BMP085.BMP085(mode=BMP085.BMP085_ULTRAHIGHRES)
pressure = sensor.read_pressure() + 2175
print '{0:0.0f}'.format(pressure)
Simple shell script which can be called by SNMP pass command: snmp-air-pressure
#!/bin/bash
if [ "$1" = "-g" ]
then
echo .1.3.6.1.2.1.25.1.20
echo gauge
python /home/pi/pressure.py
fi
exit 0
Create the script in your home directory, make it executable:
$ chmod a+x snmp-air-pressure
and copy it to a directory on the path such as:
$ sudo cp snmp-air-pressure /usr/local/bin
Now edit the snmpd configuration file, to add the pass command:
$ sudo nano /etc/snmp/snmpd.conf
add:
pass .1.3.6.1.2.1.25.1.20 /bin/sh /usr/local/bin/snmp-air-pressure
Having done all this, I encountered a problem where I needed to ask for help. As you can see from the previous examples, I expect to run a command like:
/usr/local/bin/snmp-air-pressure -g
and get a result, but all my attempts gave a result of 0.
.1.3.6.1.2.1.25.1.20
gauge
0
Running the command as root (i.e. with sudo) it worked as expected, which suggested a rights issue. After a lot of discussion on both the Usenet Raspberry Pi newsgroup, and the Adafruit forum, it emerged that there is a Linux group called "i2c" and if the current user has access to that group they can run the I2C software without requiring the sudo prefix. So I added my user name "pi" to that group:
sudo adduser pi i2c
You can check a group's membership with the "members" command, but you may need to apt-get install that command first. Further checks shows that when snmpd ran a "pass" command it did so with the user name "snmp", so you would think that all that was required would be:
sudo adduser snmp i2c
so that the user had access to the i2c group. However, it turns out that when snmpd is started it does not claim all the groups to which it should have access when it starts, and that one line needs to be added to /etc/snmp/snmpd.conf to set the group it uses by default. After the line:
agentAddress 161
add:
agentgroup i2c
Once this is done, the pass script above works correctly when called by snmpd on receipt of an snmp get request. My thanks to a number of folk on the Raspberry Pi Usenet group, in particular Nomen Nescio who spotted the agentgroup requirement.
Looking more closely, I could see that Python was giving error 13, in this case from being unable to open the pressure sensor. Running the script with sudo solved the problem from the command line, but just adding sudo into the script did not work. Following Andy Burns suggestion on the Raspberry Pi USENET group, I altered the protection on the /dev/i2c-1 device so that "others" could have read-write access.
Before: ls -l /dev/i2c-1 => crw-rw---- 1 root i2c 89, 1 Feb 28 15:12 /dev/i2c-1Command: sudo chmod o=rw /dev/i2c-1After: ls-l /dev/i2c-1 => crw-rw-rw- 1 root i2c 89, 1 Feb 28 15:12 /dev/i2c-1
This then allowed the air pressure to be read with SNMP:
$ snmpget -v 2c localhost -c public .1.3.6.1.2.1.25.1.20
iso.3.6.1.2.1.25.1.20 = Gauge32: 98749
so that I could then use standard MRTG commands to read the air pressure from anywhere in the network. However, it seems that this solution will only last until the next reboot, and I am advised (thanks Tony van der Hoff and Tauno Voipio) that it would be better to add the user (in this case snmp) to the group (i2c) which has access to the I2C bus.
Here's what I am using in an include file for my MRTG configuration.
Note that the output from standard MRTG is not very attractive for air pressure as you can't constrain the range to be a narrow band around 1013 hPa, so I wrote a small program to read the log files from MRTG and produce a more attractive output. This is from my Arduino-based BMP085 pressure monitor made some years back:
In mid-2015 a new sensor was released from Bosch which added humidity sensing to the pressure and temperature from the BMP085/180 series. Using the sensor is very similar to the instructions above, but the registers are different, and because the temperature reading is required to correct the pressure and humidity readings, I had to use a slightly different approach in that I now run the Python script which produces the ambient data readings to three files once a minute (my first time with cron), and then just read out the content of the files from the SNMP pass functions.
The Python script I used is here. You will likely want to modify it to suit your own requirements. As-supplied it write to three files in /tmp named: temperature_millidegrees.txt, pressure_pascals.txt and humidity_percent.txt. The latter name is a misnomer as it write 1000 times the percent value, so that MRTG will render it more accurately in the longer term plots. You should be able to make this file executable, copy it to /usr/local/bin and run it.
Thanks to Gennadiy who notes that the address in the BME280.py file is hard-coded to 0x77. However, BME280s may be at 0x77 or 0x76, depending on the state of the SDO pin. Some modules he obtained from China had the SDO pin grounded, resulting in the 0x76 address. It's easy enough to alter the Python file if this applies to you.
python BME280.py
ls -l /tmp/*.txt
Look for the date on the files changing when you run the Python script.
You can now copy the python script to /usr/local/bin and check that you can run it from there.
sudo cp BME280.py /usr/local/bin
Create a script to run the Python program, and make it executable.
nano bme280python /usr/local/bin/BME280.pychmod +x bme280
and copy that file to /usr/local/bin as well:
sudo cp bme280 /usr/local/bin
You need to add one line to the crontab file:
sudo nano /etc/crontab
* * * * * root /usr/local/bin/bme280
I used a sequence of three OIDs for the three variables:
.1.3.6.1.2.1.25.1.21 (temperature)
.1.3.6.1.2.1.25.1.22 (pressure)
.1.3.6.1.2.1.25.1.23 (humidity)
so three scripts for the SNMP pass commands are:
| snmp-atmos-temp | snmp-atmos-press | snmp-atmos-humid |
|---|---|---|
#!/bin/bash if [ "$1" = "-g" ] then echo .1.3.6.1.2.1.25.1.21 echo gauge cat /tmp/temperature_millidegrees.txt fi exit 0 |
#!/bin/bash if [ "$1" = "-g" ] then echo .1.3.6.1.2.1.25.1.22 echo gauge cat /tmp/pressure_pascals.txt fi exit 0 |
#!/bin/bash if [ "$1" = "-g" ] then echo .1.3.6.1.2.1.25.1.22 echo gauge cat /tmp/humidity_percent.txt fi exit 0 |
The three scripts all live in /usr/local/bin, and need to be marked as executable:
chmod +x <script-name>
The updates to /etc/snmp/snmpd.conf are:
pass .1.3.6.1.2.1.25.1.21 /bin/sh /usr/local/bin/snmp-atmos-temp
pass .1.3.6.1.2.1.25.1.22 /bin/sh /usr/local/bin/snmp-atmos-press
pass .1.3.6.1.2.1.25.1.23 /bin/sh /usr/local/bin/snmp-atmos-humid
followed by a restart of the SNMP daemon:
sudo service snmpd restart
You should now check that the SNMP is behaving as expected, using snmpget:
snmpget -v 2c localhost -c public .1.3.6.1.2.1.25.1.21
snmpget -v 2c localhost -c public .1.3.6.1.2.1.25.1.22
snmpget -v 2c localhost -c public .1.3.6.1.2.1.25.1.23
Suitable MRTG commands are given below. See the MRTG Reference for more details.
#--------------------------------------------------------------- # Raspberry Pi 3 - Ambient temperature indoors #--------------------------------------------------------------- Target[raspi3-air-temp]: .1.3.6.1.2.1.25.1.21&.1.3.6.1.2.1.25.1.21:public@raspi-3 MaxBytes[raspi3-air-temp]: 100000 MaxBytes2[raspi3-air-temp]: 100000 Title[raspi3-air-temp]: Ambient temperature indoors Options[raspi3-air-temp]: gauge, nopercent, growright, unknaszero, noi YLegend[raspi3-air-temp]: Temperature �C ShortLegend[raspi3-air-temp]: �C kMG[raspi3-air-temp]: , Factor[raspi3-air-temp]: 0.001 Legend2[raspi3-air-temp]: Indoors temperature in �C LegendO[raspi3-air-temp]: Indoors temperature PageTop[raspi3-air-temp]: <H1>Downstairs - Ambient Temperature Indoors</H1> #--------------------------------------------------------------- # Raspberry Pi 3 - Air pressure #--------------------------------------------------------------- Target[raspi3-air-pressure]: .1.3.6.1.2.1.25.1.22&.1.3.6.1.2.1.25.1.22:public@raspi-3 MaxBytes[raspi3-air-pressure]: 110000 MaxBytes2[raspi3-air-pressure]: 110000 Title[raspi3-air-pressure]: Sea-level Air Pressure for Raspberry Pi #3 Options[raspi3-air-pressure]: expscale, gauge, nopercent, growright, unknaszero, noi YLegend[raspi3-air-pressure]: Pressure hPa ShortLegend[raspi3-air-pressure]: Pa Factor[raspi3-air-pressure]: 0.01 kMG[raspi3-air-pressure]: , Legend2[raspi3-air-pressure]: Air Pressure hPa LegendO[raspi3-air-pressure]: Pressure hPa PageTop[raspi3-air-pressure]: <H1>Sea-level Air Pressure at Edinburgh</H1> #--------------------------------------------------------------- # Raspberry Pi 3 - Ambient air humidity #--------------------------------------------------------------- Target[raspi3-air-humidity]: .1.3.6.1.2.1.25.1.23&.1.3.6.1.2.1.25.1.23:public@raspi-3 MaxBytes[raspi3-air-humidity]: 100000 MaxBytes2[raspi3-air-humidity]: 100000 Title[raspi3-air-humidity]: Relative humidity for Raspberry Pi #3 Options[raspi3-air-humidity]: gauge, nopercent, growright, unknaszero, noi YLegend[raspi3-air-humidity]: Humidity % ShortLegend[raspi3-air-humidity]: % kMG[raspi3-air-humidity]: ,, Factor[raspi3-air-humidity]: 0.001 Legend2[raspi3-air-humidity]: Ambient air relative humidity LegendO[raspi3-air-humidity]: Ambient air relative humidity PageTop[raspi3-air-humidity]: <H1>Downstairs Ambient Air Relative Humidity</H1> |
I then run a small Delphi program to process the raw MRTG log files to present the pressure variable on a more sensible scale, as seeing 0...1000 hPa on one graph rather loses the variations! At the moment I am comparing two BME280 boards in the same location, just to see how accurate they are, before moving one downstairs and the other upstairs. You can see the comparison here.
The current output from all three variables can be seen below:
 |
Upstairs indoor temperature - �C |
 |
Sea-level air pressure - hPa |
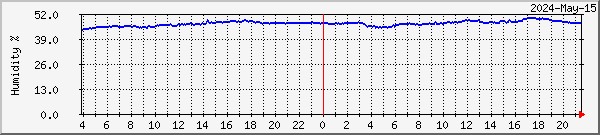 |
Upstairs ambient air humidity - % |
Thanks to folk in this
Adafruit discussion forum for their help and encouragement. No thanks
for the ridiculously large number of brackets in their example C code in the BME280
datasheet which made it so much more difficult to understand! And no
thanks to Delphi for not including an arithmetic shift right for signed
integers! All this added many hours to my debugging time....
In situations where a GPS puck is used (e.g. for precise timekeeping) it may be useful to plot the number of satellites which are in theory visible, and the number of satellites used by the GPS daemon to return a position fix and time data (PPS). I have played with a Python script for this, but the snag is that you need to wait for the gpsd to emit a message with the required information. I therefore also tried writing my own two programs to retrieve the information directly from gpsd, and while this works on recent RPi systems (with GPSD 3.11) it fails on earlier systems which have gpsd 3.6 (and which seems to to upgrade?).
Steps
In more detail:
/* Copyright (c) 2018-2021 David Taylor <gpsd@david.taylor.name>

Permission to use, copy, modify, and distribute this software for
any purpose without fee is hereby granted, provided that the above
copyright notice and this permission notice appear in all copies.

The user of the software is responsible for ensuring the accuracy
of any data produced by the software.

This software may not be used in safety-critical
or life-critical systems. */
#include <gps.h>
#include <stdio.h>
#include <string.h>
/* Update for gpsd 3.20-3.23 */
bool showMessage = false;
int main (int argc, char **argv) {
int status, used, visible;
struct gps_data_t gpsdata;
#define OID_VISIBLE ".1.3.6.1.2.1.25.1.31"
#define OID_USED ".1.3.6.1.2.1.25.1.32"
#define OID_SNR_AVG ".1.3.6.1.2.1.25.1.33"
if ((argc > 2) && (strcmp ("-g", argv[1]) == 0))
{
status = gps_open (GPSD_SHARED_MEMORY, DEFAULT_GPSD_PORT, &gpsdata);
#if GPSD_API_MAJOR_VERSION >= 7
if (gps_read (&gpsdata, NULL, 0) == -1) {
#else
if (gps_read (&gpsdata) == -1) {
#endif
} else {
used = gpsdata.satellites_used;
visible = gpsdata.satellites_visible;
int i; double snr_total=0;
for(i=0;i<visible;i++) {
if (gpsdata.skyview[i].used > 0 && gpsdata.skyview[i].ss > 1) {
snr_total+=gpsdata.skyview[i].ss;
}
}
gps_close (&gpsdata);
double snr_avg = 0.0;
if (used > 0) {
snr_avg = snr_total / used;
}
if (strcmp (OID_VISIBLE, argv[2]) == 0) {
printf (OID_VISIBLE);
printf ("\n");
printf ("gauge\n");
printf ("%d\n", visible);
}
if (strcmp (OID_USED, argv[2]) == 0) {
printf (OID_USED);
printf ("\n");
printf ("gauge\n");
printf ("%d\n", used);
}
if (strcmp (OID_SNR_AVG, argv[2]) == 0) {
printf (OID_SNR_AVG);
printf ("\n");
printf ("gauge\n");
printf ("%lf\n", snr_avg);
}
}
}
return 0;
}
|
earlier version for GPSD 3.17
/* Copyright (c) 2018 David Taylor <gpsd@david.taylor.name>

Permission to use, copy, modify, and distribute this software for
any purpose without fee is hereby granted, provided that the above
copyright notice and this permission notice appear in all copies.

The user of the software is responsible for ensuring the accuracy
of any data produced by the software.

This software may not be used in safety-critical
or life-critical systems. */
#include <gps.h>
#include <stdio.h>
#include <string.h>

int main (int argc, char **argv) {
  int status, used, visible;
  struct gps_data_t gpsdata;
  #define OID_VISIBLE ".1.3.6.1.2.1.25.1.31"
  #define OID_USED ".1.3.6.1.2.1.25.1.32"
  #define OID_SNR_AVG ".1.3.6.1.2.1.25.1.33"

  if ((argc > 2) && (strcmp ("-g", argv[1]) == 0))
  {
    status = gps_open (GPSD_SHARED_MEMORY, DEFAULT_GPSD_PORT, &gpsdata);
    status = gps_read (&gpsdata);
    used  = gpsdata.satellites_used;
    visible = gpsdata.satellites_visible;
    int i; double snr_total=0;
    for(i=0;i<=used;i++) {
        if (gpsdata.skyview[i].used > 0 && gpsdata.skyview[i].ss > 1) {
            snr_total+=gpsdata.skyview[i].ss;
        }
    }
    gps_close (&gpsdata);
    double snr_avg = 0.0;
    if (used > 0) {
        snr_avg = snr_total / used;
    }
    if (strcmp (OID_VISIBLE, argv[2]) == 0) {
      printf (OID_VISIBLE);
      printf ("\n");
      printf ("gauge\n");
      printf ("%d\n", visible);
    }
    if (strcmp (OID_USED, argv[2]) == 0) {
      printf (OID_USED);
      printf ("\n");
      printf ("gauge\n");
      printf ("%d\n", used);
    }
    if (strcmp (OID_SNR_AVG, argv[2]) == 0) {
      printf (OID_SNR_AVG);
      printf ("\n");
      printf ("gauge\n");
      printf ("%lf\n", snr_avg);
    }
  }
  return 0;
}
|
older version (3.11? and earlier)
/* Copyright (c) 2016 David Taylor <gpsd@david.taylor.name>

Permission to use, copy, modify, and distribute this software for
any purpose without fee is hereby granted, provided that the above
copyright notice and this permission notice appear in all copies.

The user of the software is responsible for ensuring the accuracy
of any data produced by the software.

This software may not be used in safety-critical
or life-critical systems. */
#include <gps.h>
#include <stdio.h>

int main (int argc, char **argv) {
  int status, used, visible;
  struct gps_data_t gpsdata;
  #define OID_VISIBLE ".1.3.6.1.2.1.25.1.31"
  #define OID_USED ".1.3.6.1.2.1.25.1.32"
  #define OID_SNR_AVG ".1.3.6.1.2.1.25.1.33"

  if ((argc > 2) && (strcmp ("-g", argv[1]) == 0))
  {
    status = gps_open (GPSD_SHARED_MEMORY, DEFAULT_GPSD_PORT, &gpsdata);
    status = gps_read (&gpsdata);
    used  = gpsdata.satellites_used;
    visible = gpsdata.satellites_visible;
    int i; double snr_total=0;
    for(i=0;i<=used;i++) {
        if (gpsdata.used[i] > 0 && gpsdata.ss[i] > 1) {
//            printf ("i: %d, P:%d, ss: %f\n", i, gpsdata.PRN[i], gpsdata.ss[i]);
            snr_total+=gpsdata.ss[i];
        }
    }
    gps_close (&gpsdata);
    double snr_avg = 0.0;
    if (used > 0) {
        snr_avg = snr_total / used;
    }
    if (strcmp (OID_VISIBLE, argv[2]) == 0) {
      printf (OID_VISIBLE);
      printf ("\n");
      printf ("gauge\n");
      printf ("%d\n", visible);
    }
    if (strcmp (OID_USED, argv[2]) == 0) {
      printf (OID_USED);
      printf ("\n");
      printf ("gauge\n");
      printf ("%d\n", used);
    }
    if (strcmp (OID_SNR_AVG, argv[2]) == 0) {
      printf (OID_SNR_AVG);
      printf ("\n");
      printf ("gauge\n");
      printf ("%lf\n", snr_avg);
    }
  }
  return 0;
}
|
#--------------------------------------------------------------- # Raspberry Pi 14 - GPS Satellites Visible and Used #--------------------------------------------------------------- Target[raspi14-gps]: .1.3.6.1.2.1.25.1.32&.1.3.6.1.2.1.25.1.31:public@raspi-14 MaxBytes[raspi14-gps]: 100 MaxBytes2[raspi14-gps]: 100 Title[raspi14-gps]: GPS Satellites Raspberry Pi #14 Options[raspi14-gps]: integer, gauge, nopercent, growright, unknaszero YLegend[raspi14-gps]: Satellites ShortLegend[raspi14-gps]: Satellites Legend1[raspi14-gps]: Used Legend2[raspi14-gps]: Visible LegendI[raspi14-gps]: Used LegendO[raspi14-gps]: Visible PageTop[raspi14-gps]: <H1>RasPi-14 - GPS Satellites in view and used</H1> #--------------------------------------------------------------- # Raspberry Pi 14 - GPS Satellites - average SNR #--------------------------------------------------------------- Target[raspi14-gps-snr]: .1.3.6.1.2.1.25.1.33&.1.3.6.1.2.1.25.1.33:public@raspi-14 Title[raspi14-gps-snr]: GPS Satellites - average SNR - Raspberry Pi #14 MaxBytes[raspi14-gps-snr]: 100 MaxBytes2[raspi14-gps-snr]: 100 Options[raspi14-gps-snr]: gauge, nopercent, growright, unknaszero, noi YLegend[raspi14-gps-snr]: Average SNR dB ShortLegend[raspi14-gps-snr]: dB Legend2[raspi14-gps-snr]: Average SNR (dB) LegendO[raspi14-gps-snr]: Average SNR PageTop[raspi14-gps-snr]: <H1>RasPi-14 - GPS average SNR</H1> #--------------------------------------------------------------- |
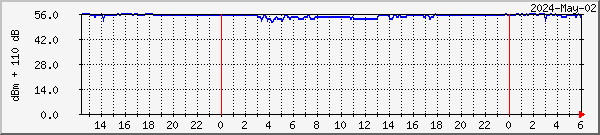
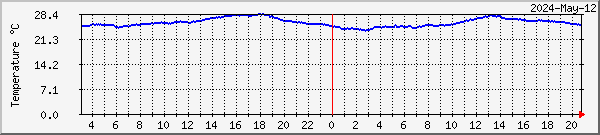
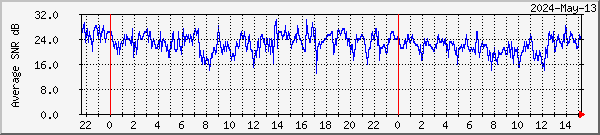
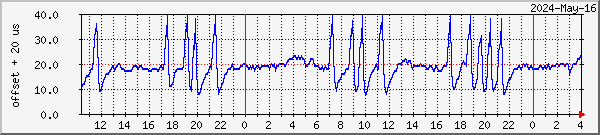
You could use this information to see how the location of an indoor GPS antenna and the quality of the receiver affects the timekeeping accuracy of an NTP server. For example, below are two systems, one with a poorly located somewhat older receiver, and the other with a better-located HAB supplies GPS. I was interested to see whether the variations if NTP offset were due to temperature fluctuations or poor GPS signal. It seem that temperature fluctuations are more important, at least for the Raspberry Pi. Remember that these are snapshots at five-minute intervals, so some shorter duration events may be missing. You can see similar graphs to the ones below for more Raspberry Pi cards here.
RasPi-3, older receiver, poor location: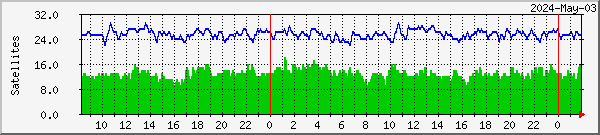
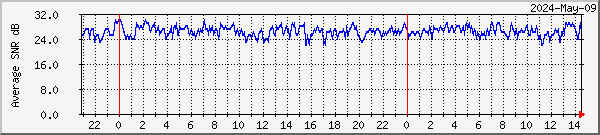


Note that the gpsd version was changed from 3.6 to 3.11 on 2016-Apr-12 at 13:00 UTC, and there is a noticeable difference in behaviour. The number of "visible" satellites appears to be less.
RasPi-13, HAB supplies
receiver, better antenna location: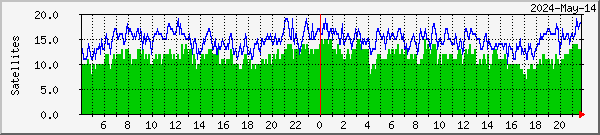
Although the solution above is believed to be optimum based on getting the data as quickly as possible, the initial development of this monitoring code was done in Python, although I needed external help (thanks, Steve O'Hara-Smith) to get it working. The items I ended up with were a mixture of shell code and Python. It seems that the C program versions above won't work with the earlier 3.6 version of GPSD which was supplied with Raspbian Wheezy, and which doesn't get upgraded when you update to Jessie. Why not!?
For available satellites (visible satellites), a shell script named: snmp-get-gps-available:
#!/bin/bash
if [ "$1" = "-g" ]
then
gpspipe -r | egrep --line-buffered  'GPGSA' | stdbuf -o0 gawk  '-F,' '
{
  AVAILABLE = 0 ;
  if ( $1 ~  /GPGSA/ ) {
    for (i = 1; i <= NF; i++) {
      if ( $i != "" ) {
        # print ( $i ) ;
        AVAILABLE++ ;
      } ;
    } ;
    print ".1.3.6.1.2.1.25.1.31";
    print "gauge";
    print ( AVAILABLE ) ;
    exit 0
  } ;
}'
fi
exit 0
|
and its pass entry:
pass .1.3.6.1.2.1.25.1.31 /bin/sh /usr/local/bin/snmp-get-gps-available
For the used satellites, a Python program (snmp-get-gps-used.py), and shell script (snmp-get-gps-used.sh):
snmp-get-gps-used.py
import gps
import json
from collections import Counter

# Listen on port 2947 (gpsd) of localhost
session = gps.gps("localhost", "2947")
session.stream(gps.WATCH_ENABLE | gps.WATCH_NEWSTYLE)

while True:
    try:
        report = session.next()
        # Wait for a 'SKY' report and display the current time
        # To see all report data, uncomment the line below
        # print report
        if report['class'] == 'SKY':
            # print report
            session = None
            if 'satellites' in report:
                total_sats = len (report.satellites)
                used_sats = 0
                for sat in report.satellites:
                    if sat['used']:
                        used_sats = used_sats + 1
                print ".1.3.6.1.2.1.25.1.32"
                print "Gauge"
                print used_sats
                session = None
                quit()
    except KeyError:
                pass
    except KeyboardInterrupt:
                quit()
    except StopIteration:
                session = None
                print "GPSD has terminated"
|
The shell script: snmp-get-gps-used.sh
#!/bin/bash if [ "$1" = "-g" ] then python snmp-get-gps-used.py fi exit 0 |
and its pass entry:
pass .1.3.6.1.2.1.25.1.32 /bin/sh /usr/local/bin/snmp-get-gps-used.sh
Paul Marsh (@UHF_Satcom on Twitter) has kindly sent a script you could use to produce data directly in the format MRTG needs. As I run MRTG on a separate Windows PC and get the data over SNMP, I've not tested this script. This script prints MRTG compatible output as number of satellites used in fix, number of visible satellites, 0 and "gps stats".
#!/bin/bash
fix=`gpspipe -r | egrep --line-buffered  'GPGGA' | stdbuf -o0 gawk '-F,' '{print $8;exit}'`
echo $fix
gpspipe -r | egrep --line-buffered  'GPGSA' | stdbuf -o0 gawk  '-F,' '
{
  AVAILABLE = -1 ;
  if ( $1 ~  /GPGSA/ ) {
    for (i = 1; i <= NF; i++) {
      if ( $i != "" ) {
        AVAILABLE++ ;
      } ;
    } ;
    print ( AVAILABLE ) ;
    print ( "0" ) ;
    print ( "GPS stats" )
    exit 0
  } ;
}'
|
John Parker asked about monitoring a relay status, and then kindly sent the following notes:
I finally got it working, after battling with it, on and off, for quite some time.
Eventually I got it working via pigpio.
Here are the steps:
1) Install pigpio http://abyz.co.uk/rpi/pigpio/download.html
2) Set it up to start the daemon on boot
3) Create a (very) simple python script which I called relay.py and stored it in /home/pi/relay:
import pigpio
pi = pigpio.pi()
pi.set_mode(14, pigpio.INPUT)
print(pi.read(14))
I then followed a system similar to how you read air pressure using BMP085, creating a shell script in /usr/local/bin:
#!/bin/bash
if [ "$1" = "-g" ]
then
echo .1.3.6.1.2.1.25.1.9
echo gauge
python /home/pi/relay/relay.py
fi
exit 0
4) Call this from the snmp file as per normal. It works well!
My next step is to see if I can convert it into a moisture detector, so if we get leak in our server room aircon, we'll be able to detect it...
|
|