ADS-B dump1090
Home Page Up ACARS decoder ADS-B dump1090 AIS receiver Cross-compiling Kernel compile Monitoring NTP RTC Wall Clock Updating GPSD


ADS-B using dump1090 for the Raspberry Pi

Raspberry Pi model B with Wi-Fi dongle and optional GPS/PPS receiver.
Raspberry Pi, case, and recommended Adafruit GPS available from ModMyPi
R820T/RTL2832U DVB receiver dongle.
DVB stick and MCX-to-SMA adapters available from CosyCave

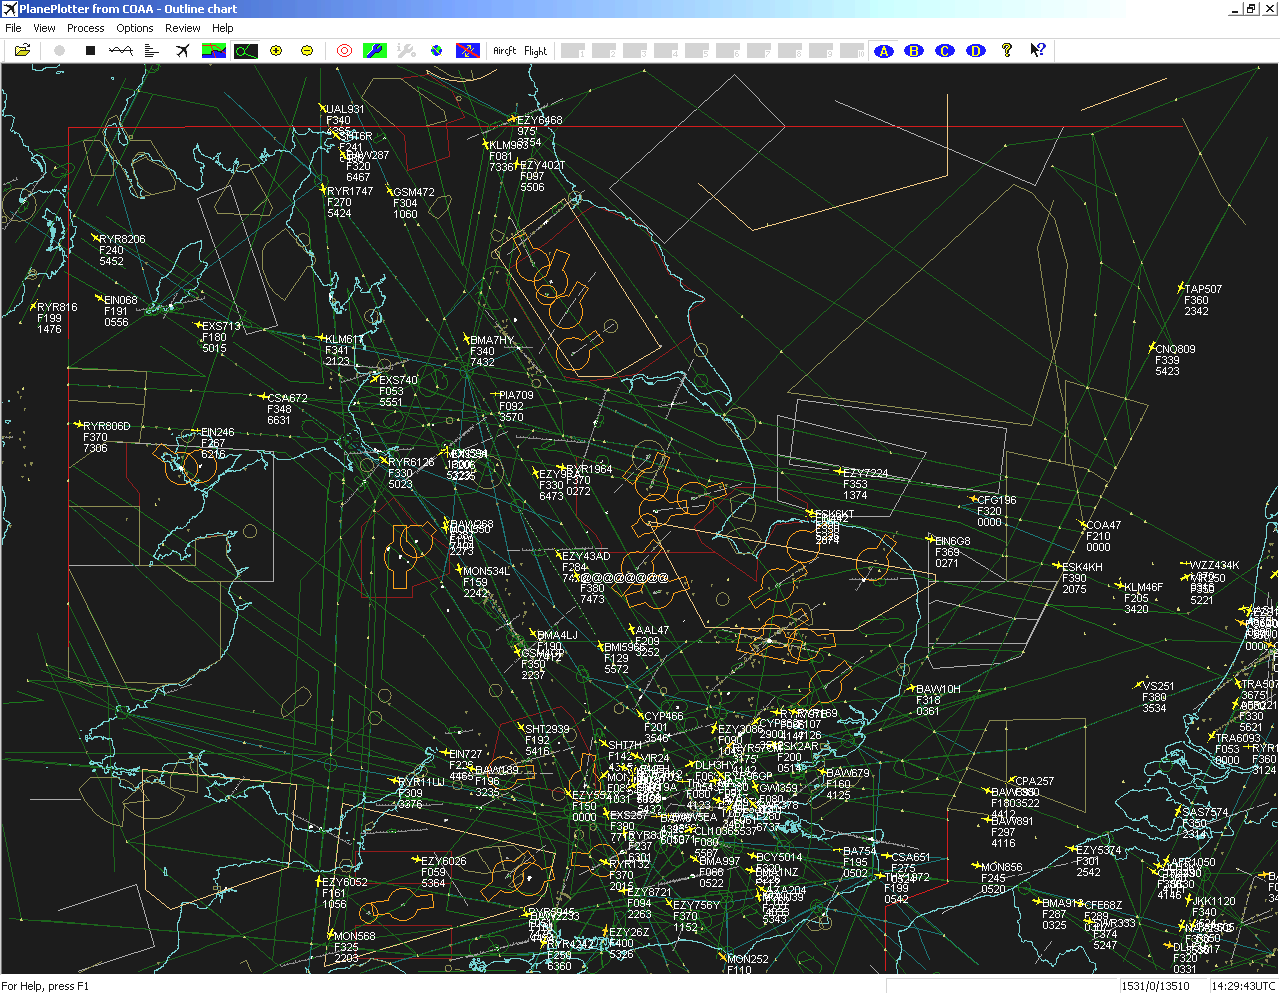
What you can do with PlanePlotter and the dump1090 program.

PlanePlotter from COAA is a well-established program taking input from a variety of receivers, and which can also operate with Internet sharing.  Below is a sample animated screenshot kindly provided by John Locker showing what PlanePlotter can do.  Click the picture for a full-resolution animation.  This note is about using a low-cost TV receiver dongle and a Raspberry Pi as a very low cost remote receiver for PlanePlotter and similar programs.  The same DVB-T dongle can work directly on your PC using the Windows version of dump1090, which supersedes with the earlier highly valued RTL1090 software.  You'll find some more notes in Sopwith's blog post.

In the picture above, I show my own Raspberry Pi which I have fitted with a GPS receiver for highly accurate timekeeping, although this is not essential for this application.  I recommend the Uputronics GPS Expansion Board or Adafruit GPS receiver if you can't find a local supplier.

Click for a full-sized image.

The System - don't forget the antenna!

Typically, you will have a Windows PC running Plane Plotter, but you will want to get the antenna as high as possible with as clear a view as possible to maximise the range you can receive.  But at 1.09 GHz the cable loss can be quite significant, even if you use good-quality satellite TV cable, so an alternative is to place a small computer with the receiving stick close to the antenna, and connect that to Plane Plotter using a Wi-Fi link.  You could also use a USB extender cable but these can be problematic and have length limitations.  The Raspberry Pi can meet the requirements for such a small computer, and it's a fun project to learn something about the Raspberry Pi, and a little about Linux.

By the way, don't forget the antenna!  The supplied antenna with the TV receiver dongle is not optimised for 1.09 GHz use, and you should get better results from a dedicated antenna.  Graham Leighton has reported good results with this home-made antenna, and Moonraker and DPD will sell you antennas as well.  Other home-made antennas: coaxial collinear, wire collinear.  What matters is getting that antenna as high as possible with a clear view all round, ideally outside and not in the loft.

I have a FlightAware account - can I upload there?

Yes!  FlightAware have released PiAware, their dump1090 client for FlightAware - see: https://flightaware.com/adsb/piaware/

It’s a simple package that connects to an existing dump1090 instance and sends the data to FlightAware over an encrypted channel, authenticated with an existing FlightAware account.  It works well, and doesn't provide a significant extra load on the Raspberry Pi.

Note!  This is a Snapshot!

Please note that this information started as notes in 2013.  Of course, the developments in the Raspberry Pi hardware, and the Linux OS variant used by the Raspberry Pi mean that at least some of this information will be out-of-date and some will be wrong as the new versions are not 100% backwards compatible.  Please let me know of anything you find which needs updating, or could be better explained.  Thanks!
 

The following information is mostly from Malcolm Robb, attavionics [at] btconnect [dot] com

Introduction

I have tonight [2013-Apr-06] uploaded a version of dump1090.c into the file shares section which I hope will implement GS/MU capability when used on a Raspberry Pi, running Raspbian Wheezy.  The file is called dump1090_06_04_2013.c. This is a work in progress - the suffix to the file indicates the date it's posted.

Note: If you are already and approved GS/MU then you should turn OFF your sharing of data until Bev/TheTeam approves and re-validates any hardware changes you make to your system.  You don't want to be feeding duff data into the system.

Note: This is NOT a windows program, and cannot be compiled or run on windows without some significant changes.  What this program does is attempt to replicate the RTL1090.exe program for RTL2832 dongles on a Raspberry Pi.  If you don't know what a Raspberry Pi is, then the file is unlikely to be any use to you.  [djt note: the program may work on other Linux systems as well.]

The Raspberry Pi (RPi for short) is small cheap (around £30) single board computer which supports 2 USB ports, and one Ethernet port.  The intention is that you plug an RTL2832 dongle into one of the USB ports.  You then connect the Raspberry Pi to your local/Home network either hardwired (via the Ethernet port), or by WiFi using an USB Ethernet dongle in the second USB socket.  The only other required connection is a 5v power supply. If you use a WiFi dongle, then it is possible to mount the RPi up on the roof very close to your ADS-B antenna.  This then means you don't have to run yards of lossy/expensive RF coax cable from the rooftop to your computer, so you should get better reception sensitivity.

In addition to the RPi itself, you'll also need an RTL dongle and aerial, an RPi power supply, and either a USB WiFi dongle or an Ethernet cable.  To set things up, you'll also need a USB Hub, a USB keyboard, a USB mouse, and a cable to connect the RPi to a suitable monitor - HDMI probably.  Note that you don't need those for operating - just for setup - so you can borrow them from somewhere else for the few minutes of setup.  Maplins sell the whole kit and caboodle (excluding the RTL dongle and Monitor) for £70.

Dump1090 is a relatively new software project.  [Note: operation as a Ground Station for Mlat is now supported with the ppup1090 program.]  The main changes I have introduced so far are:

  • Added a new command line switch, "--net-beast".  This causes the output from Dump1090 to be in Beast binary format, containing the 6 byte timestamp data.
  • Implemented a timestamp counter for Mlat/GS use.  The timestamp has a 500 nS (2 MHz) granularity.
  • Tidied up the code a bit to make it easier for me to understand.  That doesn't necessarily mean it'll be easier for you to understand, of course!

What I have not done is modify the ADS-B/Mode-S detection algorithms.  Whilst playing with the software I have noticed that dump1090 misses quite a lot of the available Mode-S frames present in the data.  In some of my off air recorded files, it misses 30% or more, mainly due to the poor detection algorithm.  However, it does correctly receive strong local signals, so it's good enough as a starter.

Remote operation

djt notes:  As the aim here is to provide a remote feed to Plane Plotter, perhaps we should say a little about remote operation.  You don't need to have a keyboard, mouse and display to set up the Raspberry Pi providing the Linux you install as been configured to allow SSH - a remote secure shell which runs over the network.  You can use SSH via a LAN connection initially with a program like PuTTY installed on your PC.  You can do everything described here directly from the command-line.  Once you have PuTTY working over your hard-wired LAN connection, you can set up the Raspberry Pi with a Wi-Fi dongle and run the device wirelessly.

The NOOBS software, however, does require a keyboard and HDMI display just for the initial configuration.  Choose the Raspbian operating system. Your house TV may well have an HDMI input you can borrow...

Setup with PuTTY is described here.

Setting up Wi-Fi from the command-line is described here, although setup with the GUI works well on Raspbian Jessie.

Using a single Ethernet cable from Raspberry Pi directly to your Netbook or laptop PC is described here.  This avoids the need to have a spare port on your LAN router or switch, and to have a power-consuming Wi-Fi dongle attached to the Raspberry Pi.  Your PC can still talk to the Internet over its own Wi-Fi link. Thanks to Fred Hillhouse N7FMH for spotting that page.

Roger House notes: I am just building a Raspberry Pi 3 to use with my new Airspy and had an issue trying to connect it to my Wi-Fi.  It seems that out of the box the Wi-Fi is only setup to use channels 1 to 11, but my Virgin Media Super Hub uses channels 1 to 13.  I found the following on the Web that has resolved the issue and now allows me to connect to channel 13.

http://tosbourn.com/get-channels-12-and-13-on-the-raspberry-pi-3/

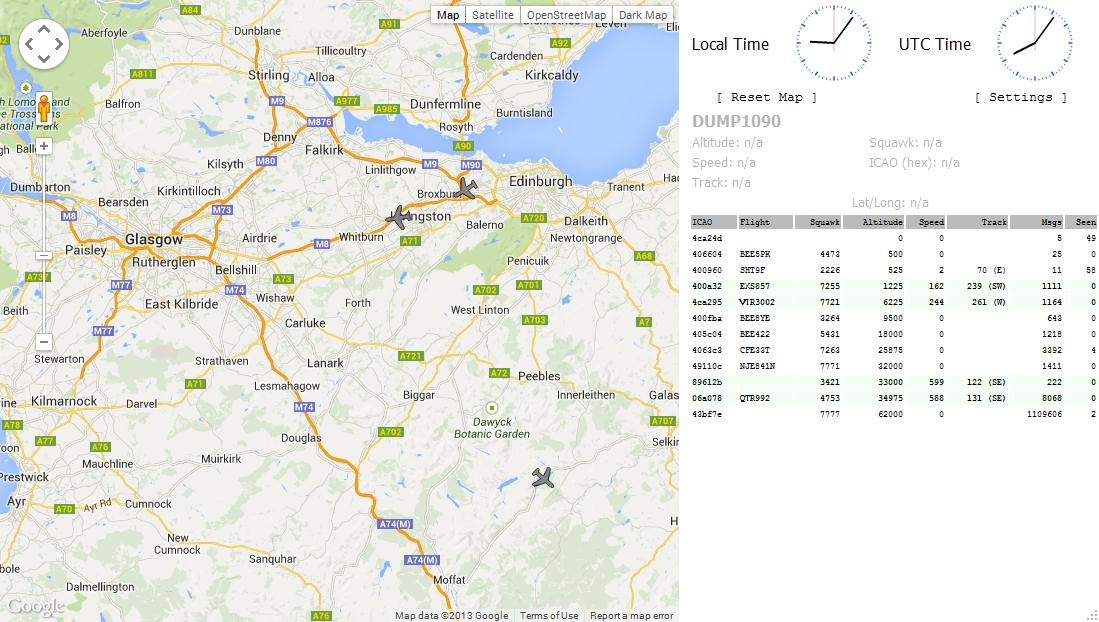
Remote Web output from the dump1090 program

The dump1090 program when running on the Raspberry Pi, can also produce a rather nice plot on a Web browser running on your local network (PC, Linux or Mac).  You might also like to use this as a check that the dump1090 program is still running as expected, and that the TCP/IP link is still up on your Raspberry Pi. Simply enter the URL:

http://<address-or-name-of-Raspberry-Pi>:8080

where the address can be a number or a name, e.g.

http://192.168.0.19:8080

Click the image for a larger version.

Preparing the Raspberry Pi

Please note I'm not any kind of RPi/Linux guru - my first contact with it was 6 days ago.  If you have RPi/Linux questions, you'll probably need to ask someone else.  In the lines below, can highlight the command required, use Ctrl-C or right-click Copy to get the text into the clipboard, and then if you use PuTTY you can right-click on the text area of the terminal session to enter the command into the Raspberry Pi.  To use the software, do the following (tested on Linux 3.6.11 and NOOBS/Raspbian 3.12.22+).

[djt: If you need help with your Raspberry Pi and following the instructions below, please ask on the Plane Plotter group.  I am unable to answer direct e-mails about using the Raspberry Pi for ADB-S reception.]

  1. I suggest you start with a new/clean SD Card.  Download the latest NOOBS software (or Raspbian Wheezy OS), and follow the instructions on preparing the SD card here:
    http://www.raspberrypi.org/downloads
  2. Get your RPi working in it's simplest form so that it can connect to the internet via your home network.
  3. If you don't want to bother with a keyboard and display, you can run your RPi headless as described here.
  4. Please note that during some of the following commands you may be prompted for Yes or No answers, perhaps about the disk space which will be used by the new download.  Unless specified otherwise here, simply accept the default answer, usually "Yes" (or "y").
  5. Open a command prompt and type:
    • sudo apt-get update

    This will update the table of updates to the latest revision.  This may take some time to complete.
    Hint: you can use the Copy clipboard function in Windows to copy a command from this Web page, and then right-click your PuTTY screen to enter the command into the RPi session.  Leave out the quotation marks when copying the text.
    It's an idea to check the Linux version at this point with a uname -a command. Initially, from a NOOBS install, mine was 3.6.11+, although on a second run, after an upgrade it was 3.10.23+, and after a third a day later it was 3.10.24+.

  6. Again at the command prompt type:
    • sudo apt-get upgrade

    This will update the operating system to the latest version, and may therefore take "some time".  Go and make a coffee! Note that upgrades after 2013-Dec-13 may overwrite the drivers required for the DVB-T USB stick.  Please see here if this happens to you.

    If, before any upgrade, your OS version shows as 3.6.11+ with the uname -a command I suggest leaving it without the upgrade.

  7. Next, at the command prompt type:
    • sudo apt-get install git-core

    This installs the git repository fetch code.  You may already have this installed, in which case you will get a message advising that you already have the most up-to-date version.  On the minimal Linux I started with "git" was not even present.

  8. Next, we will use the instructions to setup sdr-rtl which are given on this Web page.  We stop where the text says "To run the rtl server type rtl_tcp -a and the IP address of your Pi".  For your convenience, the instructions are copied below, and these are exactly what I typed into my Raspberry Pi.  You don't need to follow the instructions on the quoted Web page as well as what's below.  Step (9) below has been changed so that you no longer need the "sudo" commands to run the programs accessing the dongle.
     
    1. sudo apt-get install git
    2. sudo apt-get install cmake
    3. sudo apt-get install libusb-1.0-0-dev  # there is a slip on the referenced page
    4. sudo apt-get install build-essential
       
      You can put all those commands onto one line should you wish (thanks to Sam Reed for pointing this out):

      sudo apt-get install git git-core cmake libusb-1.0-0-dev build-essential

      although I prefer to do one command at a time in case there is an error, and you can see which step caused the problem.

      Now install theRTL-2832U USB dongle driver source and compile:

    5. git clone git://git.osmocom.org/rtl-sdr.git
    6. cd rtl-sdr
    7. mkdir build
    8. cd build
    9. cmake ../ -DINSTALL_UDEV_RULES=ON
    10. make

      Note that faster execution can be had on more recent Raspberry Pi models (B+, 3) by using four processors.
      The command becomes:  make -j5
    11. sudo make install
    12. sudo ldconfig

      if it was successful you should see no return on the previous command.
      Install the RTL-2832U USB dongle on external powered USB HUB.

      While many report using a powered USB hub, you may found the built-in ports adequate, if you have enough 5V power fed to the Raspberry Pi.  You may get different results, and possibly if you use the live plug-and-play will more likely need the hub.  I didn't need to plug and unplug the devices live, tested with a 1.5A supply, and intend to use a 2A supply from ModMyPi eventually.  If you plug in the dongle directly to the RPi and it spontaneously reboots, don't be surprised!  After an upgrade to 3.10 of Linux I also found that I needed a powered USB hub for correct working of the dongle.
        
    13. sudo ldconfig

      You should now do these steps to tell the system about what the new device is allowed to do, and reboot the system:
      cd ~
      sudo cp ./rtl-sdr/rtl-sdr.rules /etc/udev/rules.d/
      sudo reboot

  9. rtl_test -t

    The first time I tried this was with R802T tuner, and the test didn't work, saying it wanted an E4000 tuner.  As I happened to have an E4000 device, I carried on using it.  Further reading suggests that the test (-t) command is only intended to find the gap in the E4000 frequency coverage.  If you have a RTL-based dingle, omit the "-t".  I found no need for a reboot.  Some issues may arise here:
  • If you have used the more complex form of cmake in step 8.9 above when building rtl-sdr, you won't need the sudo prefix to run the dump1090 command in the future.  But you will still need sudo for the other commands where shown, like apt-get.
  • On most versions of Raspian except very early ones, you will need to "blacklist" the rtl2830 device to stop the OS using the DAB/TV drivers for the device.  The solution I found on Google was:
     
    • In /etc/modprobe.d create a new file with sudo, named no-rtl.conf (the actual name is not important, but the .conf is).

      cd /etc/modprobe.d
      sudo nano no-rtl.conf

       
    • Add the following lines to the new file:
       
      blacklist dvb_usb_rtl28xxu
      blacklist rtl2832
      blacklist rtl2830

       
    • The second and third lines might not even be necessary, but on the other hand can't harm either.
       
    • After a reboot dump1090 works again as intended.

You can now re-run the test if required:  

rtl_test -t

  • If you get error messages such as "cb transfer status: 1, canceling." it may be because the dongle is taking too much power from the Raspberry Pi.  I've not seen this with all the dongles I've tested, so I was caught out the first time it happened. You may be able to resolved this problem by putting the USB dongle on a separately powered USB hub. I used this one as it was to hand, but it's not critical.
     
  • At this point, you might want to calibrate the dongle you are using to know what the frequency offset is.  Usually, for ADS-B reception, the error which may be present is not critical. being up to 100 ppm (parts per million) which is a 100 KHz error at 1 GHz.  However, for best results you should calibrate the dongle and use the measured offset to get best results.  The easiest way to get a calibration is to use the kalibrate program, which I describe here.
  1. Now download the latest release dump1090 application source code.  We will use the instructions from this Web page.  We start following the instructions from about half way down the page where it says "git clone git://github.com/antirez/dump1090.git", which requires us to take these steps:
    1. cd /home/pi/
      or
      cd ~
      (goes to your home directory)
    2. git clone git://github.com/MalcolmRobb/dump1090.git
      (later, try: git clone https://github.com/antirez/dump1090)
    3. cd dump1090
    4. make
      [djt] I got errors at this point where pkg-config could not be found on my minimal Linux.  Installing pkg-config cured this problem, but if you had no errors from the
      make step you will not need not need to do steps 5 and 6.
    5. sudo apt-get install pkg-config
    6. make
  2. When you type "./dump1090 --interactive", if you've got everything installed, compiled and connected correctly then you should see a screen displaying aircraft being received by your RPi.  However, likely you will need to run this with privilege to allow the program to open the port. Note the double "--" if you are typing the command by hand, and note the "./" in front of the word "dump1090".

    ./dump1090 --interactive

If you want to see the output over the network at this point, remember to add the "--net" command-line switch:

./dump1090 --interactive --net

There has been one report from Marco Haakmeester that the file rtl-sdr.h and dump1090.c require changes to compile properly, but Malcolm was unable to reproduce the problem.  Contact Marco for more details if this affects you - I'll send his e-mail address on request.
 

Script for doing everything at once

Chris Jeffries has kindly contributed the following script to prepare your Raspberry Pi for using dump1090.  If you try the script, please report back to the PlanePlotter Group your success or otherwise.  Thanks to Chris for making this available.

On the Raspberry Pi, you can download the script here, then make it executable, and then run it with these three commands:

wget http://www.satsignal.eu/raspberry-pi/build-1090.sh
chmod +x build-1090.sh
./build-1090.sh
 

The box below shows what the script contains.  You could copy the text below to your clipboard:

#!/bin/bash
 sudo apt-get update
 sudo apt-get upgrade
 sudo printf 'blacklist dvb_usb_rtl28xxu\nblacklist rtl2832\nblacklist rtl2830' > /etc/modprobe.d/nortl.conf
 sudo apt-get install git-core
 sudo apt-get install git
 sudo apt-get install cmake
 sudo apt-get install libusb-1.0-0-dev  
 sudo apt-get install build-essential 
 git clone git://git.osmocom.org/rtl-sdr.git
 cd rtl-sdr
 mkdir build
 cd build
 cmake ../ -DINSTALL_UDEV_RULES=ON
 make
 sudo make install
 sudo ldconfig
 cd ~
 sudo cp ./rtl-sdr/rtl-sdr.rules /etc/udev/rules.d/
 git clone git://github.com/MalcolmRobb/dump1090.git
 cd dump1090
 make
 sudo reboot

.. and on the Raspberry Pi use nano to create a script:

    nano build-1090

Use the right-click mouse button to paste the contents of the clipboard into the script file you are creating (assuming you are using PuTTY to access the Raspberry Pi).  Once pasted, exit nano with a Crtl-X, answering "Y" to the do you want to save question.  Finally, you need to make the script executable using the chmod command:

    chmod +x build-1090

and execute it with full privilege:

    sudo ./build-1090

Thanks to Steve Tickle for those further notes.

Fred Hillhouse Jr (N7FMH) notes:

sudo printf 'blacklist dvb_usb_rtl28xxu\nblacklist rtl2832\nblacklist rtl2830' > /etc/modprobe.d/nortl.conf

It turns out that the above command did not work within the script.  I logged in as SU and entered the single line and then did reboot.  The dongle was then found.  I tried to start dump1090 immediately and was reminded that I needed to change the directory.

An alternative script to build the program is available from Roger House, who notes:

It has taken me two days but I believe I have not (now?) sorted all the issues with my build script.  I now have hosted it on www.github.com so it downloads in the correct format.  I have just built 3 SD cards which work straight away.  Here it is.  PLEASE make sure your RTL USB dongle is not plugged in until your pi reboots at the end of the script.

Please follow these instructions:-

git clone git://github.com/houser747/dump1090_buildscript.git
sudo chmod +x ./dump1090_buildscript/build1090.sh
./dump1090_buildscript/build1090.sh

Please advise any issues found.  Roger House  (roger.house@me.com)

Please note that to download Roger's script you will need git installed, so you first need to enter the command:

sudo apt-get install git

Of course, it's much more within the spirit of the Raspberry Pi to learn, and my personal feeling is that you learn more by entering the commands one at a time and watching what they do, than by running a script.....
 

Changes required for Plane Plotter Mlat (multi-lateration)

So that's Malcolm's version of dump1090 installed and running on your RPi.  This version already incorporates the changes required for a Plane Plotter Mlat Ground Station.

  1. Run the new version of dump1090 by typing:

    ./dump1090 --interactive --net
  2. You should see the same display as before on the RPi screen, but the extra command switches should enable a network server that will allow the PP software running on your PC to connect to the RPi.

[djt] notes: To reduce the amount of network traffic you can replace the --interactive with --quiet.

To run the command so that it continues to work after you logout from the Raspberry Pi, you can run a command with a trailing ampersand, such as:

  • ./dump1090 --quiet --no-fix --gain -10 --net &

Alternatively, for a reduced CPU and network I/O load:

  • ./dump1090 --quiet --no-fix --gain -10 --net --net-ro-size 500 --net-ro-rate 5 &

Note the "--no-fix" parameter to disable single-bit error correction, and the "--gain -10" parameter to set maximum gain.  Please ask in the PlanePlotter Group if you have problems as a result of using the gain parameter.  There will doubtless be better ways of doing this suggested by those more expert in Linux than I.  See the section below on automatic starting, for example.  If you intend to use the dump1090 program for Mlat, be sure to tell Bev so that he can set up the server correctly for you, as the timing for the various Mlat data sources can differ. [djt]

To find the IP address of your Raspberry Pi...

To enable Plane Plotter to talk to your Raspberry Pi, you will need to know its network address, or IP address.  You can find this out by entering the command:

  • ifconfig

Look for the line containing "inet addr:".  On my Wi-Fi connected RPi, that line is in a section "wlan0", which looks like this:

wlan0     Link encap:Ethernet  HWaddr 00:26:f2:aa:ff:ff
          inet addr:192.168.0.19  Bcast:192.168.0.255  Mask:255.255.255.0
          UP BROADCAST RUNNING MULTICAST  MTU:1500  Metric:1
          RX packets:3093550 errors:0 dropped:0 overruns:0 frame:0
          TX packets:1752901 errors:0 dropped:0 overruns:0 carrier:0
          collisions:0 txqueuelen:1000
          RX bytes:379098734 (361.5 MiB)  TX bytes:667598489 (636.6 MiB)

so you can see that the IP address is: 192.168.0.19.  On a LAN connected RPi, the information will be in the eth0 section.

eth0      Link encap:Ethernet  HWaddr b8:27:eb:e4:10:a9
          inet addr:192.168.0.111  Bcast:192.168.0.255  Mask:255.255.255.0
          UP BROADCAST RUNNING MULTICAST  MTU:1500  Metric:1
          RX packets:1852989 errors:0 dropped:125 overruns:0 frame:0
          TX packets:296245 errors:0 dropped:0 overruns:0 carrier:0
          collisions:0 txqueuelen:1000
          RX bytes:191447650 (182.5 MiB)  TX bytes:40837008 (38.9 MiB)

so you can see that the IP address is: 192.168.0.111.

Next, you need to configure Plane Plotter to talk to the RPi

  1. Start Plane Plotter on your PC.
  2. Select Options => Mode-S Receiver => RTL dongle RPi dump1090 => Setup TCP/IP client.
  3. In the window that appears, type in the IP address of your RPi on your local network, followed by ":30005".  For example, if your RPi appears as IP address 192.168.0.19 on your home network, so type in "192.168.0.19:30005".  Then click OK.
  4. Select Options => I/O settings.
  5. In the dialog that appears check the Input data, Mode-S/ADS-B box, and select "RTL > RPi+Dump1090" from the list window to the right.
  6. Press the green circle on the toolbar to start Plane Plotter monitoring.  The planes that are appearing on the RPi screen should now start to appear on your Plane Plotter screen.

Checking it's working using view1090.exe

Malcolm has released a Windows program which you can use to view the output of dump1090.  It's a command-line program, and has text output. You can download the program from:

https://github.com/MalcolmRobb/dump1090/blob/master/dump1090-win.1.10.3010.14.zip

by pressing the Raw button and saving the file.  You should right-click the downloaded view1090.exe, Properties, and press the Unblock button if it is visible.  This Windows program implements the --interactive screen as a separate application.  It connects to dump1090 over the same port as plane plotter does, so gets all the information that PP does.  To use the program, either create a shortcut with the requisite properties, or build a command file named e.g. run-view1090.cmd, which contains:

  • C:\> view1090.exe --net-bo-ipaddr <your_rpi_IPv4> --net-bo-port <your_rpi_port> --interactive-rows 60

i.e. on my system:

  • C:\> view1090.exe --net-bo-ipaddr raspi-3

You only need the --net-bo-port setting if you've configured your dump1090 command line switches using "--net-ro-port".

Double-click run-view1090.cmd to run the program, and use Ctrl-C to exit.

Keeping the Raspberry Pi's IP address across boots

Steve Tickle reminded us that as the IP address is hard-coded into Plane Plotter in the step above, you will need to make it constant across system reboots so that your Plane Plotter installation can find the Raspberry Pi every time.  The easiest way to do this may be to reserve an IP address in your router for the Raspberry Pi, which matches the MAC address of the Wi-Fi device (00:26:f2:aa:ff:ff in the example above) to a fixed IP address (192.168.0.19 in the above example).  Consult your router operations guide for information on how to do this.  An alternative may be to set the Raspberry Pi to a fixed (static) IP address as described here.

Note: you may need to edit the hosts file on your systems to allow access to the device by name rather than by IP address.  Add a line such as: 192.168.0.19 raspberry-pi-1 to the file.  On Windows-8, note that Windows Defender may try and replace an edited hosts file with the default one, thus removing your changes!  On Windows, the file to be edited is \Windows\system32\drivers\etc\hosts, and you will likely need Administrator access to edit that file.

.. and finally

Others will no doubt have suggestions on how to ease the installation - but as I said, my knowledge of RPi/Linux is minimal.

Cheers
Malcolm Robb

If you want the dump1090 program to run automatically every time your Raspberry Pi boots, please see the automated start/stop script below.

Recompiling a new version

First stop any dump1090 process which is running.  You can do this with the following commands, first checking whether you have a dump1090 process, and then killing it:

  • ps -e | grep dump1090
  • sudo killall dump1090

The ps -e shows all processes, ps alone would show just your processes.  Here's what the end of the list from ps -e looks like on one RPi.

 1870 tty5     00:00:00 getty
 1871 tty6     00:00:00 getty
 1980 ?        00:00:00 sudo
 1981 ?        10:43:09 dump1090
13832 ?        00:00:02 kworker/0:0
14209 ?        00:00:13 kworker/u:2

Alternatively, if you have installed the automated start/stop script, below, enter:

  • sudo /etc/init.d/dump1090.sh stop

Now follow these steps as you did before, with the additional step of moving (mv) the existing dump0190 directory to a safety copy, here named dump1090-001.  For your next recompile when dump1090-001 will already exist, your might want to use dump1090-002, and so on.  Note that if you are also running ppup1090 to send your output to Plane Plotter (and if you aren't, why not!), then you also need to copy the customised coaa.h which you have been sent to replace the newly downloaded file.

  • cd /home/pi/
  • mv dump1090 dump1090-001
  • git clone git://github.com/MalcolmRobb/dump1090.git
  • cd dump1090
  • cp ../coaa.h . # if you are also running ppup1090
  • make

Now you can start the program and logout.  Use one of the two following commands according to your needs:

  • ./dump1090 --quiet --no-fix --gain -10 --net &
  • ./dump1090 --quiet --no-fix --gain -10 --net --net-ro-size 500 --net-ro-rate 5 &

Just type logout after starting the program.  Alternatively, if you have installed the automated start/stop script below, enter:

  • sudo /etc/init.d/dump1090.sh start

How do I know what version I am running?

Run the command:

  • ./dump1090 --help

If you have just logged in, you will need to change to the dump1090 directory first, or run the following command from your home directory:

  • dump1090/dump1090 --help
Date Version Release notes
2013-Apr-14 1.00.1404.13 * Add version number to help output screen.
* Add --net-ro-size command line switch. This defines the minimum size of packets written to the Ethernet in raw data output modes. The default is 0, so the program will send all packets as soon as they arrive. If you suffer from high network load due to lots of small packets, invoke this switch with a parameter between 100 and 1300.
*
SBS-1 ASCII output changes suggested by JungleJet/Jetvision. Apparently, this makes the output more compatible with Plane Plotter and RTL1090.
2013-Apr-15 1.01.1504.13 * Added --net-ro-rate command line switch. The default is 0. This works in conjunction with --net-ro-size. The program will attempt to gather up net-ro-size raw bytes before sending them out over Ethernet. However, to avoid a long wait if the traffic density is very low, the program will only wait for net-ro-rate 64 millisecond periods since the last send before sending any data added to the output buffer since the last send. This allows the user to tailor the network load to suit their requirements.
* Print out the SI/II when decoding DF-11.
* Stop attempting to error correct DF-11 frames.
* Correct final CR-LF added to SBS-1 ASCII output.
* A few other tweaks aimed at reducing CPU load.
2013-Apr-19 1.01.1924.13 * Fix bug in the Raw Binary beast output format. I had the signal strength byte before the MLAT time-tags, not after. Oops!
2013-Apr-22 1.02.2204.13 * Added --modeac command line switch, first attempt at decoding legacy SSR Modes A and C. If the command line switch --modeac is used, the program will now attempt to recover Mode A/C signals contained in the raw I/Q data stream. The current recovery mechanism is quite strict and does not cope well with overlapping and corrupt SSR replies. I estimate that less than 20% of possible returns are decoded correctly. I hope that over the next few iterations this can be improved. If outputting raw data over an Ethernet link it is recommended to also use the --net-ro-size and --net-ro-rate command line options to reduce the number of very small Ethernet packets that will be generated by mode A/C replies.
When the --interactive switch is used, the software attempts to match the Mode A and Mode C replies to known Mode S records. If no match is found, after a fixed number of receptions (4 for Mode A, 127 for Mode C) the raw Mode A/C will be displayed with an ICAO prefix of "FF" added to the records. So a Mode A of 3351 will be displayed as FF3351. You should note that it is not possible to positively distinguish all Mode A values from Mode C ones, so there may well be unexpected entries. There are 4096 possible Mode A codes, whilst there are less than 450 likely Mode Cs. However, it appears that, in the UK at least, Mode A codes are deliberately chosen so that they don't clash with possible Mode C Altitude codes.
To make sure Plane Plotter is receiving Modes A, C and S, open the View => Message rates window. The Mode A/C message rate is shown in blue. To see Mode A in Plane Plotter, use the View => Aircraft List Display Options => Mode A/C => List Mode A/C Squawks, and tick it to on. Mode A data will appear in your Aircraft View windows with ICAOs preceded by XX. To see the Mode C in PP, use the View => Mode-C Altitudes Window. The Green dots are Mode C.
14-May-2013 1.06.1405.13 Version update for terribl and bdavenport's combined changes
19-Aug-2013 1.07.1908.13 Split into separate modules and remove some local filtering.
04-Oct-2013 1.07.0410.13 Extra list decoding for DF-0 and DF-16, bug-fix in position decoding, DF-11 SI/II Detection changes.
07-Oct-2013 1.07.0710.13 Makefile updates, add ppup1090 program.
24-Feb-2014 1.08.2302.14 (Malcolm writes) I hope this will fix the following problems that may have been affecting the reliability of MLAT and Beamfinder operation.

1) Missing blocks cause timestamp slips
2) Incorrect beast binary input/output handling of 0x1a escape characters

If you chose to update to this version, and if you're running the ppup109 uploader, please make sure you re-compile both the main dump1090 and ppup1090. The new dump1090 won't work with the old ppup1090. There are no additional command line switches, so your existing startup scripts should still work.
10-Mar-2014 1.08.1003.14 Adds heartbeat to try and prevent Plane Plotter for making repeated TCP connection attempts.
27-May-2014 1.08.2705.14 1) Additional command line option "--net-buffer <n>" to specify the TCP output buffer size.  Default is n=0, which is 64Kb.   Specify a value of n to increase the buffer size according to: Size = 64Kb * 2^n, so an n of 1 = 128Kb, n=2 is 256Kb etc. n is limited to 7, so the max size is 8Mb.  This option may assist if you have a high number of aircraft being received, and an unreliable network connection, or if the receiving end can be busy for an extended time.
2) Bug fix in ppup1090 which prevented the uploading of valid Mode-A/Squawk codes
3) Bug fix per Markus Grab's commit. May produce a very, very, infinitesimally small increase in message rate.
30-Oct-2014 1.10.3010.14 Updates for the Windows version, other enhancements.

Full details of these and all other updates are available here.

Automated update to a new version

Roger Peggram, G7RUH, has kindly provided a documented script which will automate updating of the program.  I have put the script and Roger's note into this Zip file (updated to V1.1, 2014-Oct-21).

Roger writes: Attached is a script file I wrote for a potential user who is not really computer literate.  I did it so the dump1090 program can be backed up and updated just by running the script.  As you can see it has a little error detection built in. I have commented the script so it should be self-explanatory.

Assuming you have downloaded all the required packages then running this script will download current version of the code from GIT and compile it.  It first makes a backup, just in case the compile/download process fails.  The idea being it should "just work" and if it does not or gives an error then the end user should seek help from the person who installed it.  I don't expect the user to fix the problems unless, of course they are more knowledgeable than the intended end-user.

If you think it worthy, please feel free to use it and make it available on the web page or via git.  I don't claim to be an expert script writer, having just got back to "cutting code" after a gap of some 30 years.  I am happy to accept comments, updates, suggestions and (low temperature) flames!  I am fairly sure I have tested for all possible errors, but you never know!

Just my way of saying thank-you for a simple to use bit of code for a cost-effective ASDB radar solution on a Raspberry Pi.

Starting the dump1090 program automatically

Here is some information kindly provided by Steve Tickle, who notes that he is a Linux user, as opposed to a Linux guru...

Steve writes: Basically, you would run the program as a daemon, which is broadly equivalent to a service, in Windows parlance.  What that means is that a program can run without a user having to be logged in to start and stop it.  So what we'll do is create a little script which is run when the RPi boots and which in turn will start our dump1090 program.  Linux has 6 run levels so we'll then create a number of shortcuts which cause the script (and therefore dump1090) to start or stop according to which run level Linux is booting into or if it's shutting down.

The assumptions I'll make are that the directory dump1090 executable lives in is /home/pi/dump1090 and the command-line switches are the ones that Malcolm first used in his example.

First create the script with the command:

  • sudo nano /etc/init.d/dump1090.sh

Now copy and paste the following into the new file:

#!/bin/bash
### BEGIN INIT INFO
#
# Provides:		dump1090
# Required-Start:	$remote_fs
# Required-Stop:	$remote_fs
# Default-Start:	2 3 4 5
# Default-Stop:		0 1 6
# Short-Description:	dump1090 initscript

#
### END INIT INFO
## Fill in name of program here.
PROG="dump1090"
PROG_PATH="/home/pi/dump1090"
PROG_ARGS="--interactive --net --no-fix --net-ro-size 500 --net-ro-rate 5 --net-heartbeat 60 --gain -10"
PIDFILE="/var/run/dump1090.pid"

start() {
      if [ -e $PIDFILE ]; then
          ## Program is running, exit with error.
          echo "Error! $PROG is currently running!" 1>&2
          exit 1
      else
          ## Change from /dev/null to something like /var/log/$PROG if you want to save output.
          cd $PROG_PATH
          ./$PROG $PROG_ARGS 2>&1 >/dev/null &
          echo "$PROG started"
          touch $PIDFILE
      fi
}

stop() {
      if [ -e $PIDFILE ]; then
          ## Program is running, so stop it
         echo "$PROG is running"
         killall $PROG
         rm -f $PIDFILE
         echo "$PROG stopped"
      else
          ## Program is not running, exit with error.
          echo "Error! $PROG not started!" 1>&2
          exit 1
      fi
}

## Check to see if we are running as root first.
## Found at http://www.cyberciti.biz/tips/shell-root-user-check-script.html
if [ "$(id -u)" != "0" ]; then
      echo "This script must be run as root" 1>&2
      exit 1
fi

case "$1" in
      start)
          start
          exit 0
      ;;
      stop)
          stop
          exit 0
      ;;
      reload|restart|force-reload)
          stop
          start
          exit 0
      ;;
      **)
          echo "Usage: $0 {start|stop|reload}" 1>&2
          exit 1
      ;;
esac
exit 0

Now we make this file executable with the following command:

  • sudo chmod +x /etc/init.d/dump1090.sh

Now we create the runlevel shortcuts with the command:

  • sudo update-rc.d dump1090.sh defaults

And that's about it. If we reboot the RPi it will start dump1090 automatically.  If we later log into the RPi, we can stop or restart dump1090 with the commands:

  • sudo /etc/init.d/dump1090.sh stop

or

  • sudo /etc/init.d/dump1090.sh start

    E&OE as they say!

Oh, and it you want to remove dump1090 as a service, try:

  • sudo update-rc.d -f dump1090.sh remove

Uploading to the Plane Plotter server directly from the Raspberry Pi

Getting started - posted by Malcolm in the Plane Plotter group

I think we're ready to try a basic uploader. However please note the following words of caution:

  1. It will only work on a Raspberry Pi or similar system running Raspian Linux.  It is very unlikely to work on other systems.
  2. The uploader does not currently support Master User (MU) operation, but can provide data for Mlat (multilateration).
  3. You can continue to connect to your RPi from your PC and upload from the PC as normal.  If you are a GS/MU you can still do Mlats/SMU and all the stuff you used to do. No changes should be required at the PC end.

Ok - To use the uploader do the following:

  1. Update your dump1090 installation with the latest github source.  Recompile everything and restart dump1090.  The current version is 1.07.0610.13. (i.e. 6 October 2013).
  2. Make sure the new dump1090 is working with Plane Plotter as normal.
  3. You must then go to http://www.coaa.co.uk/rpi-request.htm and enter your details, and the co-ordinates of your RPi, or more specifically your antenna.  You will then be e-mailed your own personal copy of a file called coaa.h.  Copy this file to your home directory for safe keeping, and also to the directory containing your dump1090 code to overwrite the dummy version supplied in the download.
  4. At the RPi command prompt type "make -f makeppup1090".  Note that you will need to be in the dump1090 directory.  This should recompile a program called ppup1090 (ppup stands for plane plotter upload).  If you haven't downloaded you own version of coaa.h (step3) you will get errors here.
  5. Once compiled error free, at the command prompt type "./ppup1090".  This should start ppup1090 running, and you will get a countdown message till the next upload.  Uploads occur every 60 seconds, and you should get a count of the number of aircraft uploaded, with position and positionless, and a status message giving you an Ok message and a time.  It can also print out some cryptic error codes if you are doing something wrong, or attempting to abuse the PP system. You will have to contact me to know what they mean.  Some of them indicate that you have fiddled with code that you should not have!

Notes

ppup1090 must be started after dump1090.  If dump1090 is not running when you attempt to run ppup1090 then ppup1090 will terminate.

If ppup1090 is being run on the same RPi as the main dump1090, then no command line arguments should be necessary.  ppup1090 defaults to connecting to dump1090 via 127.0.0.1:30005, which is the loopback IP address and default beast output port.

However, if you're running dump1090 on a separate RPi, then yes, you do need to specify the IP address of the RPi running dump1090.  And if you're running dump1090 with a different beast output port to the default (30005) then you also need to specify that. The command line in either case should be something like:

ppup1090 --net-bo-ipaddr <IPv4> --net-bo-port <port>

Anyway, give it a go and see what happens.  I'm not claiming it'll be an easy install, and there may well still be issues, but hopefully it should give those of us with remote RPi installs the ability to upload to PP 24/7.

If you get errors, please post (on the PlanePlotter Group) the exact command line arguments you're using for both dump1090 and ppup1090, together with any error messages and I'll attempt to work out what is going on.

Compiling

Malcolm has created separate makefiles for dump1090, view1090 and ppup1090, and these can be run with the command line "make -f makedump1090", "make -f makeview1090" and "make -f makeppup1090".  Running the make command on its own creates just dump1090 and view1090.

Once compiled error free, at the command prompt type "./ppup1090 &".  This runs the program in the background and allows it to continue running after you log out.

Checking it's working....

Look at the personalised coaa.h you were sent (use the cat command), and you will see a hex authorisation code - something like 123abc.  Substitute that hex string in the URL:

http://www.coaa.co.uk/rpiusers.php?authcode=123abc

and you should get a report like this:

PlanePlotter installation 123321
Time last accessed (UTC) User Count Last acft up Tot acft up Share code Valid GS
2012-01-12 12:34:56 <your-name> 444806 14 4177369 AA yes

Sample startup-script for both dump1090 and ppup1090

Steve Tickle has kindly supplied this script to start both the dump1090 program and the ppup1090 program when the Raspberry pi starts running.  You can create it as discussed above in /etc/init.d/dump1090.sh

[DJT] There could be errors in the script below - please use with caution. I modified it slightly from Steve's original.  I have also placed this file in the Plane Plotter Group's Files area as dump1090.sh.txt in case the download from scraping this Web page proves faulty.

[DJT] Paul Gulliver noted that there's an alternative way mentioned here.  Look for section (3) "Make ppup1090 to auto-start at boot".

#!/bin/bash
### BEGIN INIT INFO
#
# Provides:             dump1090
# Required-Start:       $remote_fs
# Required-Stop:        $remote_fs
# Default-Start:        2 3 4 5
# Default-Stop:         0 1 6
# Short-Description:    dump1090 initscript

#
### END INIT INFO
## Fill in name of program here.
PROG="dump1090"
PROG_PATH="/home/pi/dump1090"
PROG_ARGS="--quiet  --no-fix --gain -10 --net --net-ro-size 500 --net-ro-rate 5  --net-heartbeat 60"
PIDFILE="/var/run/$PROG.pid"

PROG2="ppup1090"
PROG2_ARGS="--quiet"
PIDFILE2="/var/run/$PROG2.pid"
DELAY=5

start() {
      if [ -e $PIDFILE ]; then
          ## Program is running, exit with error.
          echo "Error! $PROG is currently running!" 1>&2
          exit 1
      else
          ## Change from /dev/null to something like /var/log/$PROG if you want to save output.
          cd $PROG_PATH
          ./$PROG $PROG_ARGS 2>&1 >/dev/null &
          echo "$PROG started, waiting $DELAY seconds..."
          touch $PIDFILE
          sleep $DELAY
          echo "Attempting to start $PROG2..."
          ./$PROG2 $PROG2_ARGS 2>&1 >/dev/null &
          echo "$PROG2 started"
          touch $PIDFILE2
      fi
}

stop() {
      if [ -e $PIDFILE ]; then
          ## Program is running, so stop it
         echo "$PROG is running"
         killall $PROG2
         killall $PROG
         rm -f $PIDFILE2
         rm -f $PIDFILE
         echo "$PROG stopped"
      else
          ## Program is not running, exit with error.
          echo "Error! $PROG not started!" 1>&2
          exit 1
      fi
}

## Check to see if we are running as root first.
## Found at http://www.cyberciti.biz/tips/shell-root-user-check-script.html
if [ "$(id -u)" != "0" ]; then
      echo "This script must be run as root" 1>&2
      exit 1
fi

case "$1" in
      start)
          start
          exit 0
      ;;
      stop)
          stop
          exit 0
      ;;
      reload|restart|force-reload)
          stop
          start
          exit 0
      ;;
      **)
          echo "Usage: $0 {start|stop|reload}" 1>&2
          exit 1
      ;;
esac

#

Earlier version which may not download correctly....
#! /bin/sh
### BEGIN INIT INFO
# Provides: rc.local
# Required-Start: $all
# Required-Stop:
# Default-Start: 2 3 4 5
# Default-Stop:
# Short-Description: Run /etc/rc.local if it exist
### END INIT INFO


PROG="dump1090"
PROG_PATH="/home/pi/dump1090"
PROG_ARGS="--quiet  --no-fix --gain -10  --net  --net-ro-size 500  --net-ro-rate 5 --net-heartbeat 60"
#PROG_ARGS=""
PIDFILE="/var/run/$PROG.pid"
PROG2="ppup1090"
PROG2_ARGS="--quiet"
PIDFILE2="/var/run/$PROG2.pid"
DELAY=5

start() {
    if [ -e $PIDFILE ]; then
        ## Program is running, exit with error.
        echo "Error! $PROG is currently running!" 1>&2
        exit 1
    else
        ## Change from /dev/null to something like /var/log/$PROG if you want$
        cd $PROG_PATH
        ./$PROG $PROG_ARGS 2>&1 >/dev/null &
        echo "$PROG started, waiting $DELAY seconds.."
        touch $PIDFILE
        sleep $DELAY
        echo "Attempting to start $PROG2.."
        ./$PROG2 $PROG2_ARGS 2>1 >/dev/null &
        echo "$PROG2 started"
        touch $PIDFILE2
    fi
}

stop() {
    if [ -e $PIDFILE ]; then
        ## Program is running, so stop it
        echo "$PROG is running"
        killall $PROG2
        killall $PROG
        rm -f $PIDFILE2
        rm -f $PIDFILE
        echo "$PROG stopped"
    else
        ## Program is not running, exit with error.
        echo "Error! $PROG not started!" 1>&2
        exit 1
    fi
}

## Check to see if we are running as root first.
## Found at http://www.cyberciti.biz/tips/shell-root-user-check-script.html
if [ "$(id -u)" != "0" ]; then
    echo "This script must be run as root" 1>&2
    exit 1
fi

case "$1" in
    start)
        start
        exit 0
    ;;
    stop)
        stop
        exit 0
    ;;
    reload|restart|force-reload)
        stop
        start
        exit 0
    ;;
    **)
        echo "Usage: $0 {start|stop|reload}" 1>&2
        exit 1
    ;;
esac
exit 0


Program parameters

Typing ./dump1090 --help produces the following output:

-----------------------------------------------------------------------------
|                        dump1090 ModeS Receiver         Ver : 1.10.3010.14 |
-----------------------------------------------------------------------------
--device-index <index>   Select RTL device (default: 0)
--gain <db>              Set gain (default: max gain. Use -10 for auto-gain)
--enable-agc             Enable the Automatic Gain Control (default: off)
--freq <hz>              Set frequency (default: 1090 Mhz)
--ifile <filename>       Read data from file (use '-' for stdin)
--interactive            Interactive mode refreshing data on screen
--interactive-rows <num> Max number of rows in interactive mode (default: 15)
--interactive-ttl <sec>  Remove from list if idle for <sec> (default: 60)
--interactive-rtl1090    Display flight table in RTL1090 format
--raw                    Show only messages hex values
--net                    Enable networking
--modeac                 Enable decoding of SSR Modes 3/A & 3/C
--net-beast              TCP raw output in Beast binary format
--net-only               Enable just networking, no RTL device or file used
--net-bind-address <ip>  IP address to bind to (default: Any; Use 127.0.0.1 for private)
--net-http-port <port>   HTTP server port (default: 8080)
--net-ri-port <port>     TCP raw input listen port  (default: 30001)
--net-ro-port <port>     TCP raw output listen port (default: 30002)
--net-sbs-port <port>    TCP BaseStation output listen port (default: 30003)
--net-bi-port <port>     TCP Beast input listen port  (default: 30004)
--net-bo-port <port>     TCP Beast output listen port (default: 30005)
--net-ro-size <size>     TCP raw output minimum size (default: 0)
--net-ro-rate <rate>     TCP raw output memory flush rate (default: 0)
--net-heartbeat <rate>   TCP heartbeat rate in seconds (default: 60 sec; 0 to disable)
--net-buffer <n>         TCP buffer size 64Kb * (2^n) (default: n=0, 64Kb)
--lat <latitude>         Reference/receiver latitude for surface posn (opt)
--lon <longitude>        Reference/receiver longitude for surface posn (opt)
--fix                    Enable single-bits error correction using CRC
--no-fix                 Disable single-bits error correction using CRC
--no-crc-check           Disable messages with broken CRC (discouraged)
--phase-enhance          Enable phase enhancement
--aggressive             More CPU for more messages (two bits fixes, ...)
--mlat                   display raw messages in Beast ascii mode
--stats                  With --ifile print stats at exit. No other output
--stats-every <seconds>  Show and reset stats every <seconds> seconds
--onlyaddr               Show only ICAO addresses (testing purposes)
--metric                 Use metric units (meters, km/h, ...)
--snip <level>           Strip IQ file removing samples < level
--debug <flags>          Debug mode (verbose), see README for details
--quiet                  Disable output to stdout. Use for daemon applications
--ppm <error>            Set receiver error in parts per million (default 0)
--help                   Show this help

Debug mode flags: d = Log frames decoded with errors
                  D = Log frames decoded with zero errors
                  c = Log frames with bad CRC
                  C = Log frames with good CRC
                  p = Log frames with bad preamble
                  n = Log network debugging info
                  j = Log frames to frames.js, loadable by debug.html


Network connection dropping

Al Henderson had been having problems with the network connection from his Raspberry Pi dropping out, but in late October 2013 he resolved it, and posted this note on the PlanePlotter Group:

For a few months now, I have been running a Raspberry Pi with the RTL dongle and dump1090 to feed PP.  It's never been 100% reliable, seeming to drop its Wi-Fi connection every so often which is frustrating.

I think I found out why last night.  A simple Google brought me to a number of pages that discussed how to turn off the power management on the Wi-Fi dongle (it's an Edimax 7811Un).  This dongle goes into power save when network traffic drops off, and getting it to wake up seems to be a problem. Certainly Plane Plotter trying to re-establish it's TCP/IP link doesn't appear to do it.

To try and sort this problem, I did two things (although either one of them should suffice).  Firstly, I put an entry in the cron file on the Pi to ping my router every minute - this should keep the network alive and stop the dongle going into power saving.  Secondly, I turned power saving off for the dongle.  This part was specific to the model of dongle, in case anyone else has the same one, here's what I did:

- created a file called /etc/modprobe.d/8192cu.conf
- added the line: options 8192cu rtw_power_mgnt=0 rtw_enusbss=0

I did the former because I didn't have complete confidence in doing the latter - the page I was looking at didn't say if you had to do anything else to make that happen.

This seems to have done the job, my Pi has now been running for 12 hours uninterrupted which is something it hasn't done for a long time.  The drop outs got worse the other week when I changed the dump1090 options to reduce network load - clearly making the dongle fall asleep more often!

Thanks for posting that information, Al. I may not have seen the problem as both NTP and MRTG will regularly make network connections.

Running two Raspberry Pi cards on different sides of the house

Folks who have limited coverage have asked about running two Raspberry Pi cards with dongles, with antennas pointed in different directions from a single location, or perhaps one from an east-facing and one from a west-facing window.  Note that these must be at the same location - not two different locations connected by the Internet!  A helpful note was posted here (was: message 91820) by Marco showing how to use the Linux nc command to achieve this. Many thanks to Marco! He writes:

So here's my write up regarding a dual receiver using two Raspberry Pi cards, with some amendments since the original post back in December.

With a spare RPi lying idle on my desk I started wondering if I could use this somehow for a second antenna, as a simple way to get 360 degrees antenna coverage.

After a bit of online research I found it is actually very easy to use two Raspberry Pi cards, each with their own dongle and antenna. Here's how it can be done:

Two Raspberry Pi cards with dump1090 installed as usual, both network connected.  We will just for clarity call one of them PRIMARY and the other SECONDARY.  PlanePlotter connects to the PRIMARY Pi as usual (over port 30005) without any additional configuration in PlanePlotter needed.  Nor does the SECONDARY unit need any additional configuration.  Only on the PRIMARY, this line will fetch data from the SECONDARY dump1090 and inject it into the PRIMARY dump1090:

nc -d <secondary ip address> 30005 | nc 127.0.0.1 30004 &

Of course replace "<secondary ip address>" with the actual IP address of that RPi.  Entering this on the command line will do the trick, but if this setup is going to be permanent it should be in a startup script.

How does it work?  nc is short for netcat, a very handy set of Linux network commands.  First we fetch data from the remote RPi, on port 30005 (TCP output port in Beast format).  The "-d" is there to prevent the connection is broken by any keyboard input.  Next we pipe this data to the local IP address on port 30004 (TCP input port in Beast format).  Finally the & is used to let it run in the background.

With both Raspberry Pi cards linked, the view1090 program can still be used on both.  On the SECONDARY it shows only the messages received by that Pi, but on the PRIMARY it will show not only its own received messages but also the messages received from the SECONDARY.  That the setup is working can thus be tested very simply by alternately disconnecting one antenna from its dongle (just the antenna, do not unplug the dongle).  With the PRIMARY antenna disconnected, view1090 on the PRIMARY will (after a short while) show the same messages as on the SECONDARY view1090.

After some testing and using this setup for several weeks, I only found one drawback: when the netcat commands are executed on the PRIMARY, dump1090 on the SECONDARY must already be up and running and available on the network, otherwise the linking will fail.  Also, whenever the connection gets interrupted the link breaks and will not automatically restore.  Dump1090 on the PRIMARY will continue to function without any problems, regardless of the link being active or not.  In my setup, the connection is very stable and only is lost when one or both Raspberry Pi cards reboot.  Therefore on the PRIMARY if have added the netcat command line in my dump1090 startup script with a 2 or 3 second delay after starting dump1090 itself, and making sure that should the Raspberry Pi cards be rebooting I first reboot the SECONDARY and then the PRIMARY.

You can always check on the PRIMARY if the link is active, with the 'ps aux' command there should be two nc processes active.  Also the 'top' command will intermittently show the nc processes.

Not tested, but I'm 95% sure that the ppup1090 program on the PRIMARY (if used) will also upload the data fed in from the SECONDARY.

I'm not saying it would make much sense, but more than one SECONDARY can be used, just add the netcat command line for each SECONDARY on the PRIMARY.  Do NOT use remote SECONDARY antenna's (i.e. over a WAN connection) because the antenna's would not be in the same location anymore and you will mess up the system, I think...

Any feedback is much appreciated! (feedback can be given on the PlanePlotter Group)

Regards,
Marco
 

Integration with monit

Simon Hitzemann writes: Many thanks for the great write-up on how to get dump1090 running on a Raspberry Pi.

While everything worked like a charm an integration with monit on monitoring the dump1090 service was a bit tough, so I put together an init-script that's a bit nicer to integrate into monitoring solutions while being Debian/Raspbian compliant.

I'm using start-stop-daemon in it a lot, it basically implements a lot of the functionality of the original script.  It's even writing the PID of the process into the PID file and if you try to start it again it either notices the PID exists and does nothing or it spawns a new process and puts the new PID into the file.

Long story short, here's the init script. I hope it helps :)  download a Zip file with the script

Cheers,
Simon
  

Some useful Linux commands

To logout:

  • logout

To shutdown - which you should do to close the system cleanly before powering off - use shutdown. The -P argument turns the power off, now says shutdown immediately:

  • sudo shutdown -h -P now

To reboot:

  • sudo reboot

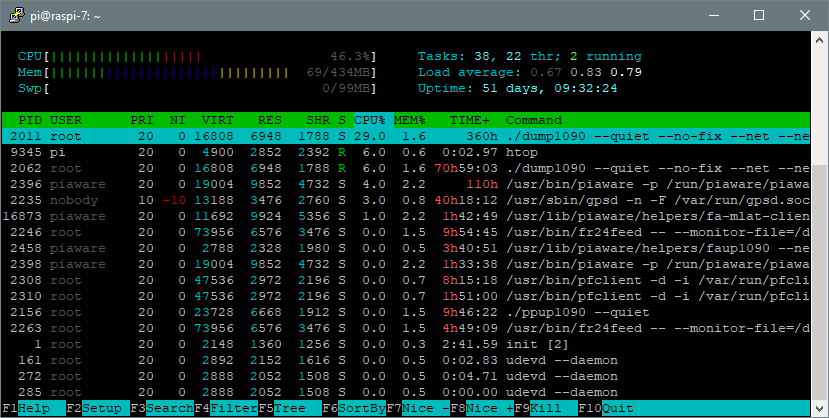
To display processes running and their CPU load, memory consumption etc.

  • htop


Note that you may need to install htop with a sudo apt-get install htop, but you can see that it's worth it!

 
An alternative approach

Perhaps the next step might be to get a better receiver, such as the Airspy.  This can be used with the Raspberry Pi to provide better performance than the DVB-T dongle provides.  Details are here.

 
Acknowledgements

To Malcolm Robb for the original post, and to Steve Tickle and others for much-needed help with Linux.

 
What else have I done with the Raspberry Pi?

  • A stratum-1 NTP server with microsecond-level offsets and a power consumption of under 4 watts.  Information about interfacing a GPS receiver to the Raspberry Pi, choosing between various receiver options, and how to compile NTP from the source.  I hope you will find the page interesting, and perhaps build a GPS-locked stratum-1 NTP server yourself.
  • A Digital Wall clock using the Raspberry Pi - synchronised with NTP, of course!  This shows how to automatically login on the Raspberry Pi, how to run a GUI program when starting the desktop, and provides pointers to installing the Free Pascal compiler and Lazarus IDE to compile your own programs.

What do the terms GS, Mlat, MU, SMU, ADS-B etc. mean?

A small glossary of the terms used may be found here.

 
Copyright © David Taylor, Edinburgh   Last modified: 2023 Jun 06 at 17:24