


|
|
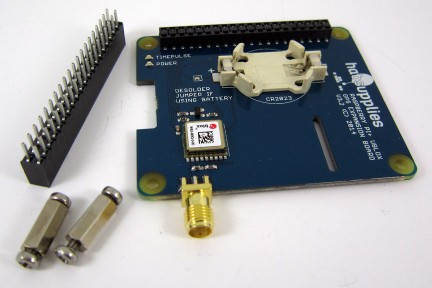
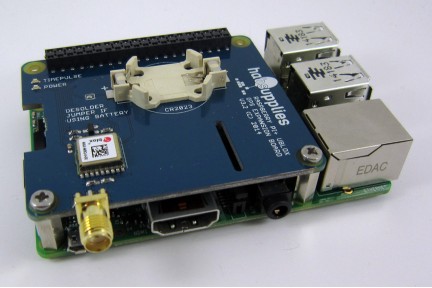
Quick start NTP on the Raspberry PiA guide based on an application note from Uputronics. There are more detailed background notes here. Some notes from Rich Schmidt using alternative hardware. The updated Uputronics article is here. Note that this is quite an old article and should probably be updated. I recommend building NTP from source rather than relying on the version in your distribution which may not be as up-to-date. Thomas Kocourek, N4FWD, was kind enough to supply a PDF guide about stand-alone operation of the Raspberry Pi as a time server with no Internet connection. He includes some considerations about configuring NTP for this use. This is for the Broadband Ham Net community. A. Peter Allan shows a really neat, well-located installation in his photos here. Thanks, Peter! Utilising the Raspberry Pi+ GPS Expansion Board for a PPS Disciplined NTP Server On the Raspberry PiDescription
Credits(Anthony wrote) A huge thanks to David Taylor from SatSignal.Eu for his excellent guide here from which this guide is collated. Requirements
Updates2015-Jan-27 Update for kernel 3.18.3+ #742 and later, thanks to Chris
Stenton for finding the fix. Prerequisite settings
Note that the Adafruit GPS Hat uses GPIO 4, physical pin 7, so you would need to change the commands given in this document. To check that the module is loaded, you can use the lsmod command, for example:
Output should be similar to: pps_gpio 2529 1 Verifying PPS is workingEnsure the GPS has a lock and the Green PPS LED on the HAB Supplies Raspberry Pi+ GPS Expansion Board is blinking once a second.
Output should be similar to: [ 0.000000] Kernel command line: dma.dmachans=0x7f35 bcm2708_fb.fbwidth=656 bcm2708_fb.fbheight=416 bcm2708.boardrev=0x10 bcm2708.serial=0x1a25ea38 smsc95xx.macaddr=B8:27:EB:25:EA:38 bcm2708_fb.fbswap=1 bcm2708.disk_led_gpio=47 bcm2708.disk_led_active_low=0 sdhci-bcm2708.emmc_clock_freq=250000000 vc_mem.mem_base=0x1ec00000 vc_mem.mem_size=0x20000000 dwc_otg.lpm_enable=0 console=tty1 root=/dev/mmcblk0p2 rootfstype=ext4 elevator=deadline rootwait Note that with the Raspberry Pi 2, or with more recent versions of Raspbian, you may see: [ 10.172015] pps pps0: new PPS source pps-gpio.-1
Output should be similar to: trying PPS source "/dev/pps0" (Press CTRL+C to quit). This indicates the PPS Module is loaded (dmesg) and is working (ppstest). Note that there is no value given for the "clear" time. Gary
E Miller reports that the pps-gpio driver only looks for one edge, the positive
going edge. If you are using a different GPS device from those mentioned
here you may need to a 3.3 volt output inverter in the PPS line from the GPS. No longer needed - skip! Enabling PPS/ATOM support in NTPDThe supplied version of NTPD on the Raspberry Pi may not support PPS so we need to recompile it (Please note that the configure and compile steps may take up to 30 minutes on older Raspberry Pi models). The latest version is 4.2.8p17, by the way.
Note that for the Raspberry Pi 2 and later, use:
as it's much quicker than just:
Note that for Raspbian Jessie you should add "--enable-linuxcaps" after the "./configure"
Thanks for that discovery to Richard Cartwright. Seems to vary whether you need this or not. In editing /etc/ntp.conf, add these lines:
Amend this line to add a trailing "prefer":
Note: you must add a preferred server or PPS doesn’t work.
After a few minutes run:
if you get oPPS(0) this indicates source selected, Pulse Per Second (PPS) used and everything is working. To see the version as well, enter:
New versionsIf you wish to be informed of new versions of NTP, either follow @NTP on Twitter, or join the NTP Hackers mailing list at: http://lists.ntp.org/listinfo/hackers To prevent NTP being subsequently downgraded when you next update the operating system, you can try:
For more information, please see here.
Thanks to Nick Sayer for that suggestion. Security for external use[DJT notes] If your Raspberry Pi is exposed to the wider Internet, and yet you still want access from the LAN for ntpq commands etc., you may want to adjust the restrict statements in the ntp.conf file to something like the following:
These commands are documented
here. Getting the time stand-alone[DJT notes] If you are operating away from your LAN or the Internet, in addition to the precise edge of the second provided by PPS you will also need to get the nearest second. You can get the time from the serial component of the GPS feed. My own preference is to install gpsd which allows you to see that the GPS is working as well - location, number of satellites etc. There are some notes here but for a different device. Installing GPSDThe next steps are to install the gpsd software, and start the gpsd service pointing to the device ttyAMA0: To allow gpsd to access the serial port, you need to make the following changes. You can then check that you are seeing the GPS device, and that it is functioning:
Raspberry Pi 3 UART & Bluetooth complicationsIt seems that changes made for the Raspberry Pi 3 currently prevent serial access over pins GPIO14 and GPIO15, which have worked on all other RPi cards. Pain! You find that minicom doesn't show any output, even with the GPS connected. Fortunately, someone has written a DT overlay which resolves the issue, and is now part of the OS distribution. You can read about this here and here. Use these steps:
Then sudo reboot your Raspberry Pi and test with minicom
again as described above. I found (2) worked on 2016-Mar-20, when the OS
version I ended up with (uname -a)
was: Linux 4.1.20-v7+ #862 SMP Sat Mar 19. However, I needed the overlay
in (3) above for Linux 4.4.6-v7+ #874 SMP. Still not working?It seems that with Jessie things are continually changing regarding access to the serial port. For example, David Briggs notes: No matter what I did, I couldn't get any GPS output from minicom
or "cgps -s"? I even resorted to re-installing Raspian Jessie and
starting from scratch but that still didn't work. I then went on line and found the forums on raspberrypi.org.
A search there produced this link which supplied the answer: GPSD softwareNow install the GPSD software:
From one report I had received, if you get errors with the above step you may need to run an update to apt-get:
Now try and start the gpsd service temporarily.
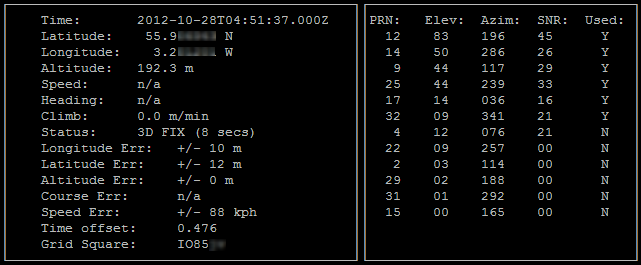
At this point, you should be able to see a text-mode output from your GPS receiver by running the command "cgps -s", something like the following.
Type "q" to exit the cgps program. Note that you can't use two programs to access the serial stream from the GPS at the same time, so minicom will not longer show the GPS output. Configuring gpsd to auto-startLikely with a fresh install of Raspbian Jessie instead of the GPS output showing you may get a "GPS timeout" message. Try editing the startup file and linkage for GPSD as follows. Thanks to A Carver: The gpsd needs to be started with the "-n" option. These options are set in the directory /etc/default, so you need to edit the file /etc/default/gpsd to change the line: GPSD_OPTIONS="" to GPSD_OPTIONS="-n". Method A is to do this through dpkg-reconfigure gpsd (which appears not to work as expected with Raspbian Jessie), method B is to edit the file directly. Set USBAUTO="false". Set DEVICES="/dev/ttyAMA0".
See: http://raspberrypi.stackexchange.com/questions/29547/cant-get-gps-to-automatically-work-after-reboot With Raspbian Jessie, gpsd doesn't appear to auto-start properly, but Tomasz Torcz on the comp.sys.raspberry-pi Usenet group suggested trying:
and that appears to do the trick. You should then find that gpsd restarts after a reboot. Some changes you may need to make if it doesn't workRob Ramsey writes: First, thanks for putting together such a great guide! I wanted to
provide the following feedback:
Thanks, Rob! David. Raspbian Jessie systemd service fixTom Thorton notes that this information from the Adafruit Web site helped him: Note that if you're using the Raspbian Jessie or later release you'll need to disable a systemd service that gpsd installs. This service has systemd listen on a local socket and run gpsd when clients connect to it, however it will also interfere with other gpsd instances that are manually run (like in this guide). You will need to disable the gpsd systemd service by running the following commands:
Changes to your NTP configurationOnce GPSD is installed, you can use the shared memory driver, type 28 to point NTP to the nearest second. For example, your ntp.conf file might include:
Note that with the type 28 driver you may want "flag1 1" in the fudge line, as this overrides the 4 hour maximum offset sanity check built into the type 28 ref-clock. This is still under investigation. There is already a "-g" parameter specified in Raspbian for that start of ntpd, which should allow it to step the time as much as is required at startup (which could be several days or weeks if your Raspberry Pi has been powered down for some time), but it seems that the type 28 driver has its own additional sanity check, which by default prevents correct operation after more than four hours down time. Thanks to Whitham D. Reeve from Anchorage, Alaska USA for the testing. The +0.105 aligns the timing of the serial data from the GPS approximately with the actual second edge. It doesn't need to be exact, but may make for faster acquisition of the true second edge. In an earlier version of this Web page I had suggested "stratum 15", but this no longer appears to work, hence "stratum 1". Earlier notes than the above: To allow gpsd to access the serial port, you need to make some changes.
The easiest way to do this under Raspbian Jessie is to use the Raspi-config
command described here.
Select the Advanced option, Serial, No. Remember to use sudo! Raspberry Pi Zero notesGreg Brougham kindly e-mailed some notes on the Raspberry Pi Zero which may be of help to you as I have no current experience of the device. He writes Further Reading
Contact HAB Supplies T/A Nevis Computers Limited Phone: +44 1274 550910 E-Mail : info@habsupplies.com
|
|
|