


|
|
Setting up NTP on WindowsIt's very helpful that Meinberg have provided an installer for the highly-respected and high-accurate NTP software for Windows users - my thanks to them. This Web page provides a quick guide to installing NTP on Windows XP, Vista, or Windows-7/8/10, using the standard out-of-the-box settings to sync your PC to the Internet, and then checking that you have a working installation. These notes show why you would want to use NTP as opposed to other timekeeping software. Some programs such as the excellent Plane Plotter even require that NTP be installed before you are allowed to use some of the more advanced features. If you have more than one PC, you should install NTP as described below on each PC. If you have more than a few PCs you may want to create one local time server (locked to the Internet) for your network and sync the other PCs to that local server, by adding one line to the configuration file. More information is here. This is easy, because the software will work as both a client to a remote NTP server, and as a server to which other NTP clients can connect. For even better timekeeping, and for a rather low extra cost (US $35, �25), you can lock that local time server to GPS, making it far more precise than one locked to Internet sources. You might like to use something like a Raspberry Pi as a low-cost, stand-alone, precision time server. Thanks to Mark Murray, W2OR, Saint Augustine, USA, for some suggestions on making the page easier to use. InstallingVisit the Meinberg
Web site (opens in a new tab), and look for the
section entitled: NTP package with IPv6 support for Windows XP and
newer. Look for the download icon Where to download software installation filesI normally make a directory named C:\Install\ on new PCs, and it's where I out all my software which I've downloaded. So in this case, I create a new directory named C:\Install\NTP\, and download the ...setup.exe file directly to that directory. The version is kept up-to-date by Meinberg (4.2.8p14 in April 2020). I suggest right-clicking the downloaded file, select Properties, and clicking the Unblock button or box if it is present. This will remove one warning message before running the install procedure. Then run the setup.exe file by double-clicking. On Vista or Windows-7/8/10/11 you may need to allow the file to run by answering the UAC (User Authorisation Control) question, however, you don't have to disable UAC either to install or to run NTP. I have had one report that on a Windows-XP/64 installation, using right-click, Run as Administrator was required, otherwise the account created for NTP had insufficient privileges. The screenshots below are from an earlier Windows-8 installation.
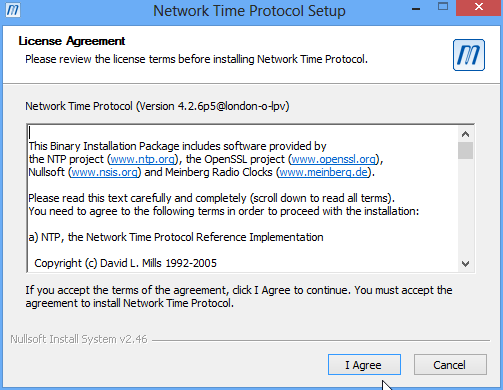
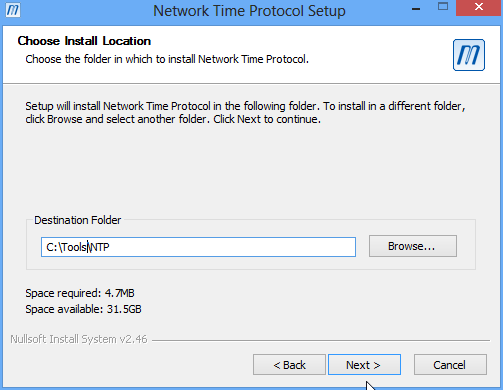
Assuming you agree to the terms, press I Agree. Select a location for the files - you have a choice to make here. Where to install NTP?In a single-user PC, in a benign environment, I recommend creating a directory called C:\Tools\ if you don't already have one, and putting the NTP software into C:\Tools\NTP\. I suggest this as the installation includes user-editable files, and C:\Program Files\ isn't an appropriate location for such data. This is because of the directory virtualisation which Windows Vista and Windows-7/8/10 perform, and you end up editing a file, but it's not the file which NTP will read. When you create the C:\Tools\ directory, give all users full control, by right-clicking the directory in Windows Explorer, selecting Properties, Security tab, Edit, Add. In the object names box, type "everyone", OK, ensure that "Everyone" is selected, and in the Permissions box, click on Full Control, OK. NTP setup:
Choose your directory and press Next to continue.
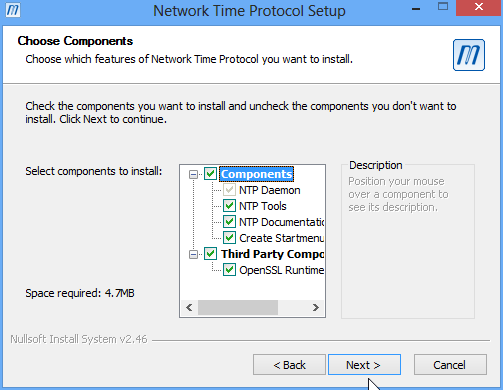
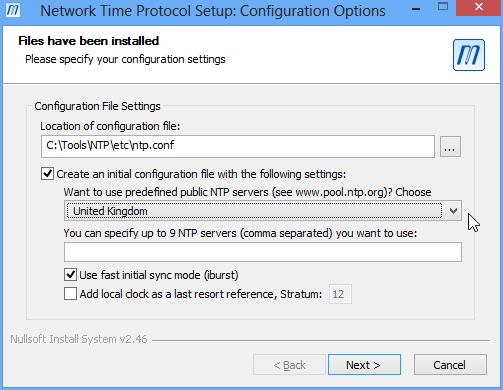
Leave all the components selected, and press Next to continue. Note that the Third Party Components, OpenSSL Runtime may not be present in later versions of the installer than that illustrated above. NTP can create an initial configuration for you using servers from the NTP Pool based on your geographic location. You should allow it to do this, as it saves you the task of choosing which servers to use. Ensure the box "Create an initial..." is checked, and... select your nearest country or region from the drop-down list. In the example below, I have selected United Kingdom. NTP will then choose servers in your region to try and provide the nearest connection for best performance. Leave the other settings as the installer suggests.
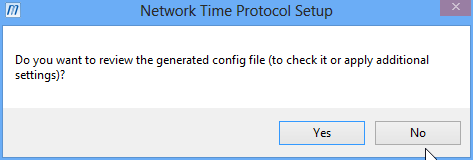
Be sure to select a region from the drop-down list! Once you have selected your region, press Next. Most users will not need to edit the file which the installer creates, so press No to continue.
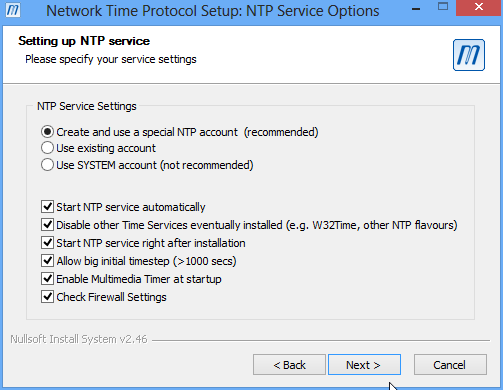
However, you may find that the security restrictions from the latest version of the Meinberg installer prevent NTP from seeing any external servers, so if all your servers later show the "INIT" state, please change the security "restrict" lines to the following: # Suggestions for NTP restrictions (accepting ntpq commands from the LAN): restrict source notrap nomodify restrict 127.0.0.1 restrict ::1 restrict 192.168.0.0 mask 255.255.255.0 One source suggests that with 4.2.7 and later, the second line above should be: restrict source nomodify noquery notrap NTP can create an account to run the software. NTP will run even while you are not logged into the computer ensuring even better timekeeping. The next dialog recommends that the installer will create an account for you, and that is the appropriate setting. Windows-8, 10, and 11 users
Please select the SYSTEM account, rather than the special NTP account. NTP will not function
otherwise! Leave the other options
as suggested. Earlier Windows versions It is recommended not to use the SYSTEM account. Leave the other options as suggested. One user reported problems as he had unchecked the "Disable other Time Services..." box below, and this lead to Windows and NTP fighting over the time setting, and NTP being unable to do its job. Unfortunately, the initial install had saved its settings in the file install.ini, so that when a re-install was attempted the same incorrect setting persisted. Editing the install.ini file restored the correct defaults and allowed a successful installation. Do check carefully if you are installing for a second time!
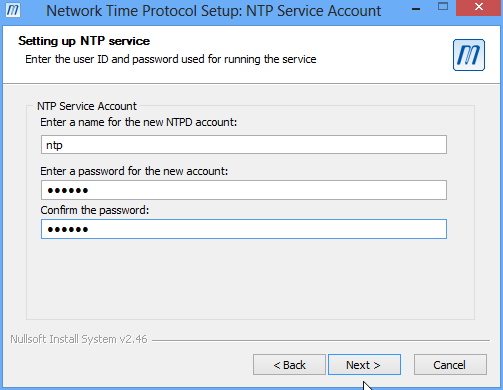
Press Next and define a password for the account. Be sure to make a note of this password in case you need it in the future or for a re-install, but as the account has limited rights there is normally no need for it to be an ultra-secure password. Should you forget that password, you would need to remove the ntp account in the unlikely event of a re-install. One person got an Error 2245 from using too simple a password, or re-using the same password, but I've had no other reports.
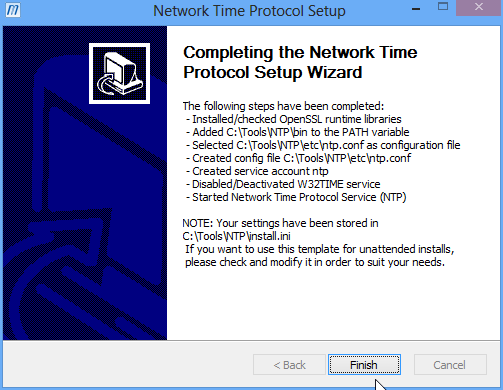
Once you press Next, the installation completes, and the NTP service is started. Windows-8.1 and Windows-10/11On a recent Windows-8.1/64 completely fresh install, and on a Windows-10/32 fresh install, I have had error messages at this point about the service not being started, and it seems that using the SYSTEM account is the easiest way round this issue. Likely this is related to the issues mentioned below. You may need to allow programs through the Windows FirewallLike any programs which access the Internet, NTP may trigger your firewall software into asking you if it's OK for NTPD to access the Internet. Be sure to allow ntpd.exe both incoming and outgoing access (called "Act as a server" in Zone Alarm). There is also a support program (ntpq.exe) you can use to query how well NTP is working either on your own system or any system you have access to in you locally or on the Internet, and that may also need to be allowed through your firewall. How to add a program to the firewall for Windows-7. The programs will be found in C:\Tools\NTP\bin\ if you have been using the suggested paths. Allow ntpd.exe to accept incoming UDP requests through the firewall if you intend to set up a local NTP network. If you haven't disabled the hiding of file extensions the programs may show simply as "ntpd" and "ntpq". I do recommend that you allow Windows Explorer to show file extensions so that you will be less confused.
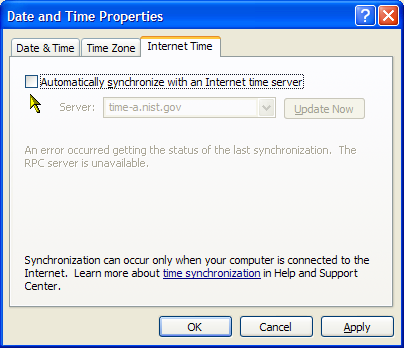
Although it should not be necessary, you may want to review the Control Panel, Date and Time dialog, the check-box suggesting that Windows automatically synchronise with an Internet server. There is no need for this setting as NTP does a much better job, indeed - this box must be unchecked for NTP to work correctly.
You can now repeat this installation for each of the PCs on your network. On Windows-10, this Control Panel setting has been removed. Instead, enter the PC Settings menu, Time & language, Date & time tab. Ensure that the setting "Set time automatically" is set to Off. To check that NTP is installed and running (from the disable W32Time settings), using the Task Manager observe:
RoutersNo special configuration should be needed for the majority of routers, as support for NTP (UDP packets on port 123) is already built-in. Using with a virtual PCVMwareVMware publish their own recommendations for using NTP in a virtual PC environment. These recommendations have changed with the various software releases, so it's best to check the VMware Web site for the current ideas. Microsoft Hyper-VWith the Microsoft Hyper-V 2012 software, some suggestions from Steve Walker (who needs good timekeeping for the excellent Plane Plotter software) are:
Steve Walker comments: I made sure the Hyper-V Time Synchronisation Service is started, as this will then allow the client to sync its time with the host. Domain Time IIIf the timekeeping from Hyper-V Time Synchronisation Service isn't good enough for you, you may be interested in Domain Time II noted by Larry Ellis - he writes:
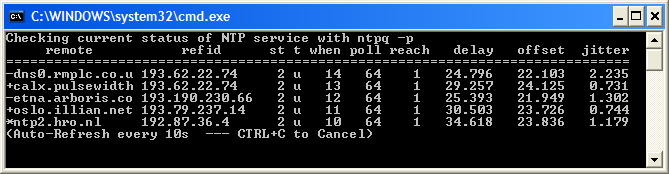
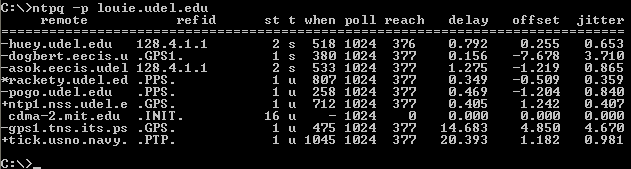
Checking it's workingCheck after a few minutes, to allow the program to connect to the Internet. If you are comfortable working with the command-line, obtain a command prompt (Start, All Programs, Accessories, Command Prompt; or Windows-key-R, cmd), and simply enter the command: ntpq -pn Note that the "-pn" must be lower-case, and that there must be a space between the "ntpq" and the "-p". An alternative command which may work a little quicker is "ntpq -pn". You should get output similar to the display below. Alternatively, from the Start menu, select Meinberg, Network Time Protocol, Quick NTP status - which gives you a handy ntpq display which automatically refreshes every ten seconds. This screen-shot was taken immediately after starting, so the poll is 64, and the reach only"1". What is reach? Click here to learn more! Note that the two screen-shots below were taken with "ntpq -p", which includes the resolution of numbers to names. Using the "-pn" version suggested above is quicker.
After some time running, the output might look more like this (synthesised) screen-shot, where "reach" is now "377", the maximum value in 8-bit Octal:
where you can see that one server (linnaeus) has an asterisk (*) as the first column, and a reach of 377. This likely indicates that all is well. Interpreting the "ntpq -pn" output:
Meinberg provide further information here.
Once basic operation is OK, if you wish to experiment I recommend you update to a more
recent version, as the one in the Meinberg install is the "stable"
release, but the "development" versions may have some performance and operational advantages. TroubleshootingNTP s a network application, so the basics of troubleshooting any network application apply. In today's Windows environments:
Note that NTP has a maximum clock error it will correct of 500ppm (43.2 seconds per day, or 1.8s per hour), so if you see the offset gradually increasing by more than this rate you know that your PC's clock is too inaccurate to disciplined by NTP. But there is a work-round reported by one user - set up a scheduled task to run twice (or more often) a day to stop and restart the NTP service. Cunning! You can also tell NTP what your clock drift rate is and that may help. For more complex issues, be aware of https://support.ntp.org and its "Support" web - it's a wiki, you may add or change content there. NTP Service will not startThis may be due to the lack of one or more DLLs
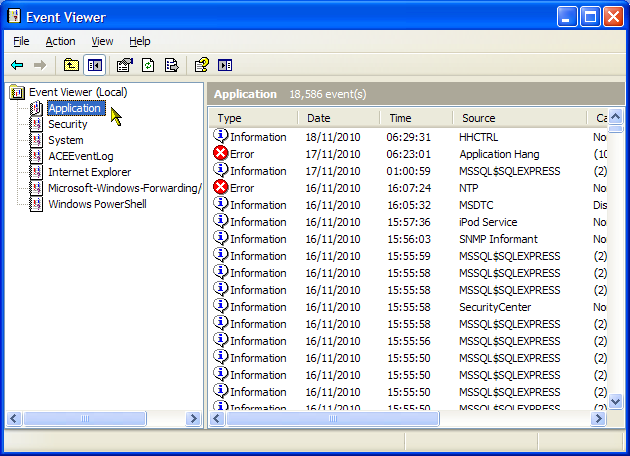
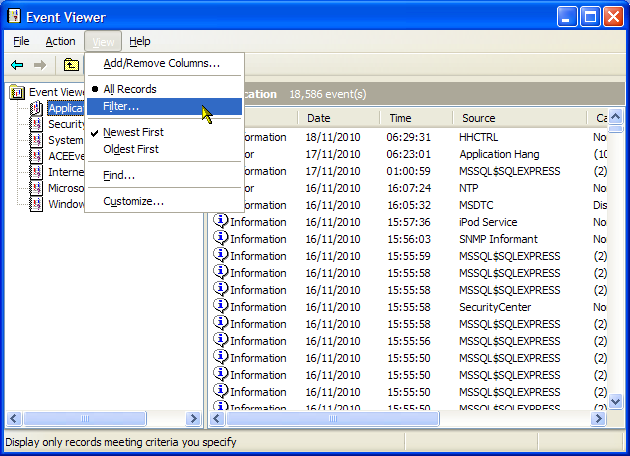
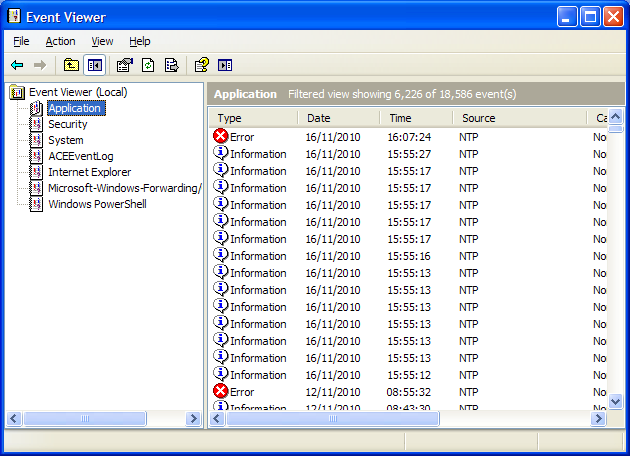
I get "System error 5 - access is denied" when starting NTPIf you use the Meinberg menus to stop, start or restart NTP on Windows Vista, Windows-7 or later, you will likely get the error message above. This is because administrator privilege is needed to stop and start services. The solution is to right-click the menu item, and select "Run as administrator". I get a message like "no associations found" from running ntpq -pCheck that your configuration file (C:\Tools\NTP\etc\ntp.conf) does contain server entries, such as in this sample simplified configuration file: # Use drift file driftfile "C:\Tools\NTP\etc\ntp.drift" # Use NTP servers from the ntp pool project (see https://www.pool.ntp.org) server 0.uk.pool.ntp.org iburst server 1.uk.pool.ntp.org iburst server 0.nl.pool.ntp.org iburst server 1.nl.pool.ntp.org iburst Use the Event ViewerWindows records events from programs including NTP in the Event Log. You can use the Windows Event Viewer to look at events which NTP records as a help in diagnosing more difficult issues. There is more information about the Event Viewer for Windows XP, and Windows Vista and Windows-7 as the format is different between Windows versions. Look at the Application log by clicking on "Application":See the various suggestions below: You will see a list of events from all sources, not just NTP, with the most recent events at the top. Now use the View | Filter... menu of the Event Viewer to select only those events from NTP.
In the event source, select NTP from the drop-down list, and click the OK button.
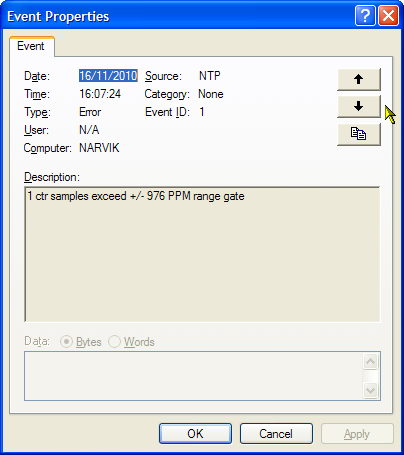
Now double-click on one of the NTP events, in particular those with an Error status and the red cross.
and see what the actual NTP message is, for example:
You can use the up and down arrows to scroll through the NTP messages. There is more
information about using the Event Viewer on the Internet, for example, here.
You will get some event information messages as NTP starts and these are quite normal,
and you will get occasional messages during the normal running of NTP. Look out for those which indicate failure. Use the Administrative Tools, Services programYou can check that the NTP service is running and, perhaps more importantly that the W32Time (the older Windows time service) is stopped using the Services applet. This may be found under the Control Panel, Administrative Tools options with Windows XP. In WIndows-10/11 press the START icon, then type Services, then scroll down to Network Time Protocol Daemon. Check that:
Broken PC clockA clock near the 43 seconds/day limitIf the file ntp.drift in your ..\ntp\etc\ directory consistently shows a value near +/- 500, and NTP stops working, then it may be that your PC's clock is outside the normal limits for NTP (a drift of up to +/- 43 seconds per day is allowed). A new feature in ntp-4.2.6p4 and later allows you to provide a base offset value to NTP when it starts, so that the +/- 500 ppm (parts per million) applies to that base value, rather than being an absolute limit. So your clock must be well behaved, but need not be quite so close to correct. There are two steps to using this new functionality:
You may need to repeat the set environment variable/restart NTP loop a number of times to get the best value for your system. Whilst I haven't tried this myself, I guess you would try and get a value in the ntp.drift file of, say, under 100, after an hour or two of operation. Have patience! Power-saving features may cause problemsIt's also possible that your PC clock appears broken to NTP, while the actual issue is some software which is tampering with the CPU speed. If you have some power-saving features enabled, you may try disabling those features and see whether NTP's performance improves. Symptoms may include the PC keeping time correctly until some CPU-intensive activity is commenced. Windows systems in a domainHartmut Schulla reports:On Windows Server 2008, 64-bit, release 2,
I needed to run ntpd.exe as Administrator. Right click and go to properties of
ntpd.exe.
Select compatibility tab and check "Run as Administrator" for all users.
In the service settings select "local system account" instead of the special account created by setup.
It seems for me, only "local system account" has necessary rights to access "windows time". Patrick O'Keeffe reports:I installed NTP 4.2.8 on a domain-controlled Windows 7 Professional x64 machine today and I have feedback for your NTP setup troubleshooting section.
On my machine, before the change system time permission was enabled, I would see these error messages in the Application Event Log:
This machine has both IPv4 and IPv6 enabled so I suspect it's nearly always the
Change system time security policy not being modified. By default, that right is only available to admins & power users (ref:
https://msdn.microsoft.com/en-us/library/ms813808.aspx). Other NTP issues
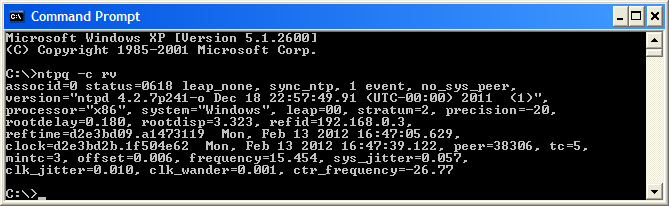
Updating NTP to a more recent versionAt the time of writing, the Meinberg site uses NTP 4.2.8p9, which is current (as of November 2016) and works well. The command: ntpq -crv
will include a list of parameters, including the version information on the second line. I would advise you to update if there is a newer version available
from the Meinberg Web site. You can then select a "Files only"
update to leave your setting intact, and just update the program and any
supporting DLLs.
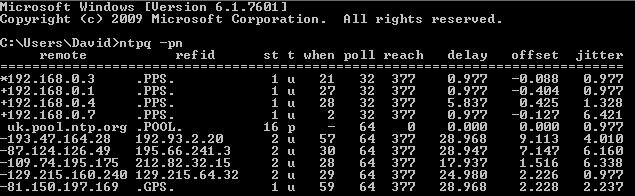
Any problems and you simply reverse the steps and use the version you saved in step (1). The later versions of NTP offer more options, and fix a few bugs. If you want the most recent version- see below. Using the "pool" directiveStrongly recommended! With NTP 4.2.6p5 (as installed by a recent Meinberg release), you can make a saving on the lines in the ntp.conf file, and get access to what NTP considers to be the most appropriate number of servers by replacing the lines: # Use pool NTP servers server 0.uk.pool.ntp.org iburst server 1.uk.pool.ntp.org iburst server 2.uk.pool.ntp.org iburst server 0.nl.pool.ntp.org iburst server 1.nl.pool.ntp.org iburst with the single line: # Use pool NTP servers pool uk.pool.ntp.org maxpoll 7 iburst if you are in the US, for example: # Use pool NTP servers pool us.pool.ntp.org maxpoll 7 iburst and you can use multiple lines such as a Dutch user might have: # Use pool NTP servers pool nl.pool.ntp.org maxpoll 7 iburst pool uk.pool.ntp.org maxpoll 7 iburst NTP will determine how many servers it should connect to automatically, and it may be more than the few from a default installation. Perhaps of more significance is that NTP monitors the connectivity to each server in a "pool", and if a server goes down it will try to connect a different one, thus maintaining a good number of working servers. The pool directive introduces a new line to the ntpq -pn output - don't be put off by the line showing stratum-16, this is normal, and the pool servers below that line will show normal connectivity. The top four servers are local to my network, and those below the .POOL. line are from the Internet over the WAN. This is from a Windows-7/32 system where the jitter is limited to a minimum value of 0.977 milliseconds. The maxpoll 7 in the configuration is to work round a different problem with some versions of Windows where a system call limits the precision with which the clock rate can be set.
What parameters are passed to the NTP service?If you are fault-finding, you may note that some parameters are passed to the service at startup: C:\Tools\NTP\bin\ntpd.exe -U 3 -M -g -c "C:\Tools\NTP\etc\ntp.conf" I asked Martin Burnicki why some of those parameters are included. Here's what he said:
There is more information here: https://www.eecis.udel.edu/~mills/ntp/html/ntpd.html Windows DefenderAround 2016-Aug-12 Windows Defender registered ntpd.exe as malware. If you are affected, to restore normal operation update the Windows Defender settings and re-install NTP:
You may also need to update ntpd.exe with any recent updates you have made. Recipe for building NTP from the sourceSome notes on rebuilding NTP from the source code. Likely to be peculiar to my system and possibly incomplete. Typically, you will not need to recompile the source, so please treat this section as guidance and notes only, and not bullet-proof step-by-step instructions. Good luck! Requirements:
What do I install?Start by downloading the Visual C++ compiler. It may be better to download the entire Visual Studio 2010 Express CD (as an ISO file) as you might want to re-install later, when Microsoft have withdrawn this version, or you might want to try some of the other components. Install the compiler to the default location, unless you are tight on space on the system drive. Next, download and install OpenSSL. You need the full 16.9 MB installation so that you can get the source files for compiling programs to run with OpenSSL. However, you don't need the full OpenSSL installed as such for compiling, you only need the files for software development, so when asked whether the binaries should be copied to the Windows system directory, answer "no". After installation, look to see what environment variables have been set for OpenSSL. On a second install on a different PC, I did not see these set, and had to set them manually. You need at least two, and on my first system these were: OPENSSL_INC=D:\Tools\openssl\OpenSSL.1.0.0c\inc32 OPENSSL_LIB=D:\Tools\openssl\OpenSSL.1.0.0c\out32dll On the second PC, I installed to C:\Tools\OpenSSL and required the following: OPENSSL_INC=C:\Tools\OpenSSL\lib OPENSSL_LIB=C:\Tools\OpenSSL\bin The compile will look for the OpenSSL files by referencing these environment variables. The %OPENSSL_INC% directory contains a sub-directory "openssl", which contains files starting "aes.h". Locate that directory and take a copy. The %OPENSSL_LIB% directory contains files with "aep.dll" as the first or second file. What I did on my first PC was to copy the files from the as-installed OpenSSL directories into the directories which I already had from a previous installation. On the first PC, the NTP compile will also require a couple of library definition files from the OpenSSL install to be in the out32dll directory. Locate the files: libeay32.lib and ssleay32.lib in the OpenSSL install tree, and copy them to your out32dll directory. Then take a backup of that directory as well. Once you have self-contained, populated %OPENSSL_INC% and %OPENSSL_LIB% directories, you can uninstall OpenSSL. I suspect that my lack of C/C++ experience may have led me to make a poor choice for either the install directory or the %OPENSSL_LIB% environment variable. Finally you can download the source code. It will be in the form of a 6 MB UNIX zipped archive, such as: ntp-dev-4.2.7p326.tar.gz. I find that the easiest way to unzip this is to send it to the 7-zip File Manager, where it appears as a file of unknown properties, double-click on that file and it turns into a directory within the 7-Zip File Manager, and then just drag that directory on to your desired location in an open Windows Explorer window. In my case, I wanted to put the source into D:\Tools\, so after the drag-and-drop I ended up with a directory: D:\Tools\ntp-dev\ntp-dev-4.2.7p326\ CompilingThe NTP source comes ready to compile in Visual Studio 2005, 2008 and 2013, but not 2010. However, this is no problem, as VS 2010 will convert the .SLN (solution) file into the new format. Locate the file: D:\Tools\ntp-dev\ntp-dev-4.2.7p326\ports\winnt\vs2008\ntp.sln and double-click on it. If you have more than one VS2010 product installed, you may need to right-click on the ntp.sln file and select: Open with, Visual C++. At this point, Visual Studio will invite you to convert the project, so allow it to do so. There should be no errors. On the top line of Visual Studio there are three drop-down lists. On the first drop-down, select "Release" (chooses between making a Release or a Debug version). The second should be "Win32", and the third will depend on your last search. Then, from the Debug menu, select Build Solution (or press F7 - being a Delphi man I am more used to pressing F9!). After a few minutes (it would be a few seconds in Delphi), you should get a message "== Build: 9 succeeded, 0 failed, 0 up-to-date, 0 skipped ==" or similar. If you get errors, I am the last person to ask! Sorry! Installing the newly compiled versionThe new files will have been created in: D:\Tools\ntp-dev\ntp-dev-4.2.7p326\ports\winnt\vs2008\Win32-bin\Release\ If you can't compile NTP yourself, there are downloadable sets of recent, ready-made .exe files here. Be sure to right-click, Properties, Unblock the .zip file after downloading, and then copy the files into a temporary directory. It may be most convenient to sort that directory by Type (click on the Type column header), and you will see 6 .EXE files and one .DLL. There may be more or fewer .EXE files. My own practice is to:
In fact, I do this so much that I made a batch file for the task, which needs to be run as administrator in Windows Vista and later. The core of the file is: set DEST="C:\Tools\NTP\bin\" net stop ntp copy ntpd.exe %DEST% copy ntpdate.exe %DEST% copy ntpdc.exe %DEST% copy ntp-keygen.exe %DEST% copy ntpq.exe %DEST% net start ntp timeout 20 ntpq -crv -pn I've coded it this way - with the %DEST% - because I have a similar file on each of my systems which run NTP. I can set DEST according to the needs of the particular PC, leaving the bulk of the file unchanged. In practice, providing you are staying within the same major version (i.e. 4.2.7), copying the ntpd.exe alone is likely to be sufficient. My actual file has some logging as well. The ntpq call at the end of the file provides a check that the update has produced a working ntp, after the 20 second delay produced by the timeout command. If working on Windows XP, the timeout command is not available, and can be replaced by: ping -n 20 127.0.0.1 OpenSSL version issueEarlier versions of the Meinberg NTP were distributed with OpenSSL 0.9.8, and later versions with 1.1.0c. However, we have found that if you compile with 0.9.8k the resulting NTP executable files will not run on a system with the 1.1.0c DLLs, and vice-versa. The working compromise appears to be to get version 1.0.0c OpenSSL, as the resulting .EXE files will run on systems with either OpenSSL DLLs. Thanks to Dave Hart, I managed to locate a copy of this version, which I have placed here. A catch for Windows 2000Programs compiled with VS 2010 don't run on Windows 2000. Fix needed for NTP 4.2.7p349-356Between NTP 4.2.7p349 to 4.2.7p356, a small edit was required to two of the files
which were incorrectly automatically generated. The fixes are described here. Why NTP?People sometimes ask why they should use this NTP software, rather than the W32Time service built into Windows, or other so-called "atomic time" programs.
The Next Step forward - your own precision time serverHaving appreciated the benefits of installing NTP, you may wonder about keeping precise time when the Internet goes down, or on a PC without an Internet connection, or perhaps you want your PC(s) to keep even closer time than NTP provides as standard? The answer is to setup your own Stratum-1 reference server, and you can do this either using Windows, Linux or FreeBSD. No extra software is required as the NTP install can act as both a client to a remote server, or as a server itself to local PC clients. NTP is a very small load, so you can run it as an extra on an existing PC without impacting the work which may be running there. All you need is a GPS device which outputs a PPS (pulse per second) signal, and these are usually accurate to within a microsecond even on the lowest cost of today's GPS timing devices. For a low-cost device, I have used the Sure Electronics GPS evaluation board (no longer available), and I have written up a page on how to use the Sure board. An alternative is the Adafruit Ultimate GPS Breakout - 66 channel. This costs roughly �25-�35 (US $35-$45) including the magnetic puck antenna and USB lead, so it is unlikely to break the bank! There are alternatives listed on my Raspberry Pi NTP server page, and you will have fun making a Raspberry Pi NTP server! The Uputronics uBLOX MAX-M8Q breakout for Active Antenna can be used - ideally the 5V version which may drive your COM port directly without the need for level conversion. Be aware that cheaper boards may not have the genuine uBLOX module! Once you have one accurate PC within your network, you can sync the other PCs to that either other the LAN or with a wireless connection, and all PCs will have improved accuracy compared to an Internet-only synced configuration. Note that you may need to set your firewall software so that PCs other than your main server can access NTP - set NTP to allow inbound access as described here. To test, be sure that you can run: ntpq -pn <my-time-server> from a client PC. If you get a time-out response, likely it's a firewall issue. When the PCs are only talking to LAN servers, you can make them even more precise by polling your local reference clock more frequently, and lessen your load on the Internet servers by polling them less frequently, so you might use configuration file such as: # Use local stratum 1 server server my-time-server iburst maxpoll 5 prefer # Use pool NTP servers pool uk.pool.ntp.org minpoll 10 iburst Replace my-time-server by the name or IP
address of your local accurate PC. A configuration such as this makes the PC poll the local stratum-1 server every 32 seconds
(2**5),
but only poll the Internet servers once every 1024 seconds (2**10). You
should keep the Internet servers as a backup, though, in case your local NTP
server fails or loses GPS lock or whatever. Why
not make this your next project? Running a publicly accessible NTP serverIf you are running a server which is accessible from the public Internet -
perhaps you are contributing to the NTP
Pool project - there are some simple precautions you should take to ensure
that your server is not used as the source of an attack on other PCs. Note
that this doesn't apply to most end-user clients sitting on your local PC, you
would need to have specially opened a port in your firewall or router to allow
public incoming unsolicited UDP port 123 packets into your local network.
If you are using a recent version (4.2.8p1 or later) you are already
protected. The following notice explains more:
I would like to support the NTP project
|
|
|